-
Notifications
You must be signed in to change notification settings - Fork 1
BL Touch
If you are here, you probably already know what a BLTouch bed level sensor is, but if not there are lots of videos on YouTube that can explain it. Here's one. Luxuri firmware offers precompiled firmware builds that support the BLTouch bed sensor. This page explains how to install a BLTouch on a Tenlog D3-style printer, and covers some basic usage.
If you have a lot of experience with 3D printing, and a lot of experience installing accessories on various printers, you may want to wire your BLTouch directly to the main board. If so, the following two images might be all you're looking for. It is the wiring reference for the 8-bit main board. If this does not make immediate sense to you, please keep reading.
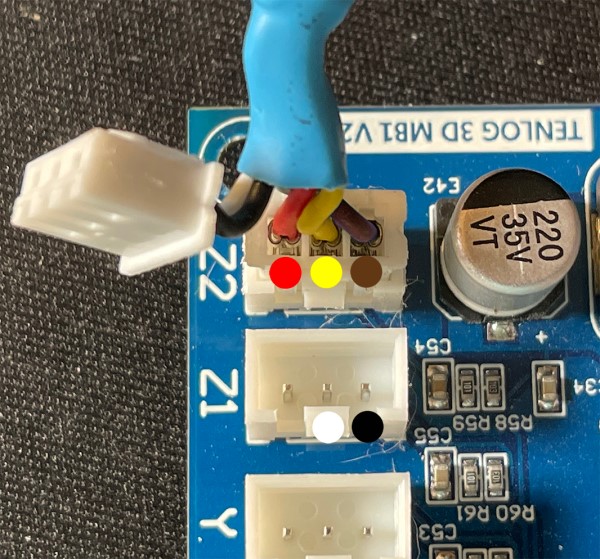
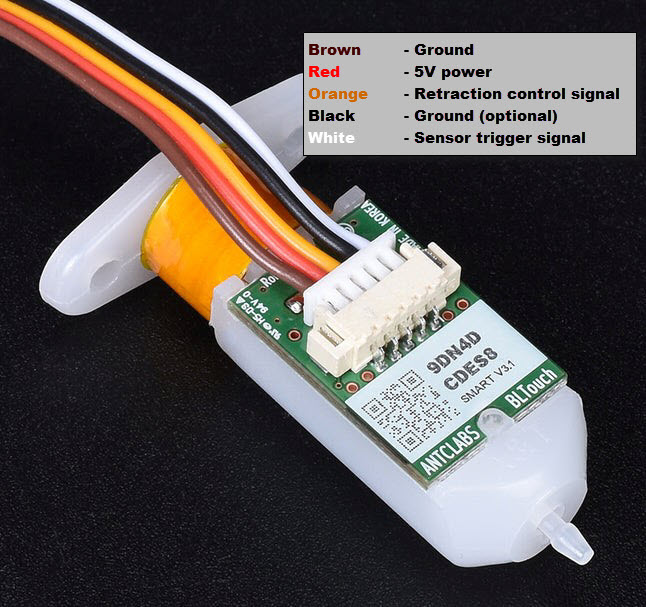
These instructions are intended for beginners. There are other more elegant ways to install a BLTouch, but these instructions intend to keep the procedure as simple as possible.
The first thing to do is confirm that there is a version of the Luxuri firmware that supports your hardware configuration. Your new sensor will not work without compatible firmware. Instructions can be found here.
It would be prudent to first install Luxuri firmware that does NOT use the BLTouch and test to make sure the printer still prints. This way if you experience problems after installing the BLTouch, you will have some confidence that the problem is related to the BLTouch and not the firmware itself.
Before attempting to install a BLTouch, you should collect the following parts:
- A BLTouch sensor - Many people believe the original made by ANTCLABS is superior to the cheaper copies.
- 2 meters of extension cable - most of the available bltouch extension cables are too short - you can make your own cable or google 'ANTCLABS SM-DU-2000' or here are some options:
- Electrical tape
- Zip ties
- Hardware to mount the sensor to the E1 extruder - here are some printable ones for common extruders:
-
Using the mounting hardware you printed earlier, attach the BLTouch to your E1 (left hand) extruder. Ensure that the tip of the sensor pin, when retracted, is in the range 2.3 to 4.3mm above the tip of the nozzle as shown in the diagram below. The sensor should be located to the front or left side of the extruder. If on the right, it will collide with the E2 extruder.
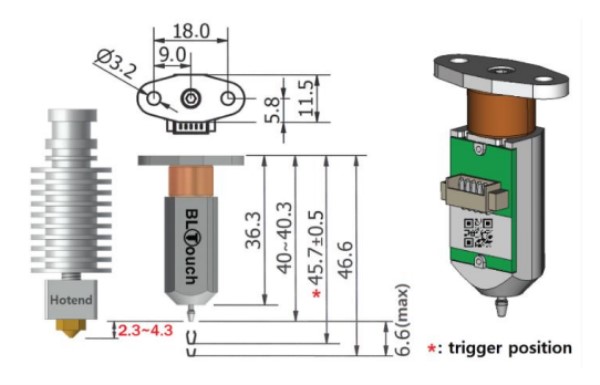
BLTouch Dimensions -
Connect the extension cable to the sensor, and loop the extension cable over the top of the printer frame alongside the extruder cable. Make sure the extension cable won't bind during operation so it does not pull on the sensor or it may unplug itself, or possibly affect sensor measurements. Attach the BLTouch cable to the extruder cable with zip ties at regular intervals all the way back to the connector at the far end of the extruder cable.
-
Look at the wiring attached to your BLTouch sensor. The next instructions refer to the color scheme used by ANTCLABS pictured below. If your wires are colored differently or attach to the sensor in a different order, make note of it, and adjust accordingly for subsequent instructions. Incorrect wiring could damage your sensor or your printer mainboard!

BLTouch Wiring -
Look at the end of your extension cable away from the sensor. It is likely that the brown, red, and orange wires all terminate in a single DuPont connector arranged in that order. If that is the case, you must rearrange the wires into the order brown->orange->red. You can remove a wire from the connector by using a small pick (tweezer, thumb tack, anything with a sharp tip) to pry up the plastic tab that locks the wire in place and gently pulling the wire to free the pin. Make sure the plastic tab is bent back down before reinserting the pin. This video shows the procedure.
-
Locate the two optical Z-stop sensors that came on your printer, one on either side of the bed. Each should have three wires leading to a connector on the side of the machine. Disconnect both connectors. In the next steps, you will connect the BLTouch extension wires to the connectors that lead into the base of the machine. (These connectors are 3-pin JST SM type connectors if you want to buy some and make your install cleaner.)
-
Previous versions of these instructions used wire colors coming from the printer to assign connections. Unfortunately, the manufacturers do not use consistent wire colors so this is invalid. Instead, use the image below to identify the pins on the connectors coming from the body of the printer.
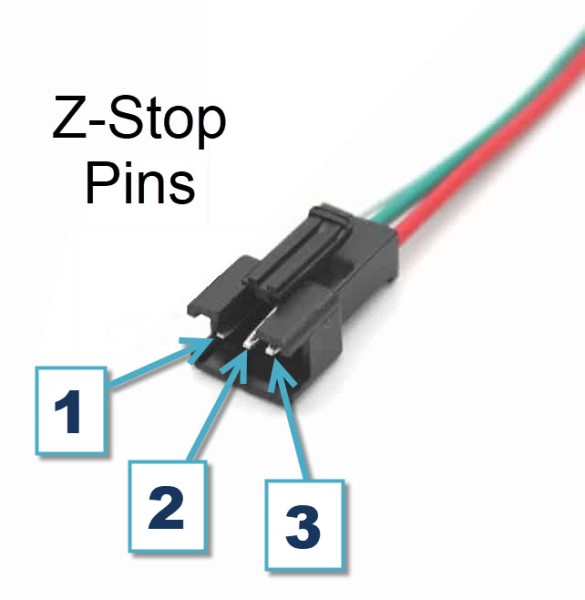
ZStop Connector PinsNote: To confirm your install is correct, you can use a voltmeter to test pin 3 on the connector coming from the printer. When powered, it should read +5 volts. If not, you will need to find the 5V pin and adjust accordingly.
-
To the RIGHT side of the machine, near the E2 print head, make the connections listed below:
- BLTouch -> Printer Right Side
- Brown -> Pin-1
- Orange -> Pin-2
- Red -> Pin-3
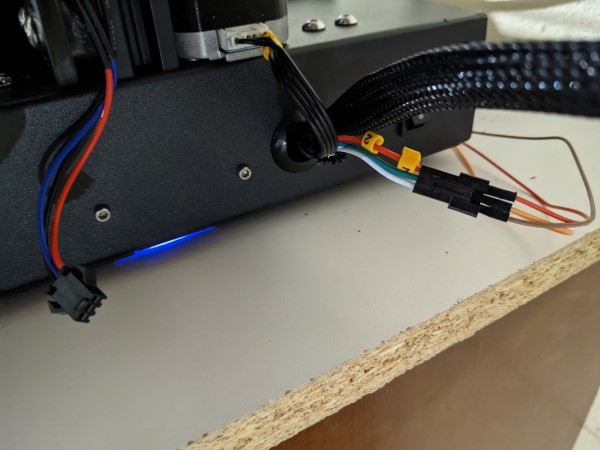
BLTouch Wiring to Z2 Endstop
-
To the LEFT side of the machine, near the E1 print head, make the connections listed below:
- BLTouch -> Printer Left Side
- Black -> Pin-1
- White -> Pin-2
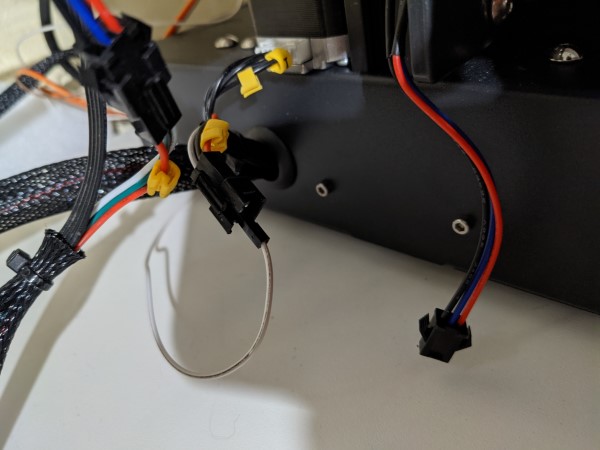
BLTouch Wiring to Z1 Endstop
-
Double-check all your wiring. This is especially important if your wires are different than those described here. Incorrect wiring could damage your sensor or your mainboard when you turn the machine on!
-
Use electrical tape to secure any connections that seem insecure. A loose connection can cause erratic behavior that can be very difficult to diagnose.
-
If you have not yet installed a BLTouch-compatible version of the Luxuri firmware, do that now.
-
After the correct firmware is installed, every time you power the printer on, the pin of the BLTouch sensor will deploy and retract several times. This tells you it is working correctly. If the red light on the BLTouch is blinking continuously, that indicates a problem with the sensor.
-
Proceed to the next section: Configure Firmware
Before you can use your new sensor, you must tell the firmware where it is mounted. There are multiple ways to do this. These instructions discuss only one option.
This process requires a terminal to send G-code commands to the printer. It is convenient if you can connect a computer via USB and run something like Pronterface that has a G-code terminal. You could also use the terminal in Octoprint. If that isn't an option, there is a less convenient terminal on the touchscreen display if you navigate to Tools -> Console.
-
Get a piece of blue painter's tape and stick it to the the printer bed. Place it near the left front corner, but not too close, and try to orient it so a corner of the tape is pointing to the front edge of the bed. This corner of the tape will be important, and the location near the edge of the bed is to make it easier to see when the print head is over it. If you do not have any blue painter's tape, you could use a dry erase marker or anything that can mark a spot on the printer bed and not move around. Depending how your BLTouch sensor is mounted, you might even be able to use the front left corner of the bed itself.
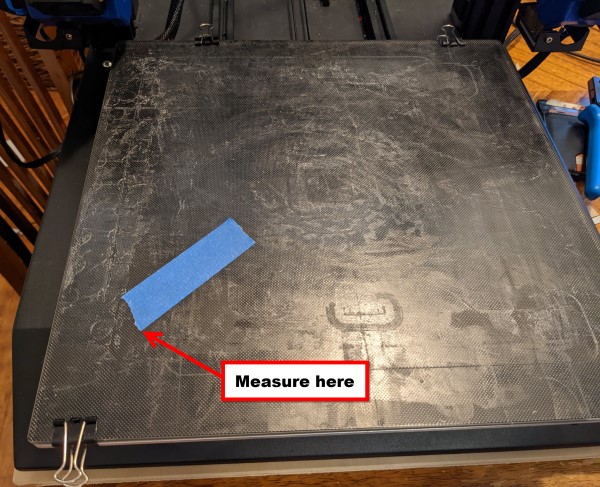
-
On the touchscreen display, navigate to the
Movemenu. You will use this menu for the rest of the procedure.
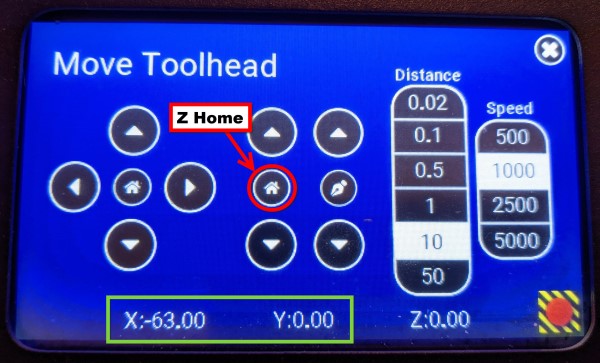
Move Menu -
Press the
Home Zbutton. This will home all 3 axes. -
Use the movement buttons to place the tip of the nozzle onto the front corner of the blue painter's tape. If you are off by a millimeter or two, it's probably fine.
-
Write down the X and Y coordinates displayed on the screen. These are the nozzle coordinates <Nx> and <Ny>.
- Example: <Nx> = 28, <Ny> = 40
-
Deploy the BLTouch probe by entering
M401in the terminal. -
Use the movement buttons to place the tip of the BLTouch probe onto the front corner of the blue painter's tape.
-
Write down the X and Y coordinates displayed on the screen. These are the probe coordinates <Px> and <Py>.
- Example: <Px> = 67, <Py> = 38
-
Do some simple math to calculate the offsets <Ox> and <Oy>. Be aware that the results may be negative.
- <Nx> - <Px> = <Ox>
- <Ny> - <Py> = <Oy>
- Example: <Nx>28 - <Px>67 = <Ox>-39
- Example: <Ny>40 - <Py>38 = <Oy>2
-
Enter the X and Y offsets in the printer - in a terminal, enter
M851 X<Ox> Y<Oy> Z0-
Example:
M851 X-39 Y2 Z0- Note that the value of <Ox> is entered with a minus sign because it is negative
-
Example:
-
Save your changes to EEPROM - in a terminal, enter
M500
-
On the touchscreen display, navigate to the
Movemenu. -
Press the
Home Zbutton. This will home all 3 axes. -
Use the movement buttons to move the print head to the center of the bed.
-
Place a sheet of printer paper on the print bed under the nozzle.
-
On the touchscreen display, navigate to Tools -> Octoprint
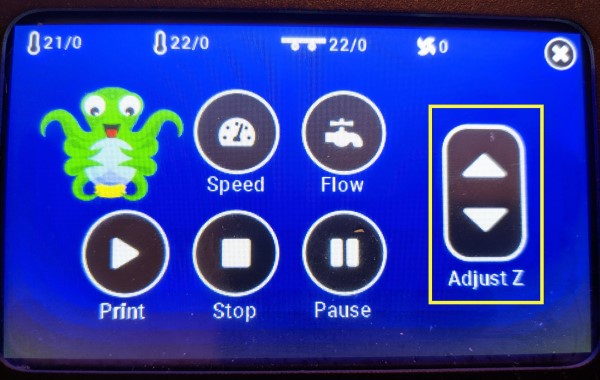
Octoprint Menu -
While continuously sliding the paper around to feel for resistance, repeatedly press the down-arrow of the 'Adjust Z' button until you feel resistance on the paper. Note: The arrows move the print head in increments of 0.02mm which is so small you may doubt anything is happening. You can put a finger on the shaft of one of the Z-axis stepper motors to confirm that they are moving.
-
There should be a fair amount of resistance when sliding the paper. Ideally the nozzle should be as close to the print bed as possible without touching. A sheet of paper is roughly 0.07mm thick so once you feel the first whisper of resistance, you can probably press the down button 2 or 3 more times.
-
The 'Adjust Z' button automatically sends the M851 command to the printer so all you have to do now is save the changes by sending
M500at the terminal. -
You may need to repeat this Z Offset procedure later with the printer warmed up to operating temperature. Dried plastic on the tip of the nozzle can skew the result, and the parts may expand and change shape as they heat up.
This procedure creates a map of the irregular shape of your printer bed and stores it for later use. Before doing this, it's a good idea to tram your bed to the printer frame to make sure the bed is as level as possible.
-
From a terminal, enter
G34. This synchronizes the two Z-axis motors to level the gantry to the bed. -
Enter
G29 P0to clear out any stored bed mesh. -
Enter
G29 P1to begin mesh generation. This will probe many points on your print bed and will take a while. Maybe 10 or 15 minutes. -
The probe cannot physically reach every point on the bed so we have to estimate the remaining points. To estimate some points, enter
G29 P3 T- this command will also return the values of the mesh grid. -
Look at the output from the previous command. If you see a lot of '0.000' values in the output, that means there are more points that need to be estimated. Run the
G29 P3 Tcommand until the output stops changing. A total of 5 times is probably more than enough. You can't hurt anything by running it too many times. -
Save the calculated mesh in memory slot #1 by entering
G29 S1 -
You will need to redo this Generate Bed Mesh procedure any time your bed changes such as if you change the bed surface or turn one of the bed adjustment knobs.
- Add the following line to the 'Start G-code' of your slicer so it runs at the start of every print:
G29 A F10 S1- this tells the printer to activate auto-leveling with a fade height of 10mm and use the bed mesh stored in memory slot #1.