Dolphin
Website: https://dolphin-emu.org/
Github: https://github.com/dolphin-emu/dolphin
Compatibility List: https://dolphin-emu.org/compat/
Updating this Emulator:
- Use
Discover(Shopping Bag icon) to update Dolphin
-
- How to Configure Gyro
- How to Optimize Performance (Power Tools)
- How to Optimize Storage (Compression Tool)
- How to Manage Multiple Discs
- How to Configure Multiplayer
- How to Install Custom Textures
- How to Create Dolphin Controller Profiles
- How to Share Your Dolphin Controller Profile
- How to Set Dolphin Controller Profiles On a Per-Game Basis
- How to Configure Wii Games To Use A Gamecube Controller
- How to Set Game Settings On a Per-Game Basis
- How to use Riivolution Patches
- How to Configure Real Wiimotes
- How to Use a Mayflash DolphinBar in Game Mode
Dolphin is a fairly straight-forward emulator to set up. Place your Wii ROMs in Emulation/roms/wii and your Gamecube ROMs in either Emulation/roms/gc or Emulation/roms/gamecube. No additional setup is required. Read the Configuration section to learn more about Dolphin and its folder locations.
To launch your ROMs in game mode, use Steam ROM Manager and use one of the following parsers to play your Gamecube or Wii ROMs:
EmulationStation-DE-
Nintendo GameCube - DolphinorNintendo Wii - Dolphin Emulators
- Type of Emulator: Flatpak
- Config Location:
/home/deck/.var/app/org.DolphinEmu.dolphin-emu - ROM location (Gamecube):
Emulation/roms/gcorEmulation/roms/gamecube - ROM location (Wii):
Emulation/roms/wii- No BIOS are required to play Gamecube or Wii ROMs
- Dolphin does not need any additional BIOS files to run
- Saves (Wii):
- Symlink:
Emulation/saves/dolphin/Wii - Target:
/home/deck/.var/app/org.DolphinEmu.dolphin-emu/data/dolphin-emu/Wii
- Symlink:
- Saves (Gamecube):
- Symlink:
Emulation/saves/dolphin/GC - Target:
/home/deck/.var/app/org.DolphinEmu.dolphin-emu/data/dolphin-emu/GC
- Symlink:
- Savestates (Wii):
- Symlink:
Emulation/saves/dolphin/StateSaves - Target:
/home/deck/.var/app/org.DolphinEmu.dolphin-emu/data/dolphin-emu/StateSaves
- Symlink:
- Savestates (Gamecube):
- Symlink:
Emulation/saves/dolphin/StateSaves - Target:
/home/deck/.var/app/org.DolphinEmu.dolphin-emu/data/dolphin-emu/StateSaves
- Symlink:
- Gamecube BIOS (Optional):
/home/deck/.var/app/org.DolphinEmu.dolphin-emu/data/dolphin-emu/GC/USA/IPL.bin- After placing the
IPL.binhere, you will need to:- Open the Dolphin emulator
- Open the
Configurationsettings - Click the
Gamecubetab - uncheck
Skip Main Menu
- After placing the
- Wii Menu (Optional): Open the Dolphin emulator, click
Toolsat the top, clickPerform System Update, select a Region- To use: Click
Tools, clickLoad Wii System Menu... - The Wii Menu is not required to play Wii ROMs
- For further reading: https://wiki.dolphin-emu.org/index.php?title=Wii_Menu
- To use: Click
Note: ~/.var is an invisible folder by default. In Dolphin (file manager), click the hamburger menu in the top right, click "view hidden files" to see these folders.
- Steam ROM Manager
- EmulationStation-DE
How to Update Dolphin
- Update through
Discover(Shopping bag icon) - Through the
Update your Emulators & Toolssection on theManage Emulatorspage in theEmuDeckapplication
How to Launch Dolphin in Desktop Mode
- Launch
Dolphin Emulator(Blue Dolphin Icon) from the Applications Launcher (Steam Deck icon in the bottom left of the taskbar)- Icon:

- Icon:
- Launch the script from
Emulation/tools/launchers,dolphin-emu.sh - Launch the emulator from
Steamafter adding it via theEmulatorsparser inSteam ROM Manager
- .ciso
- .dol
- .elf
- .gcm
- .gcz
- .iso
- .nkit
- .iso
- .rvz
- .wad
- .wia
- .wbfs
Important Note: Dolphin does not have a way of opening the menu if you are launching the game directly. It is recommended that you change any settings in the Dolphin UI itself before launching a game.
| Hotkey | Dolphin |
|---|---|
| Menu | N/A |
| Exit |
Select + Start
|
| Pause/Unpause |
Select + A
|
| Fast Forward (Hold) |
Select + R2
|
| Save State |
Select + R1
|
| Load State |
Select + L1
|
| Next Save Slot |
Start + R1
|
| Previous Save Slot |
Start + L1
|
| Shake Nunchuk | L2 |
| Shake Wiimote | L1 |
| Tilt Wiimote |
L2 + Move Left Stick
|
| Sideways Toggle |
Select + R3
|
| Attach/Detach Nunchuk |
Select + Left Stick Down
|
| Next Wii Profile Select |
Select + Left Stick Right
|
| Previous Wii Profile Select |
Select + Left Stick Left
|
| Next Game Profile Select |
Select + Left Stick Up
|
| Previous Game Profile Select |
Select + Left Stick Down
|
| Toggle Aspect Ratio |
Start + DPAD Right
|
| Increase Internal Resolution |
Start + DPAD Up
|
| Decrease Internal Resolution |
Start + DPAD Down
|
| Reset |
A + B + X + Y + L1 + R1
|
| Unlock FPS* |
Start + R2
|
| Increase Emulator Speed* |
Select + R2
|
| Decrease Emulator Speed* |
Select + L2
|
IMPORTANT
- A
*next to the hotkey means it is only mapped in the EmuDeck Beta
List of Wii Profiles Included with EmuDeck
- Wiimote with Nunchuk
- Wiimote with Nunchuk and Touchpad Support
- Wiimote with No Attachment
- Wiimote with No Attachment and Touchpad Support
- Wii Classic Controller
Steam Deck Button Layout: https://github.com/dragoonDorise/EmuDeck/wiki/Hotkeys#steam-deck-button-layout
IMPORTANT
Gyro for Cemu requires SteamDeckGyroDSU. SteamDeckGyroDSU can be installed via EmuDeck, or it can be installed manually.
You can also find community controller profiles configured for gyro here: https://github.com/dragoonDorise/EmuDeck/wiki/community-creations
SteamDeckGyroDSU
Gyro for Dolphin requires SteamDeckGyroDSU. SteamDeckGyroDSU can be installed via EmuDeck in the Tools & Stuff menu, or it can be installed manually.
Visual Reference: 
Step by Step Instructions on How to Install SteamDeckGyroDSU: https://github.com/dragoonDorise/EmuDeck/wiki/frequently-asked-questions#how-do-i-install-steamdeckgyrodsu
Prerequisites
- Decky Loader and Power Tools
- Power Tools can be installed via EmuDeck, or it can be installed manually
-
Visual Reference:

- Although this screen does not explicitly state Decky Loader, Decky Loader is included in this installation
-
Visual Reference:
- Step by Step Instructions on How to Install Power Tools: https://github.com/dragoonDorise/EmuDeck/wiki/frequently-asked-questions#how-do-i-install-power-tools-and-deckyloader
- Power Tools can be installed via EmuDeck, or it can be installed manually
Recommended Settings
- Power Tools: Turn SMT off
- Open the
QAM("..." button), select theSocketicon, selectPOWERTOOLS, turn offSMT- Visual Reference:

- Visual Reference:
- (Optional) Use the
Persistenttoggle to set these settings on a per-game basis- Visual Reference:

- Visual Reference:
- Open the
- Steam Deck Performance Menu: Set Manual GPU Clock Control to 1200 frequency
- Open the
QAM("..." button), select theBatteryicon, enableAdvance View, scroll down, enableManual GPU Clock Control, and set it to1200- Visual Reference:

- Visual Reference:
- Toggle per game profiles
- Visual Reference:

- Visual Reference:
- Open the
-
IMPORTANT: Some Gamecube or Wii games will not perform well regardless and will require the Dolphin team to improve compatibility
- In some cases, these games may have workarounds through modifying settings or applying patches or mods. Search on Google for your respective game, and see if these workarounds exist
- Check the Dolphin Compatibility List: https://dolphin-emu.org/compat/
To optimize storage, you can use the EmuDeck Compressor within EmuDeck.
The EmuDeck Compressor will compress your Gamecube and Wii ROMs from ISO to RVZ.
After running the EmuDeck Compression Tool, re-run Steam ROM Manager to update your ROM shortcuts to the newly compressed ROM.
Visual Reference: 
M3U files can be used to manage multiple discs for Dolphin. With the Change Discs Automatically option toggled (turned on by default with EmuDeck), Dolphin will automatically switch discs in combination with an M3U file.
Learn how to create an M3U File: https://github.com/dragoonDorise/EmuDeck/wiki/file-management#how-to-manage-roms-with-multiple-discs.
EmuDeck configures multiplayer out of the box. You do not need to configure the controls. However, to properly setup multiplayer, you will need to enable the additional ports.
Tutorial
- Open the Dolphin emulator
- Open the
Controllersettings - For each controller you are using:
- Gamecube: To the right of each Port # under
Gamecube Controllers, enableStandard Controller -
- Wii: To the right of each Port # under
Wii Remotes, enableEmulated Wii Remote -
- Gamecube: To the right of each Port # under


Here's how to install custom textures for Dolphin:
- Open the Dolphin emulator, right click the game you would like to install custom textures for, click
Properties, click theInfotab, note down theGameID. - In the Dolphin emulator, click
Graphicsin the top right (orOptions>Graphic Settings), clickAdvanced, make sureLoad Custom TexturesandPrefetch Custom Texturesare checked.- Visual Reference:

- Visual Reference:
- Open
/home/deck/.var/app/org.DolphinEmu.dolphin-emu/data/dolphin-emu/Load/Textures-
~/.varis an invisible folder by default. In Dolphin (file manager), click the☰(hamburger menu) in the top right, click "view hidden files" to see these folders. - If the
LoadandTexturesfolder do not exist, create them.
-
- In the
Texturesfolder from Step 2, create a folder matching the first 3 characters of theGameIDfrom Step 1.- Example:
Pokémon XD: Gale of Darkness- Original Game ID:
GXXP01(PAL Region) - Folder Name:
GXX
- Original Game ID:
- Example:
- Put your texture files directly into this folder.
- Your texture pack should now be installed.
- If the game crashes with custom textures, it is likely too demanding for the Steam Deck. You can turn off
Prefetch Custom Texturesas a workaround, but performance will still take a hit.
- If the game crashes with custom textures, it is likely too demanding for the Steam Deck. You can turn off
For a visual, watch the following GIF:

Preface
- This section goes over how to create a Dolphin controller profile and set it for a specific game. However, you can use this profile for any Gamecube/Wii game. While in game, you can use the following hotkeys to cycle through profiles:
- Wii:
Select+ tilt theLeft JoystickLeftorRight - Gamecube:
Select+ tilt theLeft JoystickUpor `Down
- Wii:
- EmuDeck currently comes with 6 profiles for Wii and 2 profiles for Gamecube. You can use these as a base to create a profile for your game of choice, using this section's tutorial.
- For a list of EmuDeck's profiles (you do not need to download any of these, use the links as a reference):
- Wii: https://github.com/dragoonDorise/EmuDeck/tree/main/configs/org.DolphinEmu.dolphin-emu/config/dolphin-emu/Profiles/Wiimote
- Gamecube: https://github.com/dragoonDorise/EmuDeck/tree/main/configs/org.DolphinEmu.dolphin-emu/config/dolphin-emu/Profiles/GCPad
- Warning: Creating too many controller configurations may make it difficult to cycle through and pick the one you would like to use.
Tutorial
- Open the Dolphin emulator, click
Optionsat the top, clickController Settings. -
- For Gamecube: Click
Configureto the right ofPort 1 Standard Controller - For Wii: Click
Configureto the right ofWii Remote 1 Emulated Wii Remote - Visual Reference:

- For Gamecube: Click
- On this screen, configure your controllers however you like.
- After you have finished configuring your controls, in the top right under
Profile, enter the profile name you would like to use. - Click
Saveto the right.- Visual Reference:

- I named my profile
EXAMPLE.
- Visual Reference:
- Close out of the
Controller Settingsmenu. - To use this profile, choose one of the following methods:
- Set it for a specific game: https://github.com/dragoonDorise/EmuDeck/wiki/dolphin#how-to-set-dolphin-controller-profiles-on-a-per-game-basis
- Select the profile in game, by tilting the
Left Joystick,LeftorRight(For Wii) orUporDown(For Gamecube), until your profile name appears in the top left.- View the full list of Dolphin hotkeys here: https://github.com/dragoonDorise/EmuDeck/wiki/dolphin#hotkeys
Refer to https://github.com/dragoonDorise/EmuDeck/wiki/community-creations#sharing-dolphin-profiles, for instructions and a page to collect Dolphin profiles.
- Choose a controller profile (use one of the following methods):
- Download a controller profile with an
.iniextension type- View community layouts: https://github.com/dragoonDorise/EmuDeck/wiki/community-creations#dolphin
- Use one of EmuDeck's included layouts
- For a list of EmuDeck's profiles (you do not need to download any of these, use the links as a reference):
- Wii: https://github.com/dragoonDorise/EmuDeck/tree/main/configs/org.DolphinEmu.dolphin-emu/config/dolphin-emu/Profiles/Wiimote
- Gamecube: https://github.com/dragoonDorise/EmuDeck/tree/main/configs/org.DolphinEmu.dolphin-emu/config/dolphin-emu/Profiles/GCPad
- Create a controller profile in the Dolphin GUI
- Download a controller profile with an
- (Optional) Place your controller profile in either the Gamecube or the Wii Profile folder
- Skip this step if you are using an EmuDeck included layout or a profile you created in the Dolphin GUI
- Gamecube Profiles:
/home/deck/.var/app/org.DolphinEmu.dolphin-emu/config/dolphin-emu/Profiles/GCPad - Wii Profiles:
/home/deck/.var/app/org.DolphinEmu.dolphin-emu/config/dolphin-emu/Profiles/Wiimote
- Open the Dolphin emulator
- Right click the game you would like to use this controller profile for, and click
Properties - On the
Game Configtab, press theEditorsub-tab - Under
User Config, enter a controller profile using the following template:- For
SelectedProfileName, only type the name of the profile, not the file path to the profile
- For
Wii:
[Controls]
WiimoteProfile1 = SelectedProfileName
Gamecube:
[Controls]
PadProfile1 = SelectedProfileName
Example (using EXAMPLE profile): 
- Exit out, and your game should now be using the selected profile
For additional information, read Dolphin's GameINI (Controller Settings) Wiki Page: https://wiki.dolphin-emu.org/index.php?title=GameINI_(Controller_Settings)
- Right click a Wii game
- Click
Properties - Click the
Game Configtab - Click the
Editortab - Under
User Config, enter the following
[Controls]
PadType0 = 6
PadProfile1 = GC_base
WiimoteSource0 = 0
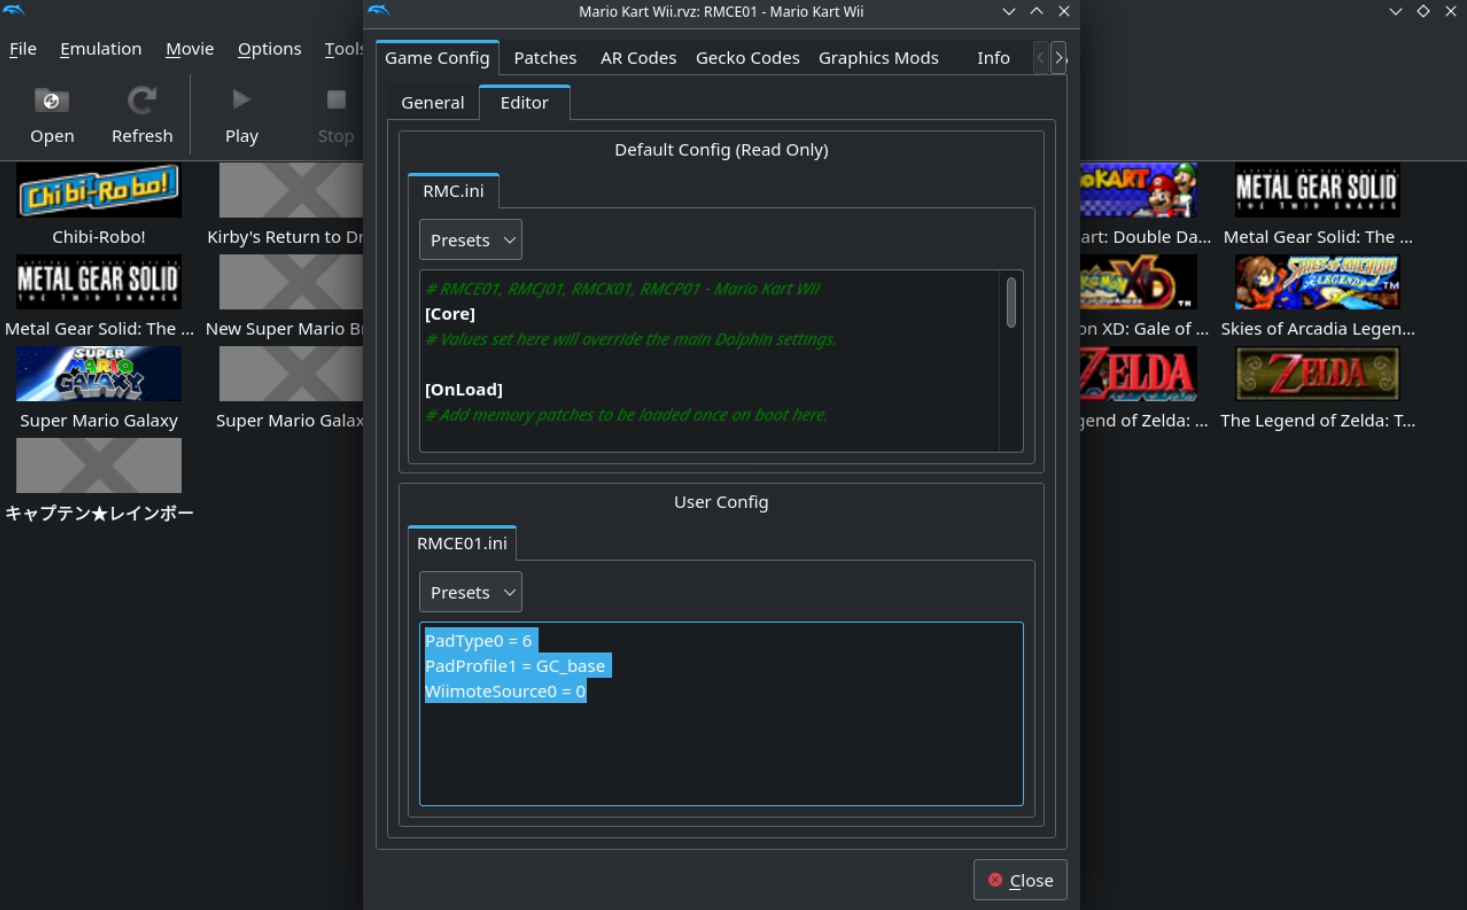
- Click OK and your Wii game should now be using a Gamecube controller profile
Multiplayer
Use the following template:
[Controls]
PadType0 = 6
PadType1 = 6
PadType2 = 6
PadType3 = 6
PadProfile1 = GC_base
WiimoteSource0 = 0
WiimoteSource1 = 0
WiimoteSource2 = 0
WiimoteSource3 = 0
For additional information, read Dolphin's GameINI (Controller Settings) Wiki Page: https://wiki.dolphin-emu.org/index.php?title=GameINI_(Controller_Settings)
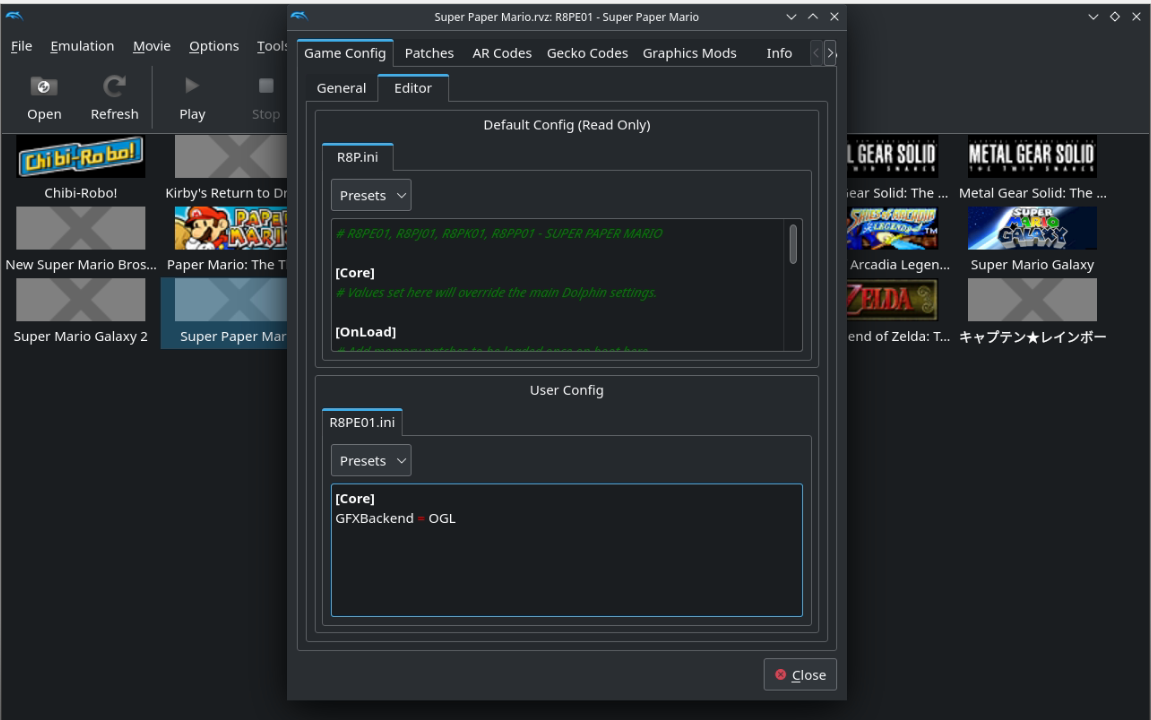
- In Desktop Mode, Open the Dolphin emulator
- Right click a game
- Click
Properties - Click the
Editortab - Under
User Config, add your configurations, use: https://wiki.dolphin-emu.org/index.php?title=GameINI for a full list- You also need to include the headers. For example, any settings under the
[Core]section need to include[Core]preceding the respective setting(s)
- You also need to include the headers. For example, any settings under the
Example, to use OpenGL for only Super Paper Mario:
Example Use Cases for Custom Game Settings
- Setting Aspect Ratio on a per game basis
- Setting OpenGL on a per game basis
- Setting Widescreen Hacks on a per game basis
- Pokemon Colosseum: Aspect Ratio keeps changing
- Copy and paste the below lines into the INI editor for Pokemon Colosseum
[Video_Settings]
wideScreenHack = False
AspectRatio = 2
Tutorial
- Place your Riivolution patch in
/home/deck/.var/app/org.DolphinEmu.dolphin-emu/data/dolphin-emu/Load/Riivolution/-
~/.varis an invisible folder by default. In Dolphin (file manager), click the hamburger menu in the top right, click "view hidden files" to see these folders.
-
- Open the Dolphin Emulator
- Right click the base game and select
Start with Riivolution patches...- Visual Reference:

- Visual Reference:
- Click
Open Riivolution XML...and select a Riivolution patch - Click
Save as Preset...- Visual Reference:

- Visual Reference:
- Name the preset with a
.jsonfile extension- The name of the preset itself does not matter
- Visual Reference:

- Save your preset file with a
.jsonfile extension toEmulation/roms/wii - Your Riivolution patch should now be playable as a stand-alone game
Optional - Steam ROM Manager
- Open Steam ROM Manager
- Select the
Nintendo Wii - DolphinParser on the left - Under
User's Glob, add a|at the end, add a.jsonafter the|, everything should be inside of the parentheses- Visual Reference:

- Visual Reference:
- Save the parser
- Generate and save an app list
- Verify that your Riivolution patch is in the app list
- Return to Game Mode and your Riivolution patch should now be playable
Keep in Mind
- Some Riivolution patches may require additional steps. Read any attached instructions or the associated website for further help.
- If a Riivolution patch includes extra content, the
rootdirectory generally means:/home/deck/.var/app/org.DolphinEmu.dolphin-emu/data/dolphin-emu/Load/. Place any additional content from the patch here. This does not apply to all Riivolution patches, read any attached instructions or the associated website for further help. - Linux is case sensitive. If a patch includes extra content and Dolphin is not identifying it, you may want to read the included XML files and folders to look for any casing mismatches. This does not apply to all Riivolution patches, read any attached instructions or the associated website for further help.
Known Riivolution Patch Fixes
- Mario Kart Midnight
- Open the included
Mario Kart Midnight.xmlin a text editor and capitalize theLinloader{$__region}.bin
- Open the included
- Mario Kart Wii Deluxe
- Rename the included
mkwdxfolder toMKWDX
- Rename the included
How to Configure Real Wiimotes
- In Desktop Mode, open Dolphin
- Open the controller settings
- Under
Wii Remotes, selectReal Wii Remoteunder the drop-down list next toWii Remote 1and checkContinuous Scanningat the bottom of the screen -
- Return to Game Mode
- Open a Wii game, and press
1and2on the Wiimote at the same time

IMPORTANT
- Do not pair the Wiimote to the Steam Deck
For Further Reading: https://dolphin-emu.org/docs/guides/configuring-controllers/
Preface: To use the Mayflash DolphinBar, you need to blacklist it from Steam to properly allow it to work with Dolphin in Game Mode.
Note: This section is specifically for the Mayflash Dolphinbar. Read: https://github.com/dragoonDorise/EmuDeck/wiki/Dolphin#how-to-configure-real-wiimotes, for information on how to configure Real Wiimotes.
- Back up
/home/deck/.local/share/Steam/config/config.vdf - Exit out of Steam
- If Steam is not closed, any edits you make to
config.vdfwill be reverted
- If Steam is not closed, any edits you make to
- Right click
config.vdf, clickOpen with Kate - Add the following to the end of the file, on a new line before the final
}and save
"controller_blacklist" "57e/0306,57e/0306,57e/0306,57e/0306"

- Make sure
Wii Emulator Modeis toggled on the Mayflash DolphinBar by clicking theMODEbutton (LED 4)