MoDL: Model Based Deep Learning Architecture for Inverse Problems
MoDL: Model Based Deep Learning Architecture for Inverse Problems by H.K. Aggarwal, M.P Mani, and Mathews Jacob in IEEE Transactions on Medical Imaging, 2018
Link: https://arxiv.org/abs/1712.02862
IEEE Xplore: https://ieeexplore.ieee.org/document/8434321/
Presentation: https://github.com/hkaggarwal/modl/blob/master/MoDL_ppt.pdf
In the above paper, we propose a technique to combine the power of deep-learning with the model-based approaches. This code suggest how we can use a deep convolutional neural netwrok (CNN) as a regularizer to solve an optimization problem.
This code solves the following optimization problem:
argmin_x ||Ax-b||_2^2 + ||x-Dw(x)||^2_2
A can be any measurement operator. Here we consider parallel imaging problem in MRI where
the A operator consists of undersampling mask, FFT, and coil sensitivity maps.
Dw(x): it represents the denoiser using a residual learning CNN.
- One of the first deep model that works with parallel MRI data.
- Can account for more general image forward models by using conjugate graident
- Needs less training data because of weight sharing across MoDL iterations.

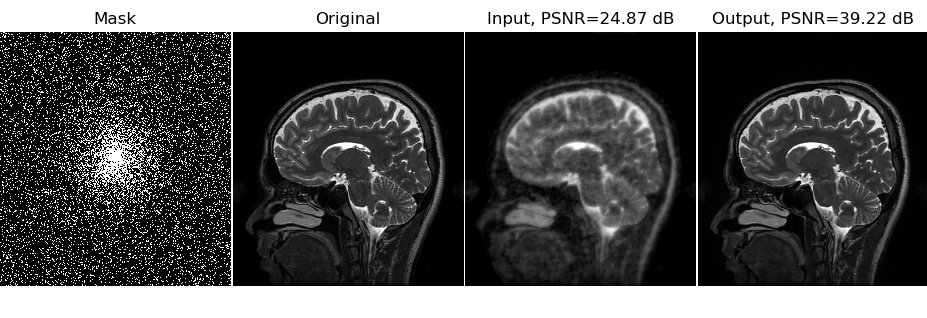
The output GIF is showing the reconstructions from 10 iterations of alternating minimization as described in the MoDL paper.

We have tested the code in Anaconda python 2.7 and 3.6. The code should work with Tensorflow-1.7 onwards.
The dataset is in the hdf5 format. You may require to install hdf5 library in python.
In Anaconda you can give following command
conda install h5py
The training code requires tqdm library. It is a nice library that is helpful in tracking the training progress.
It can be installed using:
conda install tqdm
In addition, matplotlib is required to visualize the output images.
This git repository also includes a single image in the file demoImage.hdf5. The testing script tstDemo.py will use this image by default and does not require full data download for the testing purpose.
We have released the parallel imaging dataset used in this paper. You can download the full dataset from the below link:
Download Link : https://zenodo.org/records/6481291
You will need the file dataset.hdf5 to run the training code trn.py. You can download the dataset from the link provided above. Please ignore the future warning by python. You do not need to download the dataset.hdf5 for testing purpose.
This dataset consist of parallel magnetic resonance imaging (MRI) brain data of five human subjects. Four of which are used during training of the model and fifth subject is used during testing. Above link contain fully sampled preprocessed data in numpy format for both training and testing. We also provide coil-sensitity-maps (CSM) pre-computed using E-SPIRIT algorithm. Total file size is 3 GB and contains following arrays:
trnOrg: This is complex arrary of 256x232x360 containing 90 slices from each of the 4 training subjects.
Each slice is of spatial dimension 256x232. This is the original fully sampled data.
trnCSM: This is a complex array of 256x232x12x360 representing coil sensitity maps (csm). Here 12 represent number of coils.
trnMask: This is the random undersampling mask to do 6-fold acceleration. We use different mask for different slices.
tstOrg,tstCSM, tstMask: These are similar arrays for testing purpose. There are total 164 testing images.
The undersampling mask, for both training and testing cases, is shared corresponding to 6-fold acceleration case.
First, ensure that Tensorflow 1.7 or higher version is installed and working with GPU.
Second, just clone or download this reporsitory. The tstDemo.py file should run without any changes in the code.
On the command prompt CD to this modl directory i.e. the directory containig tstDemo.py.
Then you can run the test code using the command:
$python tstDemo.py from the command prompt.
The MoDL architecture can be trained using Knee datasets freely available from other sources. The directory knee_trained_MoDL contains a trained model on Knee data. Here we performed the training with a structured mask that is kept same for all the slices during training. The file knee_demo_data.h5 contains one raw image, mask, as we as coil sensitivity maps corresponding to a single slice from a particular subject for demo purpose only.
Just use the command $python knee_demo_code.py to see the performance of the MoDL on Knee dataset.
The folder savedModels contain the learned tensorflow model parameters. tstDemo.py will use it to read the model and run on the demo image in the file demoImage.hdf5.
supportingFunctions.py: This file contain some supporting functions to calculate the time, PSNR, and read the dataset.
model.py: This file contain the code for creating the residual learning CNN model as well as the algorithm for
conjugate-gradient on complex data.
trn.py: This is the training code
tstDemo.py: This is the testing code
The code is provided to support reproducible research. If the code is giving syntax error in your particular python configuration or some files are missing then you may open an issue or directly email me at [email protected]

