HTTP Dependency Injection (HTTP 依赖注入)
http-typedi 致力于编写更高效,可维护性强的TypeScript代码。由于实际业务中,封装的请求方法不够模块化,后期维护过于困难(如:时间拉长,请求方法参数和参数类型遗忘)都给后期维护带来极大困扰,有时还需要向后端同事询问具体的接口约定。极大的浪费了开发时间,因此http-typedi的出现,就是为了解决这一痛点。
功能描述:面向 AOP 编程, http-typedi依靠强大的依赖注入设计模式来运行程序,支持聚合装饰器(applyDecorators)、方法装饰器(Override | Post | Get ...等常用请求方法)、参数装饰器(Param)、类装饰器(Controller | Module | Injectable)、DTO(参数自动验证)、管道(Pipe)、(全局 | 控制器 | 单例路由方法)请求(前置、后置)拦截器、(全局 | 控制器 | 单例路由方法)错误回调方法。
上述为http-typedi的大概描述,具体使用方式请往下看
当前默认支持vite+vue3+ts结构项目
npm install http-typedi reflect-metadata --save
npm install @swc/core unplugin-swc --save
typescript:依赖装饰器特性需要在tsconfig.json开启特性experimentalDecorators和emitDecoratorMetadata
reflect-metadata:获取类型信息,需要在项目入口文件中import 'reflect-metadata';由于esbuild不支持装饰器特性,所以这里用了@swc/core unplugin-swc来编译代码,使其可在vite上运行
tsconfig.json
{
  "compilerOptions": {
    "target": "esnext",
    "strictNullChecks": true,
    "useDefineForClassFields": true,
    "module": "esnext",
    "moduleResolution": "Node",
    "strict": true,
    "sourceMap": true,
    "resolveJsonModule": true,
    "isolatedModules": true,
    "esModuleInterop": true,
    "lib": [
      "ESNext",
      "DOM",
      "ES2015.Promise"
    ],
    "skipLibCheck": true,
    "baseUrl": ".",
    "declaration": true,
    "allowSyntheticDefaultImports": true,
    "experimentalDecorators": true, // 设置为true
    "emitDecoratorMetadata": true, // 设置为true
    "keyofStringsOnly": false,
    "noImplicitOverride": true,
    "extendedDiagnostics": false,
  },
  "ts-node": {
    "swc": true,
    "esm": true
  }
}
vite.config.ts
import Swc from 'unplugin-swc'
export default defineConfig({
  plugins: [Swc.vite() as PluginOption]
})
配置完之后运行项目不出意外还是会遇到这种错误,
Error: Dynamic require of "path" is not supported
    at file:///Users/stickb/Code/niwc-pac/cosmos/node_modules/.pnpm/[email protected]_g6o72fkdx62msvhc7bd7opzgc4/node_modules/unplugin-swc/dist/index.mjs:29:9
    at node_modules/.pnpm/[email protected]/node_modules/picomatch/lib/picomatch.js (file:///Users/stickb/Code/niwc-pac/cosmos/node_modules/.pnpm/[email protected]_g6o72fkdx62msvhc7bd7opzgc4/node_modules/unplugin-swc/dist/index.mjs:1377:17)
    at __require2 (file:///Users/stickb/Code/niwc-pac/cosmos/node_modules/.pnpm/[email protected]_g6o72fkdx62msvhc7bd7opzgc4/node_modules/unplugin-swc/dist/index.mjs:47:50)
    at node_modules/.pnpm/[email protected]/node_modules/picomatch/index.js (file:///Users/stickb/Code/niwc-pac/cosmos/node_modules/.pnpm/[email protected]_g6o72fkdx62msvhc7bd7opzgc4/node_modules/unplugin-swc/dist/index.mjs:1522:22)
    at __require2 (file:///Users/stickb/Code/niwc-pac/cosmos/node_modules/.pnpm/[email protected]_g6o72fkdx62msvhc7bd7opzgc4/node_modules/unplugin-swc/dist/index.mjs:47:50)
    at file:///Users/stickb/Code/niwc-pac/cosmos/node_modules/.pnpm/[email protected]_g6o72fkdx62msvhc7bd7opzgc4/node_modules/unplugin-swc/dist/index.mjs:1583:32
    at ModuleJob.run (node:internal/modules/esm/module_job:198:25)
    at async Promise.all (index 0)
    at async ESMLoader.import (node:internal/modules/esm/loader:385:24)
    at async importModuleDynamicallyWrapper (node:internal/vm/module:437:15)
解决方法只需要将package.json中的"type": "module"去掉重新运行即可
| filename | description |
|---|---|
| app.controller.ts | 带有单个路由的基本控制器示例。 |
| app.module.ts | 应用程序的根模块。 |
| app.service.ts | 带有单个方法的基本服务 |
| main.ts | 应用程序入口文件。它使用 HttpFactory 用来创建 Http 应用实例。 |
使用前需安装typescript环境,因为本插件使用了typescript的依赖注入设计模式,相关依赖注入设计模式请参考NestJs或Angular。
控制器负责处理传入的请求参数和向服务端发出请求并进行响应。
控制器的目的是接收应用的特定请求。路由机制控制哪个控制器接收哪些请求。通常,每个控制器有多个路由,不同的路由可以执行不同的操作。
为了创建一个基本的控制器,我们使用类和装饰器。装饰器将类与所需的元数据相关联,并使 http-typedi能够创建路由映射(将请求绑定到相应的控制器)。
下面是一个controller控制器的一个示例
interfaces/article.interface.ts
export interface UpdateArticleReq {
  name: string;
  id: number;
}
import { Controller, Post, Header } from 'http-typedi'
import { UpdateArticleReq } from './interfaces/article.interface'
@Controller('article')
export class ArticleController {
@Post('update')
updateArticle(confugre: UpdateArticleReq) {
return 'this is update article method'
}
}@Controller() 装饰器定义一个基本的控制器。可选 路由路径前缀设置为 article。在 @Controller() 装饰器中使用路径前缀可以使我们轻松地对一组相关的路由进行分组,并最大程度地减少重复代码。例如,我们可以选择将一组用于管理与 /article 下的文章实体进行互动的路由进行分组。这样,我们可以在 @Controller() 装饰器中指定路径前缀 article,这样就不必为文件中的每个路由重复路径的那部分。本例中的updateArticle方法被Post装饰器修饰之后,它已经变成请求路径为article/update的一个路由,由于方法被@Post修饰,方法的形参(confugre)也被重写。下面是被重写之后的形参类型
import { UpdateArticleReq } from './interfaces/article.interface'
interface Confugre {
    url: string;
    method: string;
    data: UpdateArticleReq
}在上例中我们发现updateArticle路由只返回了一个字符串,它其实应该实现和服务端进行交互(接口请求)。下面的Providers会讲到这一点,我们继续往下看。
Providers 是 http-typedi 的一个基本概念。 被http-typedi的@Injectable() 装饰之后的会被视为 provider - service,他们都可以通过constructor注入依赖关系。 这意味着对象可以彼此创建各种关系,并且“连接”对象实例的功能在很大程度上可以委托给 http-typedi。 Provider 只是一个用 @Injectable() 装饰器注释的类。provider可以在 controller控制器中或其他的provider中使用。我们强烈建议在每个@Injectable()装饰的类应该实现可以请求服务端的接口。所以下面我们先创建一个请求类供被@Injectable()修饰之后的类使用
import axios from 'axios'
import type { AxiosInstance, AxiosRequestConfig } from 'axios'
import { Injectable } from 'http-typedi'

interface Response<T = unknown> {
  readonly code: number
  readonly message: string
  data: T
}

type ServerRes<T, U = Promise> = U extends Promise
  ? Promise<Response<T>>
  : Response<T>

@Injectable()
export class RequestService {
  private _instance!: AxiosInstance
  /**
   * @method constructor
   */
  constructor() {
    this.forRoot()
  }
  public async request<T, U>(config: AxiosRequestConfig<T>): ServerRes<U> {
    return await this.instance.request<{}, ServerRes<U>, T>(config)
  }

  /**
   * @method forRoot
   * @param { AxiosRequestConfig } AxiosRequestConfig
   * @description Set Configure
   */
  public forRoot(config: AxiosRequestConfig = {}): void {
    this.instance = axios.create(config)
  }

  /**
   * @method getters
   * @return { AxiosInstance } AxiosInstance
   * @description instance Getter
   */
  private get instance(): AxiosInstance {
    return this._instance
  }

  /**
   * @method setters
   * @description instance Setter
   */
  private set instance(axiosInstance: AxiosInstance) {
    this._instance = axiosInstance
  }
}
下面我们创建一个基本的被@Injectable()修饰之后的类并使用上面创建的请求类
demo.service.ts
import { Injectable } from 'http-typedi'
import { RequestService, ServerRes } from './request.service'
import { DemoReq, DemoRes } from './interfaces/demo.interface'
@Injectable()
export default class DemoService {
  constructor(private requestService: RequestService) {}
  private readonly url: stirng = 'http://localhost:8080'
  public getDemoDetail(param: DemoReq): ServerRes<DemoRes> {
     return this.requestService.request(param)
  }
}
我们的 DemoService 是具有一个属性和一个方法的基本类。唯一的新特点是它使用 @Injectable() 装饰器。该 @Injectable() 附加有元数据,因此 http-typedi 知道这个类是一个 http-typedi provider。需要注意的是,上面有一个 Demo 接口。看起来像这样:
interfaces/demo.interface.ts
export interface DemoReq {
  name: string;
  age: number;
  breed: string;
}

export interface DemoRes {
  list: string[]
}
现在我们有一个服务类来检索 Demo ,让我们在 DemoController 里使用它 :
import { Controller, Post } from 'http-typedi';
import { DemoService } from './demo.service';
import { DemoReq, DemoRes } from './interfaces/demo.interface';

@Controller('demo')
export class DemoController {
  constructor(private demoService: DemoService) {}

  @Post('detail')
  async getDemoDetail(demo: DemoReq): ServerRes<DemoRes> {
    return this.demoService.getDemoDetail(demo);
  }
}
DemoService 是通过类构造函数注入的。注意这里使用了私有的只读语法。这意味着我们已经在同一位置创建并初始化了 demoService成员。
在上面的示例中,用户通过调用getDemoDetail方法触发 @Post('detail') 装饰器告诉 http-typedi 当前方法为需要和服务端进行通信的方法和请求路径。 什么是路由路径 ? 一个处理程序的路由路径是通过连接为控制器 (Controller) 声明的(可选)前缀和请求装饰器中指定的任何路径来确定的。由于我们已经为当前的 Controller 声明了一个前缀,并且在请求装饰器(@Get('list'))中添加了list后缀,因此 http-typedi 会通过 **@Get('list')**装饰器进行处理并返回请求路径为 /demo/detail,Route 路由并且携带请求参数调用 demoService实例的 getDemoDetail方法传入请求参数信息和服务端进行通信。
http-typedi 是建立在强大的设计模式,通常称为依赖注入。我们建议在官方的 Angular文档中阅读有关此概念的精彩文章。
在 http-typedi 中,借助 TypeScript 功能,管理依赖项非常容易,因为它们仅按类型进行解析。在下面的示例中,http-typedi 将 demoService 通过创建并返回一个实例来解析 DemoService(或者,在单例的正常情况下,如果现有实例已在其他地方请求,则返回现有实例)。解析此依赖关系并将其传递给控制器的构造函数(或分配给指定的属性):
constructor(private readonly demoService: DemoService) {}http-typedi 不仅仅支持构造函数依赖注入,也支持属性依赖注入,我们来看一个例子
import { Controller, Post, Injection } from 'http-typedi';
import { DemoService } from './demo.service';
import { DemoReq, DemoRes } from './interfaces/demo.interface';

@Controller('demo')
export class DemoController {
  @Injection()
  private readonly demoService!: DemoService;

  @Post('detail')
  async getDemoDetail(demo: DemoReq): ServerRes<DemoRes> {
    return this.demoService.getDemoDetail(demo);
  }
}上例中使用@Injection()装饰的属性会被注入为一个服务实例。和上例的构造函数注入一样,属性注入也是通过类型来注入的,所以我们需要在属性声明的时候指定类型。@Injection()在没有参数的情况下必须声明属性的类型
Injection装饰器可以接受一个参数,参数为一个字符串,的字符串为需要注入的服务的名称,如果传入参数,则会从服务容器中获取对应名称的服务实例,如果没有传入参数,则会从服务容器中获取属性声明的类型对应的服务实例,我们来看一个使用参数的例子
demo.module.ts
import { Module } from 'http-typedi';
import { DemoController } from './demo.controller';
import { DemoService } from './demo.service';

@Module({
  controllers: [DemoController],
  providers: [DemoService, {
    provide: 'config',
    useValue: {
      url: 'http://localhost:5173'
    }
  }],
})
export class DemoModule {}
demo.controller.ts
import { Controller, Post, Injection } from 'http-typedi';
import { DemoService } from './demo.service';
import { DemoReq, DemoRes } from './interfaces/demo.interface';

@Controller('demo')
export class DemoController {
  @Injection('config')
  private readonly config;

  @Post('detail')
  async getDemoDetail(demo: DemoReq): ServerRes<DemoRes> {
    return this.demoService.getDemoDetail(demo);
  }
}上例中使用@Injection('config')进行属性注入,由于传入了参数,所以会从服务容器中获取名称为config的服务实例,如果没有传入参数,则会从服务容器中获取属性声明的类型对应的服务实例 (不使用具名注入必须传递参数类型),如果使用具名注入想更好的获取类型提示,也可以在属性声明的时候指定类型,如下例所示
@Injection('config')
private readonly config: {
  url: string;
};要指定自定义请求头,可以使用 @header() 装饰器
import { Controller, Post, Header } from 'http-typedi';
import { DemoService } from './demo.service';
import { DemoReq, DemoRes } from './interfaces/demo.interface';

@Controller('demo')
export class DemoController {
  constructor(private demoService: DemoService) {}

  @Post('detail')
  @Header('Cache-Control', 'none')
  async getDemoDetail(demo: DemoReq): ServerRes<DemoRes> {
    return this.demoService.getDemoDetail(demo);
  }
}
Header 需要从 http-typedi 包导入。
顾名思义,可以使路由请求延迟一段时间,如果您需要延迟路由请求时间,可以使用 @Sleep() 装饰器,该方法形参接受一个数字类型的参数,单位为毫秒(ms)
import { Controller, Post, Sleep } from 'http-typedi';
import { DemoService } from './demo.service';
import { DemoReq, DemoRes } from './interfaces/demo.interface';

@Controller('demo')
export class DemoController {
  constructor(private demoService: DemoService) {}

  @Post('detail')
  @Sleep(1000)
  async getDemoDetail(demo: DemoReq): ServerRes<DemoRes> {
    return this.demoService.getDemoDetail(demo);
  }
}
Sleep 需要从 http-typedi 包导入。
当您需要接受动态数据 **(dynamic data)**作为请求的一部分时(例如,使用GET /article/articleDetail/1 来获取 id 为 1 的 articleDetail),带有静态路径的路由将无法工作。为了定义带参数的路由,我们可以在路由路径中添加路由参数标记(token)以捕获请求 URL 中该位置的动态值。下面的 @Get() 装饰器示例中的路由参数标记(route parameter token)演示了此用法
import { Controller, Get, Header } from 'http-typedi';
import { DemoService } from './demo.service';
import { DemoDetailReq, DemoDetailRes } from './interfaces/demo.interface';

@Controller('demo')
export class DemoController {
  constructor(private readonly demoService: DemoService) {}
  @Get('articleDetail/:id')
  getDemoDetail(confugre: DemoDetailReq) {
    return this.demoService.getDemoDetail(<AxiosRequestConfig>confugre)
  }
}模块是具有 @Module() 装饰器的类。 @Module() 装饰器提供了元数据,http-typedi用它来组织应用程序结构。
每个 http-typedi应用程序至少有一个模块,即根模块。根模块是 http-typedi开始安排应用程序树的地方。事实上,根模块可能是应用程序中唯一的模块,特别是当应用程序很小时,但是对于大型程序来说这是没有意义的。在大多数情况下,您将拥有多个模块,每个模块都有一组紧密相关的功能。
@module() 装饰器接受一个描述模块属性的对象:
| providers | 由 http-typedi 注入器实例化的提供者,并且可以至少在整个模块中共享 |
|---|---|
| controllers | 必须创建的一组控制器 |
| imports | 导入模块的列表,这些模块导出了此模块中所需提供者 |
| exports | 由本模块提供并应在其他模块中可用的提供者的子集。 |
默认情况下,该模块封装提供程序。这意味着无法注入既不是当前模块的直接组成部分,也不是从导入的模块导出的提供程序。因此,您可以将从模块导出的提供程序视为模块的公共接口或API。
DemoController 和 DemoService 属于同一个应用程序域。 应该考虑将它们移动到一个功能模块下,即 DemoModule。
demo/demo.module.ts
import { Module } from 'http-typedi';
import { DemoController } from './demo.controller';
import { DemoService } from './demo.service';

@Module({
  controllers: [DemoController],
  providers: [DemoService],
})
export class DemoModule {}
我已经创建了 demo.module.ts 文件,并把与这个模块相关的所有东西都移到了 demo目录下。我们需要做的最后一件事是将这个模块导入根模块 (ApplicationModule)。
app.module.ts
import { Module } from 'http-typedi';
import { DemoModule } from './demo/demo.module';

@Module({
  imports: [DemoModule],
})
export class ApplicationModule {}
现在 http-typedi 知道除了 ApplicationModule 之外,注册 DemoModule 也是非常重要的。 这就是我们现在的目录结构:
src
├──demo
│    ├──interfaces
│    │     └──demo.interface.ts
│    ├─demo.service.ts
│    ├─demo.controller.ts
│    └──demo.module.ts
├──app.module.ts
└──main.ts
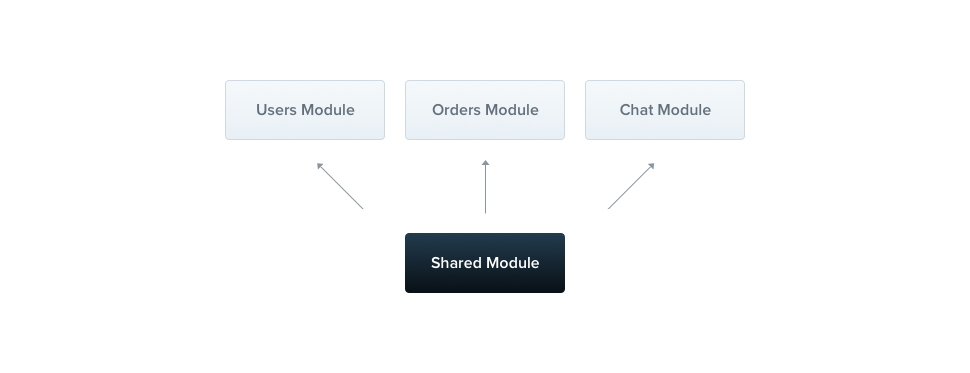
在 http-typedi中,默认情况下,模块是单例,因此您可以轻松地在多个模块之间共享同一个提供者实例。
实际上,每个模块都是一个共享模块。一旦创建就能被任意模块重复使用。假设我们将在几个模块之间共享 DemoService 实例。 我们需要把 DemoService 放到 exports 数组中,如下所示:
cats.module.ts
import { Module } from 'http-typedi';
import { DemoController } from './demo.controller';
import { DemoService } from './demo.service';

@Module({
  controllers: [DemoController],
  providers: [DemoService],
  exports: [DemoService]
})
export class DemoModule {}
现在,每个导入 DemoModule 的模块都可以访问 DemoService ,并且它们将共享相同的 DemoService 实例。
如果你不得不在任何地方导入相同的模块,那可能很烦人。在 Angular 中,提供者是在全局范围内注册的。一旦定义,他们到处可用。另一方面,http-typedi 将提供者封装在模块范围内。您无法在其他地方使用模块的提供者而不导入他们。但是有时候,你可能只想提供一组随时可用的东西 - 例如:helper,http请求类等等。这就是为什么你能够使模块成为全局模块。
import { Module, Global } from '@nestjs/common';
import { DemoController } from './demo.controller';
import { DemoService } from './demo.service';

@Global()
@Module({
  controllers: [DemoController],
  providers: [DemoService],
  exports: [DemoService],
})
export class DemoModule {}
@Global 装饰器使模块成为全局作用域。 全局模块应该只注册一次,最好由根或核心模块注册。 在上面的例子中,DemoService 组件将无处不在,而想要使用 DemoService 的模块则不需要在 imports 数组中导入 DemoModule。
顾名思义,拦截器就是在每个路由请求前、后进行拦截处理,保证程序的正常运行
此为请求前置拦截器,我们来看一下如何使用前置,后置拦截器,下面是一个例子
demo.controller.ts
import { Controller, Post, UseInterceptorsReq } from 'http-typedi';
import { DemoService } from './demo.service';
import { DemoDetailReq } from './interfaces/demo.interface';

function InterceptorsReq (config) {
  console.log(`Before...`)
  return config
}

@Controller('demo')
@UseInterceptorsReq(InterceptorsReq)
export class DemoController {
  constructor(private readonly demoService: DemoService) {}
  @Get('demoDetail/:id')
  getDemoDetail(confugre: DemoDetailReq) {
    return this.demoService.getDemoDetail(<AxiosRequestConfig>confugre)
  }
}由此,DemoController 中定义的每个路由处理程序都将使用 InterceptorsReq。当有人调用 GET /demo/demoDetail/1 路由时,您将在控制台窗口中看到以下输出:
Before...为了设置拦截器, 我们使用从 http-typedi 包导入的 @UseInterceptorsReq() 装饰器。拦截器可以是控制器范围内的, 方法范围内的或者全局范围内的。
如上所述, 上面的构造将拦截器附加到此控制器声明的每个处理程序。如果我们决定只限制其中一个, 我们只需在方法级别设置拦截器。为了绑定全局前置拦截器, 我们使用 http-typedi应用程序实例的 useGlobalInterceptorsReq() 方法
import { HttpFactory, useGlobalInterceptorsReq, useGlobalInterceptorsRes } from 'http-typedi'
import { ApplicationModule } from './app.module'

function InterceptorsReq (config) {
  console.log(`Before...`)
  return config
}

function createHTTPClient(): ApplicationModule {
  const app = await HttpFactory.create(ApplicationModule)
  app.useGlobalInterceptorsReq(InterceptorsReq)
  app.useGlobalInterceptorsRes(InterceptorsReq);
  return app
}

const HTTPClient = createHTTPClient()
export { HTTPClient }
全局拦截器用于整个应用程序、每个控制器和每个路由处理程序。
由于 Typescript 没有保存
泛型或接口的元数据。当你在你的 DTO 中使用他们的时候。ValidationPipe可能不能正确验证输入数据。出于这种原因,可以考虑在你的 DTO 中使用具体的类。
当你导入你的 DTO 时,你不能使用仅类型的导入,因为类型会在运行时被擦除,记得用
import { CreateUserDto }而不是import type { CreateUserDto }。
http-typedi 与 class-validator 配合得很好。这个优秀的库允许您使用基于装饰器的验证。装饰器的功能非常强大,尤其是与 http-typedi 的 Pipe 功能相结合使用时,因为我们可以通过访问 metatype 信息做很多事情,在开始之前需要安装一些依赖。
npm install class-validator class-transformer --save现在我们可以在 CreateUserDto 中添加一些验证规则。我们使用 class-validator 包提供的装饰器来实现这一点,这里有详细的描述。以这种方式,任何使用 CreateUserDto 的路由都将自动执行这些验证规则。
import { IsEmail, IsNotEmpty } from 'class-validator';

export class CreateUserDto {
  @IsEmail()
  email: string;

  @IsNotEmpty()
  password: string;
}
要测试我们的DTO,让我们创建一个基本请求路由
@Post()
create(createUserDto: CreateUserDto) {
  return this.requestService.request(createUserDto)
}
有了这些规则,当某人使用无效 email 执行对我们的接口的请求时,为了营造良好的体验环境,应用程序会在控制台输出错误信息。以便开发者在调试过程中发现接口字段错误等常见问题。避免参数错误经常询问后端,造成极大的时间成本。
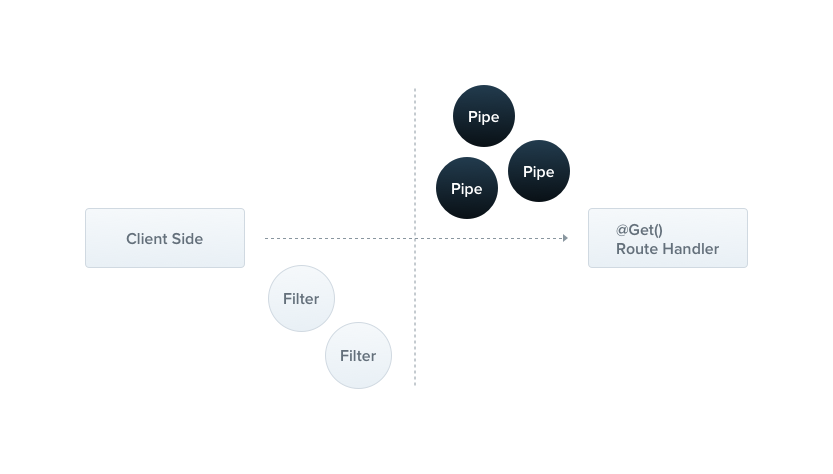
管道是具有 @Override() 装饰器的类方法。管道应实现 PipeTransform 接口。
管道有两个典型的应用场景:
- 转换:管道将输入数据转换为所需的数据输出(例如,将字符串转换为整数)
- 验证:对输入数据进行验证,如果验证成功继续传递; 验证失败则抛出异常
暂未处理验证失败场景
在这两种情况下, 管道 参数(arguments) 会由 控制器(Override)的方法处理程序 进行处理。http-typedi会在调用这个方法之前插入一个管道,管道会先拦截方法的调用参数,进行转换或是验证处理,然后用转换好或是验证好的参数调用原方法。
http-typedi自带很多开箱即用的内置管道。你还可以构建自定义管道。本章将介绍先内置管道以及如何将其绑定到处理程序@Override上,然后查看一些自定义管道以展示如何从头开始构建自定义管道。
http-typedi 自带5个开箱即用的管道,即
ParseIntPipeParseFloatPipeParseBoolPipeDefaultValuePipeValidationPipe
他们从 http-typedi 包中导出。
我们先来快速看看如何使用ParseIntPipe。这是一个转换的应用场景。在本章后面,我们将展示 ParseIntPipe 的简单自定义实现。下面的示例写法也适用于其他内置转换管道(ParseBoolPipe、ParseFloatPipe,我们在本章中将其称为 Parse* 管道)。
为了使用管道,我们需要将一个管道类的实例绑定到合适的情境。在我们的 ParseIntPipe 示例中,我们希望将管道与特定的路由处理程序方法相关联,并确保它在该方法被调用之前运行。我们使用以下构造来实现,并其称为在方法参数级别绑定管道:
@Override()
async findOne(@Param('id', ParseIntPipe) id: number) {
  return this.requestService.request({ id });
}
这确保了我们在 findOne() 方法中接收的参数是一个数字(与 this.catsService.findOne() 方法的诉求一致
正如上文所提到的,你可以构建自定义管道。虽然 http-typedi提供了强大的内置 ParseIntPipe 和 ValidationPipe,但让我们从头开始构建它们的简单自定义版本,以了解如何构建自定义管道。
先从一个简单的 ValidationPipe 开始。最初,我们让它接受一个输入值并立即返回相同的值。
validation.pipe.ts
import { PipeTransform, Injectable } from 'http-typedi';

export class ValidationPipe implements PipeTransform {
  transform(value: any) {
    return value;
  }
}
PipeTransform<T, R> 是每个管道必须要实现的泛型接口。泛型 T 表明输入的 value 的类型,R 表明 transfrom() 方法的返回类型
为实现 PipeTransfrom,每个管道必须声明 transfrom() 方法。该方法有一个参数:
value
value 参数是当前处理的方法参数(在被路由处理程序方法接收之前)
TypeScript 中的 interface 在转译期间会消失。因此,如果方法参数的类型被声明为接口(interface)而不是类(class),则
metatype将是Object。
import { HttpFactory } from 'http-typedi'
import { ApplicationModule } from './app.module'

function createHTTPClient(): ApplicationModule {
  const HTTPClient = await HttpFactory.create(ApplicationModule)
  return HTTPClient
}
const HTTPClient = createHTTPClient()
要创建一个 Http 请求应用实例,我们使用了HttpFactory核心类。HttpFactory 暴露了一些静态方法用于创建应用实例。 create()方法返回一个实现 HttpServicesApplication<AppModule>接口的对象。该对象提供了一组可用的方法,我们会在后面的章节中对这些方法进行详细描述。 在上面的 main.ts 示例中,我们只是在程序中挂载上 HTTP 服务,让应用程序可以使用 HTTP 请求。

