-
Notifications
You must be signed in to change notification settings - Fork 1
Home

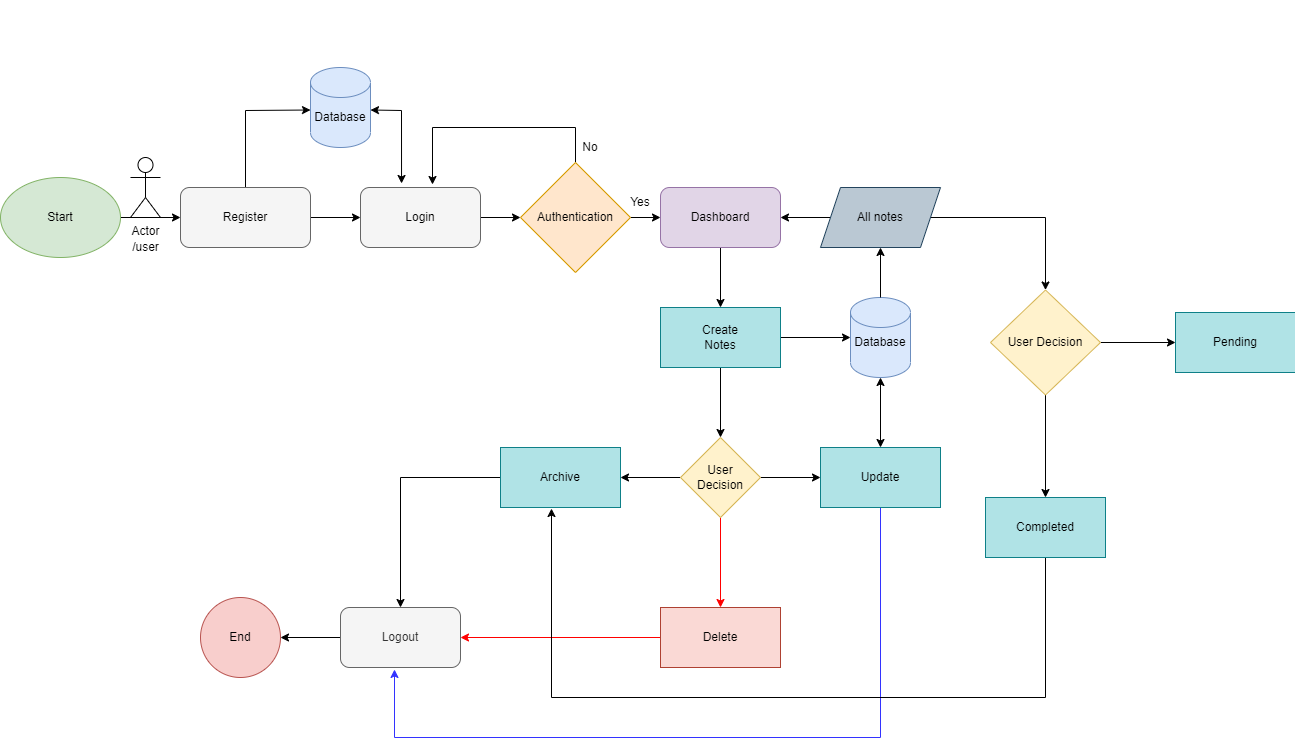
Todo Tracker application allows user to add todo, assign categories to them and set reminders.
- Allows user to add todo
- Edit, catagorize, organize, and mark as complete
- Get reminded about self-imposed deadlines.
- Offers user fiendly interface
- List the archived tasks as and when required.
Angular For Frontend
SpringBoot For Backend
todotracker
    |
    ├── FrontEnd                                          // This is the frontend Angular appliaction
    ├── To_Do_Tracker                                     // This is the backend spring boot application
    ├── LICENSE
    └── README


- Clone the repository
cd To_Do_Tracker-
Do
mvn clean installinside the backend folder Springboot application to generate target folder or .jar file. -
You can Run the backend using Docker in
Ubuntuor using service in intelij or run using STS 4.
sudo docker-compose up --buildcd FrontEnd-
To run the fornt end application you need nodejs install in your system and intall Angular CLI.
-
Do
npm installinside the frontend application to install application dependencies. -
Then run
ng serve --opento run the angular server https://localhost:4200
In this spring boot appliaction we implement different technologies to run the microservices, we used JWT (JSON Web Token) for token based authentication, used netflix eureka for service discovery and to check which service is up and running, used feign client for syncronous commumication with service and used rabbitmq for asyncronous communication among the service. Used MySql to store authenticated user and Used MongoDB for storing the user data. Used Docker to contanarize the backend appliaction.
In this project, we created six service.
    1. ArchiveService
    2. AuthenticationService
    3. EurekaServer
    4. GatewayService
    5. NotificationService
    6. TODOService
To_Do_Tracker
    |
    ├── ArchiveService
    ├── AuthenticationService
    ├── EurekaServer
    ├── GatewayService
    ├── NotificationService
    ├── TODOService
    ├── LICENSE
    ├── README.md
    ├── docker-compose.yml
    ├── mvnw
    ├── mvnw.cmd
    └── pom.xml
- Do
mvn clean installinside the To_Do_Tracker Springboot application to generate target folder or .jar file. - While running
mvn clean installthe mongodb and the mysql service need to be running. - Pull mongo docker image using
sudo docker pull mongocommand. - Open a seperate terminal then Pull RabbitMQ image using docker command and keep it running in the terminal.
sudo docker run -it --rm --name rabbitmq -p 5672:5672 -p 15672:15672 rabbitmq:3.8.23-management- check RabbitMQ is running using browser by typing http://localhost:15672 [user name : guest & password : guest].
- To run the application use this command in the terminal.
sudo docker-compose up --build- Open a terminal and check the status of image and containers using
sudo docker ps -acommand. - And check in eureka server by typing http://localhost:8761 which service is up and running.
- You can use postman to populate the data.
A todo tracker can capture quick ideas, add notes, check tasks off your To-Do list. One of the fundamental features for any productivity tool is a To-Do list. With the To-Do Tracker, you can create and share notes and lists. To-Do Tracker surfaces the right tasks at the right time, so you always know what to focus on next.
- Clone the repository and cd into it
- Install dependencies
npm install - Run the backend spring boot part 6 microservices using docker or run seperate instances.
- Run the frontend
npm run startwhich shall run on http://localhost:4200
- User can create as many todo he/she wishes to, categorize and organize your tasks.
- Get reminded about self-imposed deadlines.
- Mark the tasks as completed. Modify/Update and remove the tasks from list as required.
- Offers user friendly interface.
- List the archived tasks as and when required.
FrontEnd
    |
    ├── src/
    ├── .gitignore
    ├── angular.json
    ├── Karma.config.js
    ├── LICENSE
    ├── package.lock.json
    ├── package.json
    ├── README.md
    ├── tsconfig.app.json
    ├── tsconfig.json
    └── tsconfig.spec.json


This project was generated with Angular CLI version 12.1.3.
Run ng serve for a dev server. Navigate to http://localhost:4200/. The app will automatically reload if you change any of the source files.
Run ng generate component component-name to generate a new component. You can also use ng generate directive|pipe|service|class|guard|interface|enum|module.
Run ng build to build the project. The build artifacts will be stored in the dist/ directory.
Run ng test to execute the unit tests via Karma.
Run ng e2e to execute the end-to-end tests via a platform of your choice. To use this command, you need to first add a package that implements end-to-end testing capabilities.
To get more help on the Angular CLI use ng help or go check out the Angular CLI Overview and Command Reference page.
MIT License
Copyright (c) 2022 Tamojit Das, Shashank Malviya and Sai Saranya.
Permission is hereby granted, free of charge, to any person obtaining a copy of this software and associated documentation files (the "Software"), to deal in the Software without restriction, including without limitation the rights to use, copy, modify, merge, publish, distribute, sublicense, and/or sell copies of the Software, and to permit persons to whom the Software is furnished to do so, subject to the following conditions:
The above copyright notice and this permission notice shall be included in all copies or substantial portions of the Software.
THE SOFTWARE IS PROVIDED "AS IS", WITHOUT WARRANTY OF ANY KIND, EXPRESS OR IMPLIED, INCLUDING BUT NOT LIMITED TO THE WARRANTIES OF MERCHANTABILITY, FITNESS FOR A PARTICULAR PURPOSE AND NONINFRINGEMENT. IN NO EVENT SHALL THE AUTHORS OR COPYRIGHT HOLDERS BE LIABLE FOR ANY CLAIM, DAMAGES OR OTHER LIABILITY, WHETHER IN AN ACTION OF CONTRACT, TORT OR OTHERWISE, ARISING FROM, OUT OF OR IN CONNECTION WITH THE SOFTWARE OR THE USE OR OTHER DEALINGS IN THE SOFTWARE.