Table of Contents
- Style Guide for Python Code
- Recommended development environment
Licence Key (scroll down to the bottom)
- Leif has provided us with on Moodle
##Pip
pip is a tool for installing Python packages from the Python Package Index.
Python actually has another, more primitive, package manager called easy_install, which is installed automatically when you install Python itself. pip is vastly superior to easy_install for lots of reasons, and so should generally be used instead. You can use easy_install to install pip as follows:
$ sudo easy_install pipInstalling packages with pip is simple:
#DON'T DO THIS YET
$ sudo pip install requests
pip tries to install the package into /Library/Python/2.7/site-packages/requests. This is a special directory that Python knows about. Anything that's installed in site-packages can be imported by your programs.
##Further reading
###Virtualenv
virtualenv solves a very specific problem: it allows multiple Python projects that have different (and often conflicting) requirements, to coexist on the same computer.
To install virtualenv, globally simple type:
$ sudo pip install virtualenvNow you can create your very own virtual environments
virtualenvwrapper
is a set of extensions to Ian Bicking’s virtualenv tool. The extensions include wrappers for creating and deleting virtual environments and otherwise managing your development workflow, making it easier to work on more than one project at a time without introducing conflicts in their dependencies.
Features
- Organizes all of your virtual environments in one place.
- Wrappers for managing your virtual environments (create, delete, copy).
- Use a single command to switch between environments.
- Tab completion for commands that take a virtual environment as argument.
$ sudo pip install virtualenvwrapperAdding a virtual environment
$ mkvirtualenv my-envDeleting a virtual environment
$ rmvirtualenv my-envList all virtual environments
$ lsvirtualenvWorkon on an existing virtual env
$ workon my-envDeactivate a vitual env that you were currently working on.
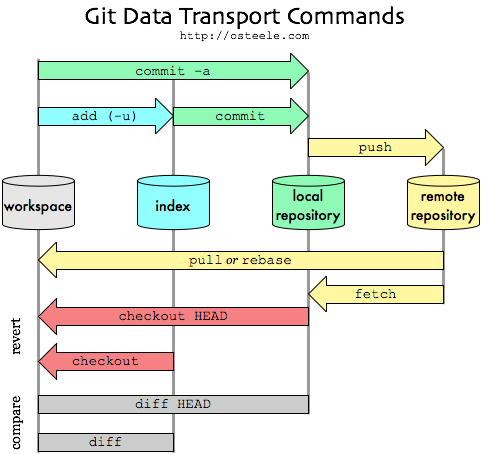
$ deactivateStudy this diagram it will help you a lot.
Download the project
	#template
	$ git clone <remote> <project folder>

	#could look like this
	$ git clone https://github.com/mickeypash/itech-team-pamm itech-project/
Pre-requisites
- Mac OSX - it comes preinstalled
- Windows - you can download it here
- This will install git bash and git gui
- I recommend you try to get used to command-line interface before moving onto a GUI
Setting-up git
- Configure your credentials this will be useful when you start using
Github - Set your name and email to the ones you used for
Github
$ git config --global user.name "John Doe"
$ git config --global user.email [email protected]
Basic git workflow
- You make changes to e.g.
view.py - You do
git statusto see if the changes are registered - You could do
git diffto check what differs from the original file - You do
git addto add your changes to your local repo - You do
git commit -m "info about what you changed/fixed"to commit things (if they are ready) - Finally
git pushto push your changes to the shared project on github
Example in action
$ git add README.md
$ git commit -m "hello world"
$ git push
# username and password
# todo: set-up SSH authenticationStarting a Django 1.6 Project the Right Way
The philosophy behind Django as I understand it is that you create a project such as a blog. Let's call it 'Great Crack' - this would be your project (folder). This might be comprised of a poll for surveying your buddies, a comments section so they can troll you, and of course everyone needs to search through your many blog posts. The things I just enumerated are potential apps this makes Django quite modular.
pamm/                       - project root
├── manage.py               - creating and running the server
├── mango                   - an app
│   ├── __init__.py
│   ├── admin.py
│   ├── migrations
│   │   └── __init__.py
│   ├── models.py
│   ├── tests.py
│   └── views.py
└── pamm                    - project cofig
    ├── __init__.py
    ├── settings.py
    ├── urls.py
└── wsgi.py####The presentation will only last 5 minutes!
The text in bold highlights essential components tha should be included in the presentation.
The text in italics highlights things that we will need to produce but won't necessarily make it into the presentation.
- Title of the project + team members
- Short description of the problem
- A diagram of the system architecuter to be used (i.e N-Tier)
- Our development stack (technologies used e.g. Bootstrap)
- ER Diagram otherwise known as our Data Model
- Specification (using the MoSCoW framework)
- No more than 2 user profiles
- User needs matrix
- No more than two wireframes
- URL Schemas (e.g. example.com/mango/search)
- Site map
How to avoid death By PowerPoint
We could use legos to represent our users - Lego user generation


