####Apple Service Server was written with Ruby/Sinatra and Sequel(Sqlite3), it provides push notification with web admin interface ####
- 'ass' is a rubygem, simple to install.
- only need to provide pem file.
- no need to setup database(using sqlite3).
- provide default config file(ass.yml) with default value.
CentOS/Redhat:
$ yum install sqlite3
Debian/Ubuntu:
$ apt-get install sqlite3
FreeBSD:
$ cd /usr/ports/databases/sqlite34
$ sudo make install clean
Mac:
$ brew install sqlite # Homebrew
$ port install sqlite # Macport
Installation
- Method 1: with OS X builtin Ruby(AKA 'system ruby'), need to run with 'sudo', no extra step
$ sudo gem install ass- Method 2: Install Ruby 1.9 (via RVM or natively) first, no need to run with 'sudo'
$ gem install rvm
$ rvm install 1.9.3
$ rvm use 1.9.3- Install ass:
$ gem install assunder the current directory, provide single pem file combined with certificate and key(name pattern: appid_mode.pem), HOWTO (Check this link)
dev_cert.pem:
$ openssl x509 -in aps_development.cer -inform der -out dev_cert.pem
dev_key.pem:
$ openssl pkcs12 -nocerts -in Certificates.p12 -out dev_key.pem
$ Enter Import Password:
$ MAC verified OK
$ Enter PEM pass phrase:
$ Verifying - Enter PEM pass phrase:
Development Pem:
$ cat dev_cert.pem dev_key.pem > appid_development.pem
prod_cert.pem:
$ openssl x509 -in aps_production.cer -inform der -out prod_cert.pem
prod_key.pem:
$ openssl pkcs12 -nocerts -in Certificates.p12 -out prod_key.pem
$ Enter Import Password:
$ MAC verified OK
$ Enter PEM pass phrase:
$ Verifying - Enter PEM pass phrase:
Production Pem:
$ cat prod_cert.pem prod_key.pem > appid_production.pem
$ ass
when you run 'ass' first time, it will generate 'ass.yml' config file under current directory. (Check this link)
port: 4567  ## ASS server port, default is sinatra's port number: 4567
mode: development ## 'development' or 'production' mode, you should provide pem file ({appid}_{mode}.pem) accordingly(such as, app1_development.pem, app1_production.pem).
cron: cron  ## cron job file name, ASS server will generate a demo 'cron' file for demostration only under current directory.
timer: 0	# how often you run the cron job, unit: minute. when set with 0, means no cron job execute.
user: admin # admin username
pass: pass	# admin password
flood: 1 	# request time from same ip every one minute as Flood Attack
pempass: pempass # pem password
loglevel: info	 # logger level
apps:
- app1 ## appid you want to supprt APNS, ASS Server can give push notification support for many iOS apps, just list the appid here.
- How to register notification? (Client Side)
In AppDelegate file, add methods below to register device token
#pragma mark - push notification methods

- (void)sendToken:(NSString *)token {

    NSString *tokenUrl = [NSString stringWithFormat:@"http://serverIP:4567/v1/apps/app1/%@", token];
    NSLog(@"tokenUrl: %@", tokenUrl);
    //prepare NSURL with newly created string
    NSURL *url = [NSURL URLWithString:tokenUrl];

    //AsynchronousRequest to grab the data
    NSURLRequest *request = [NSURLRequest requestWithURL:url];
    NSOperationQueue *queue = [[NSOperationQueue alloc] init];

    [NSURLConnection sendAsynchronousRequest:request queue:queue completionHandler:^(NSURLResponse *response, NSData *data, NSError *error) {
        if ([data length] > 0 && error == nil) {
            //            NSLog(@"send data successfully");
        } else if ([data length] == 0 && error == nil) {
            //            NSLog(@"No data");
        } else if (error != nil && error.code == NSURLErrorTimedOut) { //used this NSURLErrorTimedOut from
            //            NSLog(@"Token Time out");
        } else if (error != nil) {
            //            NSLog(@"Error is: [%@]", [error description]);
        }
    }];
}

- (void)application:(UIApplication *)application didRegisterForRemoteNotificationsWithDeviceToken:(NSData *)deviceToken {

        NSString *tokenAsString = [[[deviceToken description]
                                    stringByTrimmingCharactersInSet:[NSCharacterSet characterSetWithCharactersInString:@"<>"]]
                                   stringByReplacingOccurrencesOfString:@" " withString:@""];
        NSLog(@"My token is: [%@]", tokenAsString);
        [self sendToken:tokenAsString];

}

- (void)application:(UIApplication *)application didFailToRegisterForRemoteNotificationsWithError:(NSError *)error {

    NSLog(@"Failed to get token, error: %@", error);
}

- (void)application:(UIApplication *)application didReceiveRemoteNotification:(NSDictionary *)userInfo
{
    NSString *message = nil;
    NSString *sound = nil;
    NSString *extra = nil;

    id aps = [userInfo objectForKey:@"aps"];
    extra = [userInfo objectForKey:@"extra"];
    if ([aps isKindOfClass:[NSString class]]) {
        message = aps;
    } else if ([aps isKindOfClass:[NSDictionary class]]) {
        message = [aps objectForKey:@"alert"];
        sound = [aps objectForKey:@"sound"];
        // badge
    }
    if (aps) {
        DLog(@"extra %@",[NSString stringWithFormat:@"sound %@ extra %@", sound, extra ]);
    }
}
- How to send push notification? (Server Side)
run curl command to send push notification message on server' shell.
$ curl http://localhost:4567/v1/apps/app1/push/{message}/{pid}
Note:
param1 (message): push notification message you want to send, remember the message should be html escaped
param2 (pid ): unique string to mark the message, for example current timestamp or md5/sha1 digest
- How to send test push notification on web?
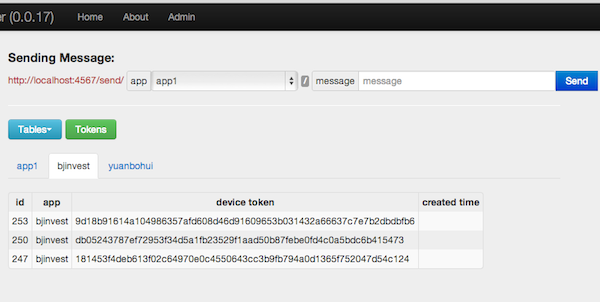
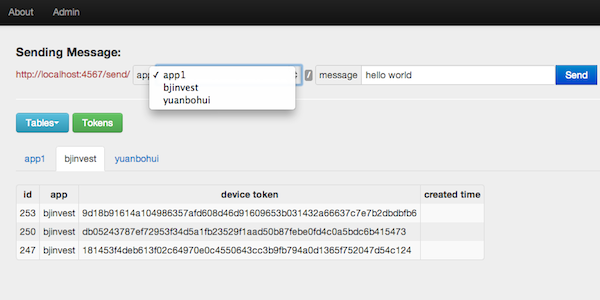
open your web browser and access http://localhost:4567/ (localhost should be changed to your server IP address accordingly), click "admin" on top navbar, you will see the Test Sending textbox on the top page, select your app , input your message and click 'send' button to send push notification.
- How to run ass in background?
$ nohup ass
control + z to return to shell prompt
$ bg
now ass is running as a background service .
- Check out the latest master to make sure the feature hasn't been implemented or the bug hasn't been fixed yet.
- Check out the issue tracker to make sure someone already hasn't requested it and/or contributed it.
- Fork the project.
- Start a feature/bugfix branch.
- Commit and push until you are happy with your contribution.
- Make sure to add tests for it. This is important so I don't break it in a future version unintentionally.
- Please try not to mess with the Rakefile, version, or history. If you want to have your own version, or is otherwise necessary, that is fine, but please isolate to its own commit so I can cherry-pick around it.
#####Copyright (c) 2013 Eiffel Qiu. See LICENSE.txt for further details.#####


