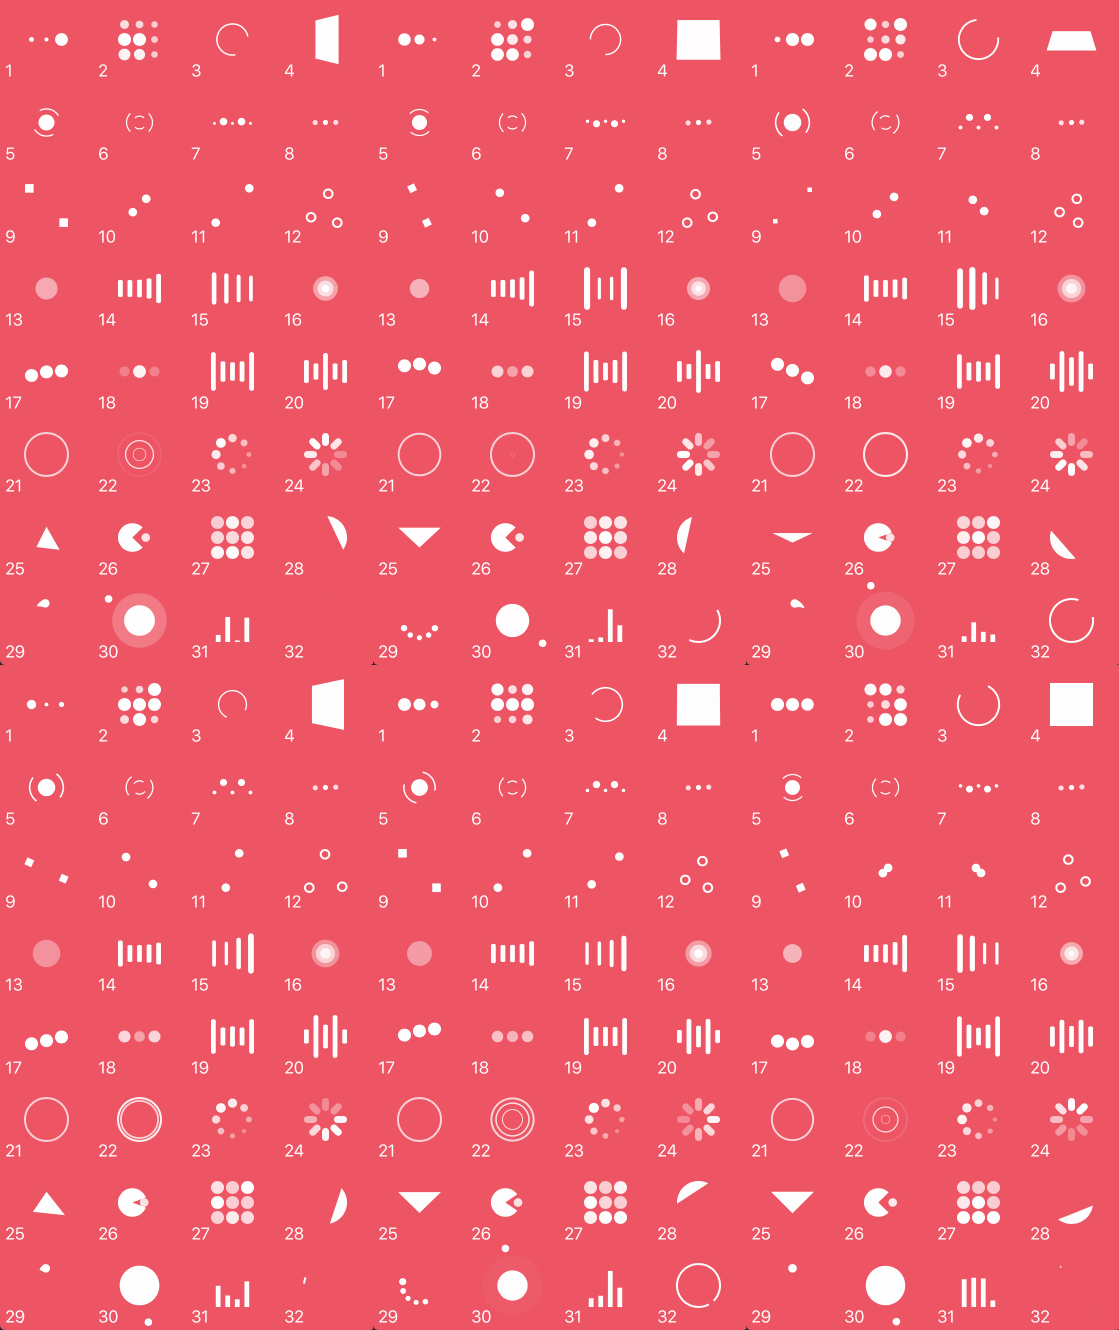
NVActivityIndicatorView is a collection of awesome loading animations.
This is original a fork from DGActivityIndicatorView, inspired by Loaders.css, written in Swift with full implementation of animations, plus more.
You can also find Objective-C version of this here.
For first-hand experience, just open the project and run it.
| Type | Type | Type | Type |
|---|---|---|---|
| 1. ballPulse | 2. ballGridPulse | 3. ballClipRotate | 4. squareSpin |
| 5. ballClipRotatePulse | 6. ballClipRotateMultiple | 7. ballPulseRise | 8. ballRotate |
| 9. cubeTransition | 10. ballZigZag | 11. ballZigZagDeflect | 12. ballTrianglePath |
| 13. ballScale | 14. lineScale | 15. lineScaleParty | 16. ballScaleMultiple |
| 17. ballPulseSync | 18. ballBeat | 19. lineScalePulseOut | 20. lineScalePulseOutRapid |
| 21. ballScaleRipple | 22. ballScaleRippleMultiple | 23. ballSpinFadeLoader | 24. lineSpinFadeLoader |
| 25. triangleSkewSpin | 26. pacman | 27. ballGridBeat | 28. semiCircleSpin |
| 29. ballRotateChase | 30. orbit | 31. audioEqualizer | 32. circleStrokeSpin |
Install Cocoapods if need be.
$ gem install cocoapodsAdd NVActivityIndicatorView in your Podfile.
use_frameworks!

pod 'NVActivityIndicatorView'
If you're using NVActivityIndicatorView in an app extension, use NVActivityIndicatorView/AppExtension instead.
use_frameworks!

pod 'NVActivityIndicatorView/AppExtension'
Then, run the following command.
$ pod installNote: Please refer to the migration note for version 3.7.0 below.
Install Carthage if need be.
$ brew update
$ brew install carthage
Add NVActivityIndicatorView in your Cartfile.
github "ninjaprox/NVActivityIndicatorView"Run carthage to build the framework and drag the built NVActivityIndicatorView.framework in the folder appropriateto the platform, e.g. iOS, tvOS, into your Xcode project.
Note: You might encounter compile issue, if so please use carthage branch instead. Check issue #101 for more information.
Copy NVActivityIndicatorView folder to your project. That's it.
Note: Make sure that all files in NVActivityIndicatorView included in Compile Sources in Build Phases.
Note: If you encounter issues while uploading the app to iTunes Connect, remove the Info.plist file in NVActivityIndicatorView. Check issue #129 for more information.
This version requires Xcode 10.1 and Swift 4.2.
This version requires Xcode 9.0 and Swift 4.
This version splits NVActivityIndicatorView pod to 2 subpods NVActivityIndicatorView/Presenter and NVActivityIndicatorView/AppExtension. There is no need to change pod NVActivityIndicatorView to pod NVActivityIndicatorView/Presenter since it will be installed by default if you use the main pod name.
However, if you want to use NVActivityIndicatorView in an app extension, use pod NVActivityIndicatorView/AppExtension instead.
Note: Related issue #119.
Firstly, import NVActivityIndicatorView.
import NVActivityIndicatorViewThen, there are two ways you can create NVActivityIndicatorView:
- By storyboard, changing class of any
UIViewtoNVActivityIndicatorView.
Note: Set Module to NVActivityIndicatorView.
- By code, using initializer. All parameters other than
frameare optional andNVActivityIndicatorView.DEFAULT_*are used as default values.
NVActivityIndicatorView(frame: frame, type: type, color: color, padding: padding)Start animating.
activityIndicatorView.startAnimating()Stop animating.
activityIndicatorView.stopAnimating()Determine if it is animating.
animating = activityIndicatorView.isAnimatingIn storyboard, you can change all properties in Attributes inspector tab of Utilities panel.
Note: Use one of values (case-insensitive) in Animation types for Type Name.
All properties are public so you can change them after initializing.
Note: All changes must be made before calling startAnimating().
By conforming NVActivityIndicatorViewable protocol, you can use NVActivityIndicatorView as UI blocker for UIViewController.
class ViewController: UIViewController, NVActivityIndicatorViewable { }Start animating.
startAnimating(size, message) // plus other parameters as in initializer.Stop animating.
stopAnimating()Check if it is animating.
animating = isAnimatingOr you can use NVActivityIndicatorPresenter to display UI blocker anywhere.
Start animating.
let activityData = ActivityData()

NVActivityIndicatorPresenter.sharedInstance.startAnimating(activityData)
Note: Check documentation for detail of ActivityData.
Stop animating.
NVActivityIndicatorPresenter.sharedInstance.stopAnimating()Change message.
NVActivityIndicatorPresenter.sharedInstance.setMessage("Done")Check if it is animating.
animating = NVActivityIndicatorPresenter.sharedInstance.isAnimatingYou have control over showing and hiding UI blocker animation.
startAnimating(fadeInAnimation: fadeInAnimation)
stopAnimating(fadeOutAnimation)
Check DEFAULT_FADE_IN_ANIMATION and DEFAULT_FADE_OUT_ANIMATION for examples of how to implement animation.
Thanks Connor Atherton for great loaders and Danil Gontovnik for kick-start.
The MIT License (MIT)
Copyright (c) 2016 Vinh Nguyen @ninjaprox


