This repository gives you everything to deploy your own (basic) image resizing service based on Azure Functions and Azure Blob Storage.
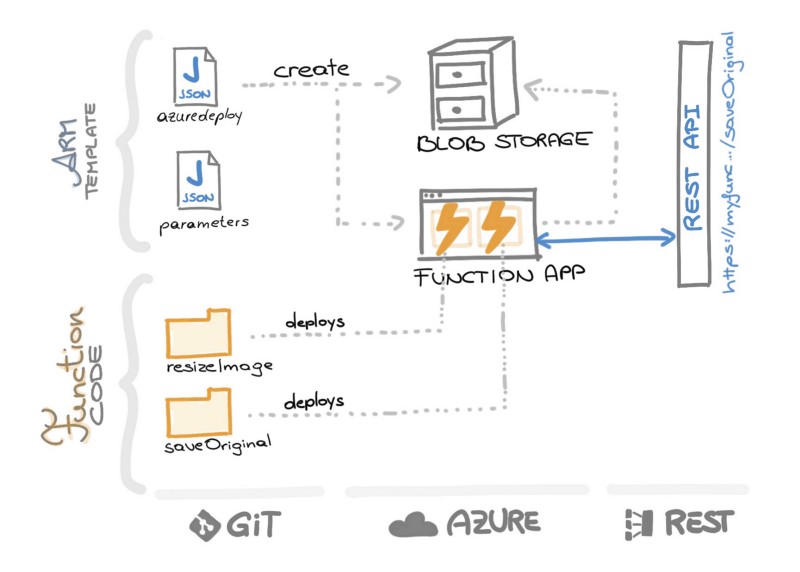
You have three options how you want to deploy the service. The easiest way is to press the button above. The other two options need a bit more knowledge of Azure CLI or PowerShell - so chose the weapon you feel most comfortable with. What happens during the deployment is shown by this neat illustration :)
Just click the "Deploy to Azure" button.
If you haven't already installed the Azure CLI, you download the installable here: Azure CLI download
-
Chose a name for your service Change "storageAccountName" in the parameter.json file to a value that fits for you. This will be the name for your services and must be unique. If the deployment fails, the error message might indicate that your chosen name was not unique.
-
Open a terminal or command line
-
Login to Azure Follow the install instructions
azure login
-
Create a new Resource Group Be aware that this name needs to be unique within your subscription.
azure group create -n ResizingFunctionGroup -l "West Europe"
-
Deploy the ARM template to the resource group
azure group deployment create -f azuredeploy.json -e parameters.json -g ResizingFunctionGroup -n MyARMDeployment
A detailed how-to can be find in this blog post with a lot of descriptive screenshots of the process Deployment of a mock server using Azure Functions
###Option 3: Use Powershell to deploy the ARM template
-
Login to Azure
Login-AzureRmAccount Select-AzureRmSubscription -SubscriptionID "your-subscription-id"
-
Create a new Resource Group
New-AzureRmResourceGroup -Name ResizingFunctionGroup -Location "West Europe"
-
Deploy ARM to Resource Group
New-AzureRmResourceGroupDeployment -ResourceGroupName ResizingFunctionGroup -TemplateFile "azuredeploy.json" -TemplateParameterFile "parameters.json"
##Usage After the deployment you will have an HTTP POST endpoint saveOriginal. Just add the URL parameter imgName and tell the service how your image shall be named. Then attach the file itself and post everything into the interwebsz :)
Your URL will look like this: https://theNameOfYourApp.azurewebsites.net/api/saveOriginal
- Request - URL parameters
- code = your code listed at the function as a very basic way of authentication
- imgName = the name of the file - and all its resizings - within the service
- Request - File attachment
- attach your image to the POST request
- Response
- [string, string] - a dictionary of URLs in the JSON format which contain all the generated resized versions of your uploaded image with the size as the key
Response example
{
 "original":"https://thumbfuncstorage.blob.core.windows.net/originals/mario/mario.jpeg",
 "200":"https://thumbfuncstorage.blob.core.windows.net/sized/200/mario/mario.jpeg",
 "100":"https://thumbfuncstorage.blob.core.windows.net/sized/100/mario/mario.jpeg",
 "80":"https://thumbfuncstorage.blob.core.windows.net/sized/80/mario/mario.jpeg",
 "64":"https://thumbfuncstorage.blob.core.windows.net/sized/64/mario/mario.jpeg",
 "48":"https://thumbfuncstorage.blob.core.windows.net/sized/48/mario/mario.jpeg",
 "24":"https://thumbfuncstorage.blob.core.windows.net/sized/24/mario/mario.jpeg"
 }
In the "background" the second deployed function will be called as soon as the blob service saved the original - and then the resized images are generated.
##WOW, a wild resizing service appeared
So this is it! Just those few steps and you have a ready to go resizing service! Nice one!
Have fun and share your feedback with me :)


