-
Notifications
You must be signed in to change notification settings - Fork 1
6. Sandboxed Logic
This is an alpha-preview of a secure execution environment for tenant-specific code in the Node.js version of CAP.
This functionality is experimental and not meant for productive use! The sandbox environment is delivered for interested stakeholders to evaluate the scope, security, and performance to provide feedback and additional requirements for continued development.
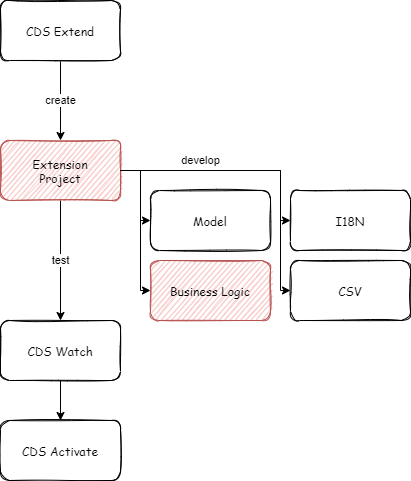
Upon enabling the sandboxed extension feature, the runtime is extended with an additional capability to execute tenant-specific custom code securely. The custom code is written as plain JavaScript files and completely embedded as part of the CAP extension project.

The developer experience is very similar to writing regular CAP event handlers, the only difference is that each event handler requires an individual file and has to follow a strict naming convention. The deployment and execution of custom logic require the new MTX-S component and is intended for multi-tenant applications.
Enabling the sandbox in any CAP node.js project requires just the following switch to the application configuration package.json
"cds": {
    "requires": {...
      "extensibility": {
        "code": true
      }
    }
}
also, please add the following dependencies
"devDependencies": {
    ...,
    "escodegen": "*",
    "vm2": "*"
  },
For this example to work, we need to disable the MTX-Sidecar configuration by deleting the following line in the same file
"cds": {
    "profile": "with-mtx-sidecar"
  },
please stop the MTX sidecar (4005) and restart the application server (4004) for the changes to take effect
After making the above-noted changes to package.json, a developer can immediately start testing the code execution sandbox using cds watch. Since this setup now runs completely in memory, please make sure to subscribe to a tenant and push the extension every time you restart the application server using.
cds subscribe t1 --to http://localhost:4004 -u alice
cds push --to http://localhost:4004 -u alice
Note that we are now communicating via the application server port 4004 since no sidecar is running anymore.
By adding a file with the name IncidentsService.Incidents-after-READ.js in the srv/handlers folder, the runtime will be able to find and embed the code at runtime for the READ event of the Books entity.
Every event handler should follow the same pattern of exposing exactly one callable async function to the outside world. The easiest method is to create a self-invoking function using the pattern
;(async function () {
  // your code here
})()
but other methods like module.exports will also work.
For the Incidents entity, a valid event handler would look like this:
;(async function () {
    const result_ = Array.isArray(req.results) ? req.results : [req.results]
    for (const row of result_) {
      row.component = " Custom Handler here"
    }
  })()
Note the first line of the event handler. In the read case, req.results can either be an array when multiple rows are read or an object if only a single row is read. This line helps application developers to treat the result always as an array. This is subject to change in the future.
Developers can create custom logic for:
| When | What | Scope |
|---|---|---|
| Before | Create, Update, Delete | Request Payload, Response |
| After | Read | Response |
| On | Event | Inbound Interface |
| On | Bound/Unbound Action and Function | Inbound Interface, Response |
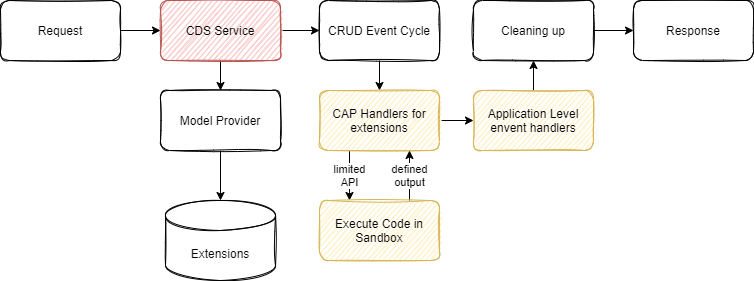
Sandboxed code is executed first in the event loop, and another framework or application-level code is executed after, allowing application developers to inspect or mitigate customer-level coding effects.

The available API within custom handlers is limited to a subset of the req object and contains
data: req.data,
params: req.params,
results: req.results,
messages: req.messages,
errors: req.errors
and the ability to call the req.reject(...) method.
The req object is available to the extension developer within the environment and doesn't need and require statement or initialization. Throwing errors within custom code is not possible. Instead, developers should either call the req.reject(...) method or push a message to the req.errors array. Developers are free to manipulate the req.data and req.results arrays but should be aware that adding attributes beyond the application model will be ignored by the framework and won't appear in subsequent processing.
In addition, developers can asynchronously call SELECT, INSERT, UPDATE, DELETE, and UPSERT on service level with authorization enforced on request-user level. Calls to database entities will be rejected with an error message.
A more complex example would be to display the customer's e-mail directly in the Incidents list. We also want to display a useful default for the component if there is no one selected yet. You need to extend the data model first with
extend Incidents with {
  virtual customerEmail: String @title: 'Customer Email';
}
This virtual element will be filled at runtime in the handler IncidentsService.Incidents-after-READ.js.js
;(async function () {
    const result_ = Array.isArray(req.results) ? req.results : [req.results]
    for (let r of result_) {
        try {
            const { email } = await SELECT.one`email`.from`Customers`.where`ID = ${r.customer.ID}`
            r.customerEmail = email
        }
          catch {r.customerEmail = "" }

      if (r.component === undefined || r.component == null) {r.component = 'Not yet defined!'}
    }
  })()
The core of this function is the for of loop. We can operate on the req.results object like in normal application-level event handlers. The SELECT statement operates on the application service level, meaning the before READ handler for Customers - if any is present - will also be executed.
Keep in mind that adding a query on incidents in the customer read handler would create a recursive loop and would lead to the request timing out. When querying data, be aware that custom event handlers cannot throw or raise their own errors. So you must embed queries in try / catch statements to prevent your code from aborting without a meaningful error message.
To ensure secure handling, the sandbox environment is decoupled from the runtime through a limited API, and the code is scanned before deployment/activation for potentially harmful or resource-consuming constructs. Code scanning is always applied within the MTX-S component before activating and checks for the following constructs
| What | Description | Mitigation |
|---|---|---|
| Globals | The globals Object, Reflect, Symbol, Proxy, global, globalThis cannot be accessed within the sandbox. Any usage will be rejected at deployment time | Extension Developers need to simply live with this limitation |
| Require | Is it not possible to require any library beyond the limited API provided inline to the sandbox | |
| Console | I/O information anywhere is completely prohibited, including the console |
req.messages can be used to output information in a limited fashion |
| Object properties | access to prototype or __proto__ is also completely prohibited to ensure no potential backdoor is kept open |
|
| Asynchronous calls |
await is prohibited generally - except for the data access API SELECT, INSERT, UPDATE, DELETE, UPSERT where it is actually required |
We have yet to see a valid use case for asynchronous calls within the sandbox when I/O is generally disallowed. Helper functions and system libraries can be called synchronously |
| Throw Statement | No errors can be thrown within the sandbox | Either call req.reject or push a message to the req.errors array |
| New Expression | New objects cannot be created within the sandbox | Variables, including arrays and structured objects can still be declared. Together with helper functions, these should adequately fulfull developer needs in this limited sandbox |
| Non-functional loops | Due to the potential for endless loops, non-functional statements are forbidden. So for, and while are all rejected |
Use the map, for of or for each constructs as functional replacements |
| Spread Syntax | Spread Syntax is an easy way to create memory leaks and is disallowed | |
| Generator Functions | Generator functions and yield may also be used to create malicius code by sneaking object creation and constructors into the sandbox |
|
| Debugger Statement | In local single-tenancy mode, debugging the sandbox is allowed and supported through the debugger keyword within custom code. When deploying to a multi-tenant application, debugger statements pose a serious performance and security risk and are prohibited |
Remove debugger statements before activating custom code |
| Direct Array Member Access | Directly accessing array members using [ ] is strictly forbiden. |
The map function can be used to loop through the whole array and the at() function to access single members by index |
Within an extension project, an extension developers needs to create a new folder srv\handlers and create new files according to a naming convention. Event handlers are registered based on Service Entity, Event Type and Event Timing:
Servicename.Entity-When-What.js
Servicename is the fully qualified service name within the application
Entity is optional. When registering a CRUD handler or a bound action, then the Entity name must be specified. For unbound actions and application level events, only the service name should be specified
When refers to the implementation hook. For CUD events, it should be before, for read events after and for actions and events on
What would specify the name of the event. Framework events are CREATE, UPDATE, DELETE, READ. Application Level Events and Actions are called as defined in the model.
All parameters are case sensitive and application level events as well as event and action signatures need to be statically defined in the model
Code extensibility is also reflected in the extension allow list:
"cds": {
    "requires": {...
      "cds.xt.ExtensibilityService": {
        "namespace-blocklist": "com.sap.",
        "extension-allowlist": [
          {
            "for": ["ServiceName"],
            "kind": "entity",
            "new-fields": 0,
            "code" : ["CREATE", "READ", "UPDATE", "DELETE", "action", "function"]  // bound actions and functions
          },
          {
            "for": ["ServiceName.EntityName"],
            "kind": "entity",
            "code" : ["READ"]
          },
          {
            "for": ["ServiceName"],
            "kind": "service",
            "new-entities": 1,
            "code" : ["action", "function"] // unbound actions and functions
          }
        ]
      }
    }
}So in this final exercise, we created some business logic and added them to an extension project. This was a small sneak preview of exiting things to still come from the CAP development team in the future-
Go on to the final summary section of this hands-on walkthrough.