-
Notifications
You must be signed in to change notification settings - Fork 80
Home
Destiny is a tools which restructure your files and folders following specific rules. In shorter words: Prettier for files structure.
Destiny follows the fractal tree concept to structure your files and folders.

Each branch is a file depending on its sub branches (sub branches which are dependencies/files). Because each branch of this tree has the ability to extends to the infinity, your project's files structure too.
Let's dive in some examples.
If a file has a dependency, Destiny will move this dependency in a folder with the same name as the file.
If we look at the following file tree:
src
├── index
│   ├── header.js
│   └── footer.js
└── index.js
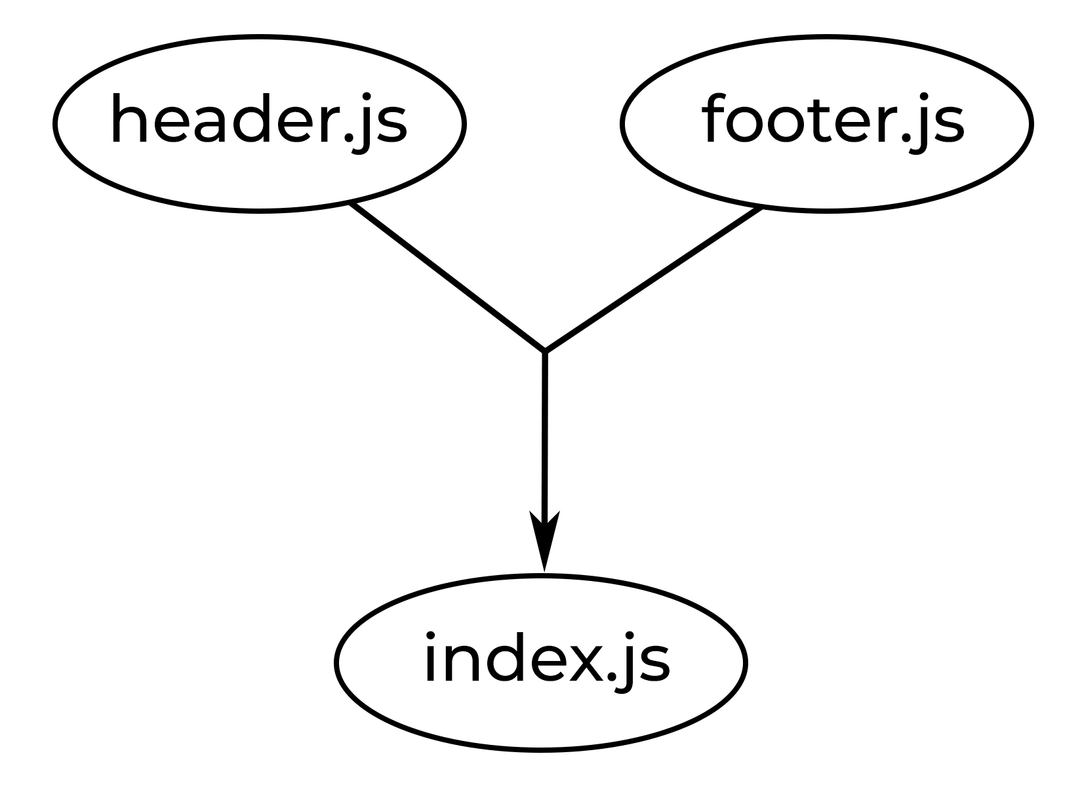
We can see that index.js has two dependencies, header.js and footer.js because they are in the index/ folder.
Here is the dependency graph:

We can already see the base of the fractal tree in the graph.
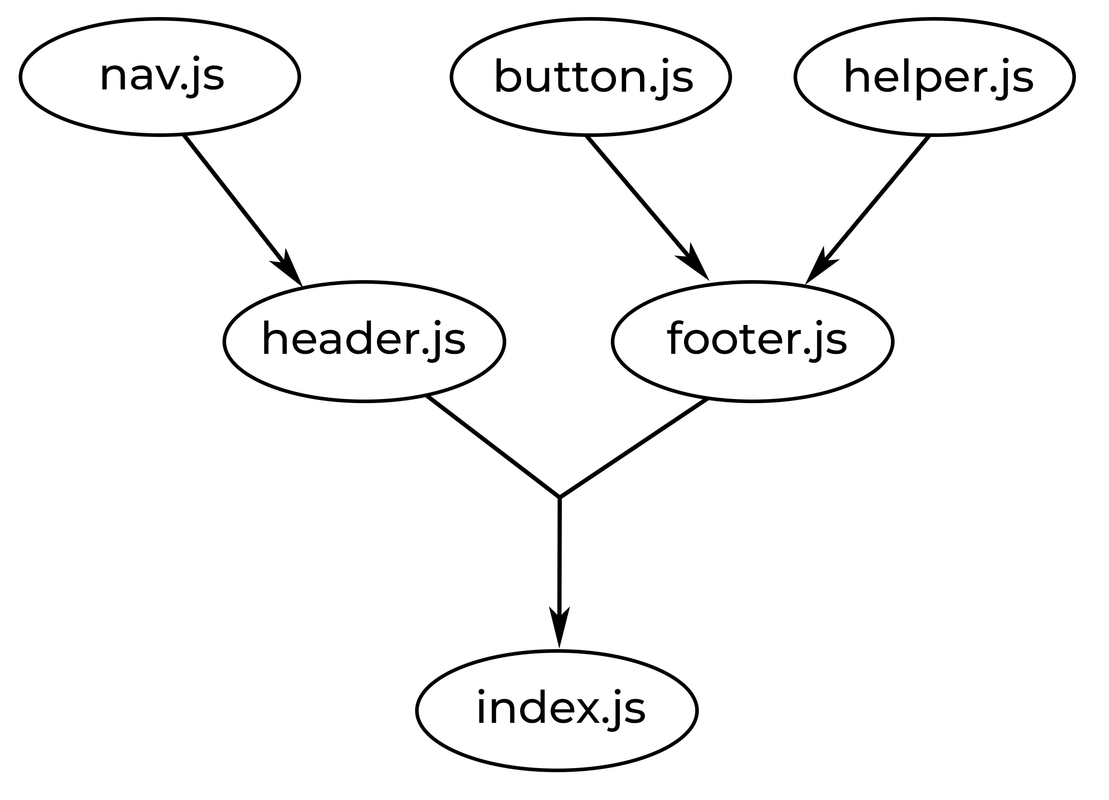
If header.js and footer.js has depedencies, they are going to be moved in a sub folder of index/.
src
├── index
│   ├── header
│   │   └── nav.js
│   ├── footer
│   │   ├── helper.js
│   │   └── button.js
│   ├── header.js
│   └── footer.js
└── index.js

Here we can really see the tree.
Note: if you want Destiny to disallow directories with a single file (like
nav.jsin the above tree), you can use the--avoid-single-file/-Sflag.
-S, --avoid-single-file | Indicate to Destiny if single files in folders should be avoided.
If we take this example again:
src
├── index
│   ├── header.js
│   └── footer.js
└── index.js
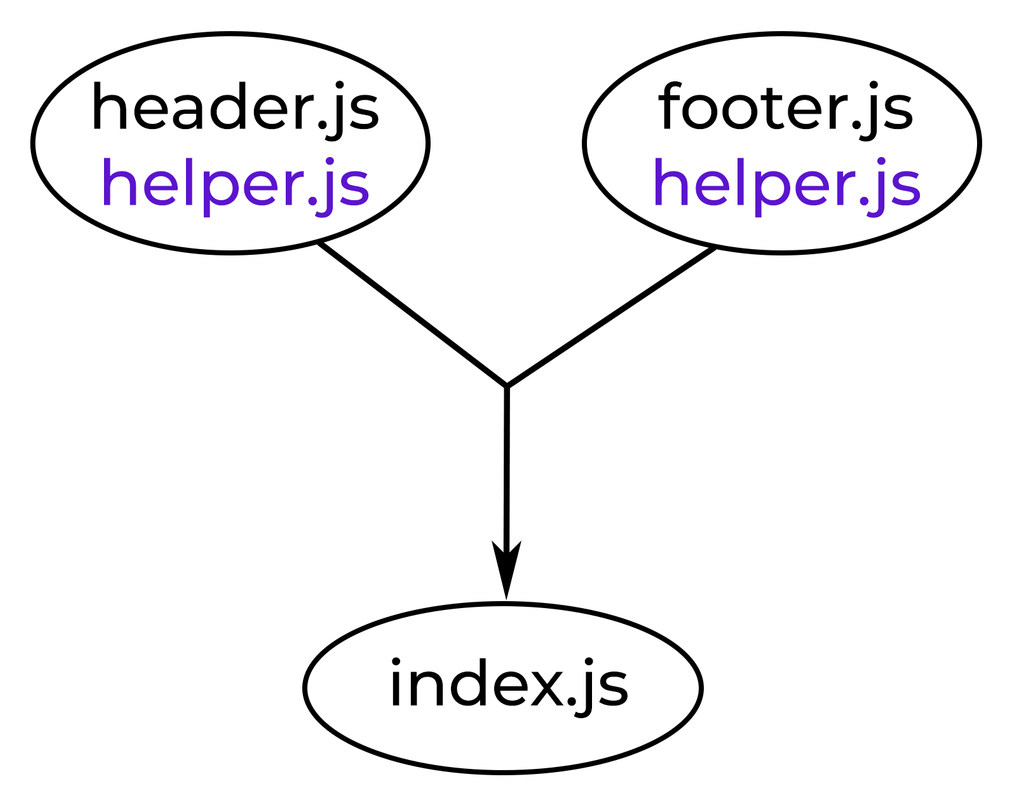
What if header.js and footer.js, both need a file called helper.js? Well, Destiny is going to put it in a shared/ folder in the index/ folder.
src
├── index
│   ├── shared
│   │   └── helper.js
│   ├── header.js
│   └── footer.js
└── index.js

Because it's kind of hard to represent shared dependencies in the tree, we will simply represent them as purple file name under files that needs them.
One thing that doesn't show the tree is, where the shared/ folder is located. The shared/ folder will always be placed beside the highest file that's needing its dependency(ies).
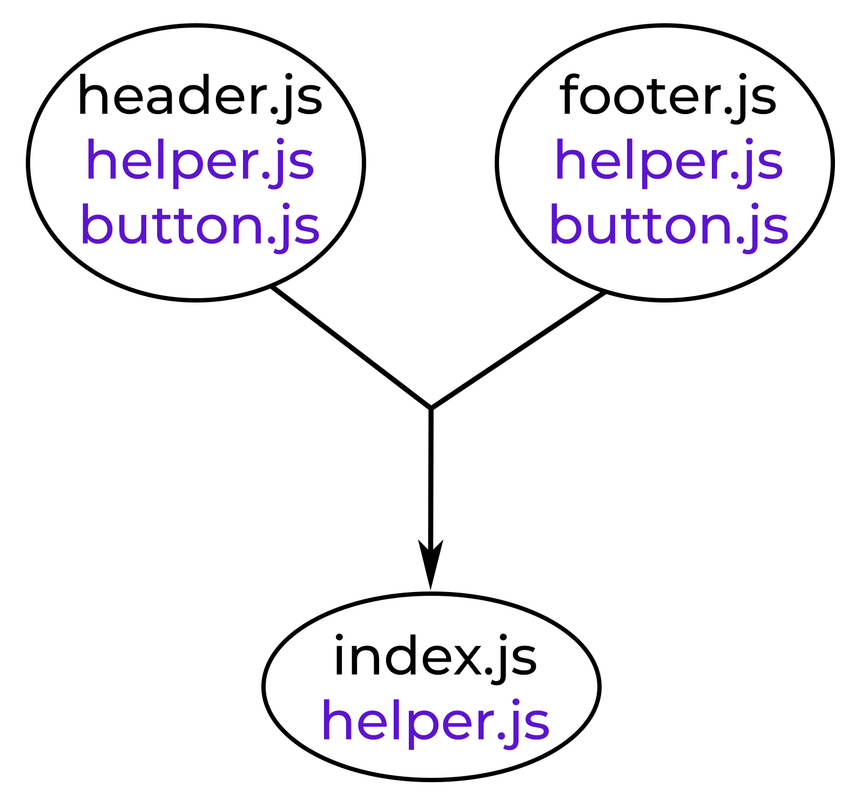
For example, if index.js is also dependent of helper.js, shared/ will be placed beside index.js.
src
├── index
│   ├── header.js
│   └── footer.js
├── shared
│   └── helper.js
└── index.js
But if header.js and footer.js are also dependent on another file - let's call it button.js - it will not be placed in the shared/ folder since it isn't needed by index.js. It will be placed in a new index/shared/ folder because the shared dependencies are always placed in a shared/ folder which is located beside the highest dependent file (or the shared parent if dependent files are nested).
src
├── index
│   ├── shared
│   │   └── button.js
│   ├── header.js
│   └── footer.js
├── shared
│   └── helper.js
└── index.js

You should now understand the core concept of a fractal files structure. Feel free to dive in the below Getting started to try Destiny your self.
There is multiple ways to use Desinty, the following sections should cover most use cases.
Note: If you want to give a first glance at Destiny we recommend you to use npx instead of installing Destiny as a global package.
To do so: if you have
npm5.2.0 or superior npx should be installed by default. If you don't you can simply runnpm i -g npxto install npx. Then skip the following "To install Destiny globaly..." section and prefixdestinywithnpxwhen you want to run Destiny. For example:npx destiny --help.
To install Destiny globaly, you can run:
npm i -g destiny
Once this is done you can test your install with:
destiny --help
Now, to try Destiny on your own project simply run the following:
destiny <path to source files>

# example
destiny ./src
This will return you a tree of your files. This tree represents how Destiny wants to move your files. But non of your files has be changed by now.
To apply changes you need to use the --write or -w.
destiny <path to source files> --write

# example
destiny ./src --write
To see more options you can dive in the API section of the documentation.
This is the way we recommend if you want to set a workflow with your team on a collaborative project. It is exactly as you would do with tools like ESLint and Prettier.
First of all, install Destiny on your project with your favorite package manager. We will use Yarn:
yarn add -D destiny
Then you can either use CLI flags, use a config file, or both. We do recommend you to run Destiny as a script in your package.json anyway.
To setup a config file you can do the following ways:
- a
destinyproperty inpackage.json - a
.destinyrcfile in JSON or YAML format - a
.destinyrc.json/.destinyrc.yaml/.destinyrc.ymlfile - a
destiny.config.js/.destinyrc.jsfile exporting a JS object
Then Destiny will automatically take in count the options gave in your config file.
You can see available options in the API section of the documentation.
Path(s) that Destiny have to prettify. You can give multiples paths in the cli by splitting them with spaces (destiny first/path second/path). Destiny also support globbing patterns destiny ./src/**/*.{js, ts}.
-
CLI:
<path> -
Config file property:
include(string[])
Tell Destiny to write changes that he propose you by default in the file tree.
-
CLI:
--write/-w -
Config file property:
write(boolean)
Indicate to Destiny if single files in folders should be avoided.
-
CLI:
--avoid-single-file/-S -
Config file property:
avoidSingleFile(boolean)
Print debugging information.
-
CLI:
--debug -
Config file property:
debug(boolean)