is a tool to manage applications within Kubernetes. You can easily deploy charts with your application information, allowing them to be up and preconfigured in minutes within your Kubernetes environment. When you’re learning something new, it’s always helpful to look at chart examples to see how they are used, so if you have time, take a look at these stable charts. In a Helm-deployed application, list provides details about an application’s current release. Running the basic list command always brings up the default namespace. Since I don’t have anything deployed in the default namespace, nothing shows up:
$ helm list
NAME    NAMESPACE    REVISION    UPDATED    STATUS    CHART    APP VERSION
So, let start from basics that how we can create charts, templates and variables. In kuberentes, we need to write tons of code to deploy a single app and you wanted to change something in the version then you need to rescale the pods with the latest image. So, it’s looks like much complicated. So, here helm gives you an easy way to deploy the apps with single click also if you wanted to change the version with the latest update or if you wanted take your app with the previous version then you can simply rollback the resources. So helm gives also this facility so you can change the app’s image version dynamically.
So, to manage this kind of resources dynamically, helms tell you to create a chart. Helm uses a packaging format called charts. A chart is a collection of files that describe a related set of Kubernetes resources. A single chart might be used to deploy something simple, like a memcached pod, or something complex, like a full web app stack with HTTP servers, databases, caches, and so on. Templates generate manifest files, which are YAML-formatted resource descriptions that Kubernetes can understand.
Charts file consists of the version and resource type of the kubernetes you wanted to use. The directory in which chart lies is known as package. So, create a directory mkdir myapp and inside that create a file named Chart.yaml ensure C is capital and its yaml.
apiVersion: v1
name: myapp
version: 0.1
appVersion: 1.1
decription: "This is my first app"
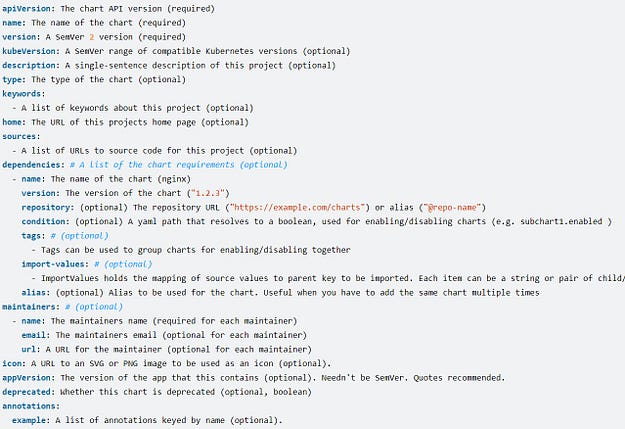
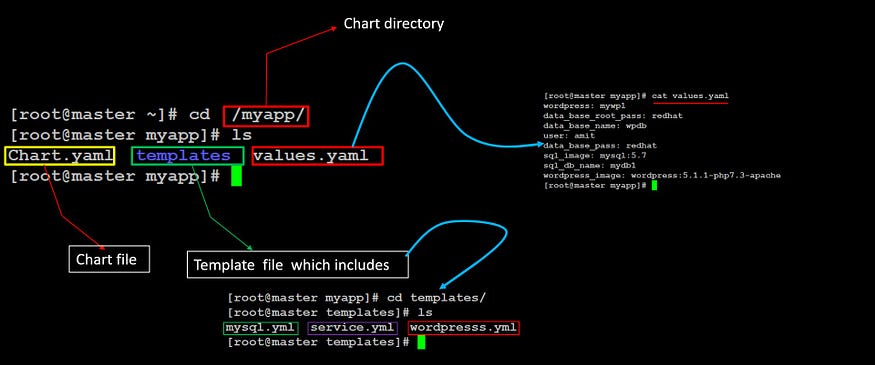
For more options in charts file you can check this below page and can add more options for more understanding. Visit here for more options. So, take a loot at below image you will get to know the flow of helm infrastructure.
As you can see that i have created a directory named “myapp” and inside that we need to create respective folders like “Chart.yaml”, “values.yaml” and a template folder which will consists of launching wordpress app and mysql database and to expose the wordpress press we need to use service.yml file. Below are the codes of template folder.
You can use this command to create a code of the wordpress file.
kubectl run mywp1 --image=wordpress:5.1.1-php7.3-apache --dry-run -o yaml > wordpress.yml
This above code will create a file named wordpress.yml and it will launch a wordpress application.
apiVersion: v1
kind: Pod
metadata:
  creationTimestamp: null
  labels:
    run: {{ .Values.wordpress }}
  name: {{ .Values.wordpress }}
spec:
  containers:
  - image: {{ .Values.wordpress_image }}
    name: {{ .Values.wordpress }}
    resources: {}
  dnsPolicy: ClusterFirst
  restartPolicy: Always
status: {}
kubectl run mydb1 --image= mysql:5.7 --dry-run -o yaml > mysql.yml
This above code will create a file named mysql.yml and it will launch a mysql database.
apiVersion: v1
kind: Pod
metadata:
  creationTimestamp: null
  labels:
    run: mydb1
  name: mydb1
spec:
  containers:
  - env:
    - name: MYSQL_ROOT_PASSWORD
      value: {{ .Values.data_base_root_pass }}
    - name: MYSQL_DATABASE
      value: {{ .Values.data_base_name }}
    - name: MYSQL_USER
      value: {{ .Values.user }}
    - name: MYSQL_PASSWORD
      value: {{ .Values.data_base_pass }}
    image: {{ .Values.sql_image }}
    name: {{ .Values.sql_db_name }}
    resources: {}
  dnsPolicy: ClusterFirst
  restartPolicy: Always
status: {}
kubectl expose pod mywp1 --type=NodePort --port=80 --dry-run -o yaml > service.yml
This above code will create a file named service.yml and it will expose the wordpress application.
apiVersion: v1
kind: Service
metadata:
  creationTimestamp: null
  labels:
    app: mywp1
    app.kubernetes.io/managed-by: Helm
  name: {{ .Values.wordpress }}
spec:
  ports:
  - port: 80
    protocol: TCP
    targetPort: 80
  selector:
    app: myd
  type: NodePort
status:
  loadBalancer: {}
This below code is the variables which i have used in wordpress.yml and mysql.yml file.
wordpress: mywp1
data_base_root_pass: redhat
data_base_name: wpdb
user: amit
data_base_pass: redhat
sql_image: mysql:5.7
sql_db_name: mydb1
wordpress_image: wordpress:5.1.1-php7.3-apache
So, now all is set we can now proceed further. Now we have to create a app. So helm will launch all the resources.
helm install myapp  myapp/

Here myapp → name of the app

myapp/ → Name of the folder in which Chart.yaml, template, values.yaml file exists
As you can see that the application has been deployed. Now we can check the wordpress application. you (node on which wordpress is deployed) public ip with exposed port.
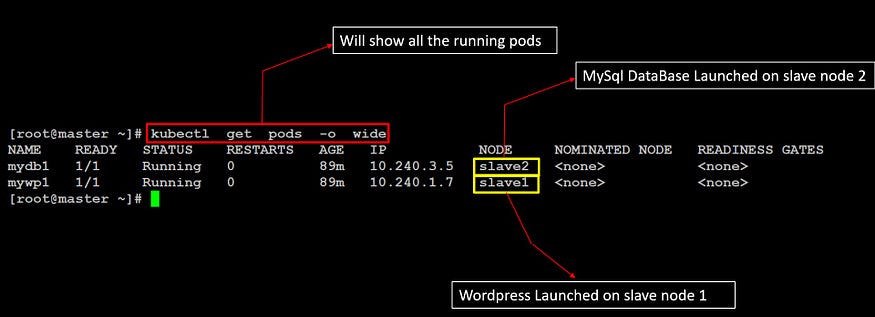
As you can see that the application has been deployed. You can check the list of helm you have using helm list command. Now we can check the the pods in which slave are running in the kubernetes cluster.
kubectl get pods -o wide
So as you can see that, wordpress application is launched in slave1 and mysql database is launched in slave2 node in the kubernetes cluster.
For Creating K8S Cluster 🎡🎡 Vist here
Below Gif will give you an idea about what we have done till now.
If you wanted to install helm on redhat then click here.


