-
Notifications
You must be signed in to change notification settings - Fork 19
Search Features Walkthrough
When opening Unity 21.1 you might have had a small surprise: a new button on the main menu bar.

This button is your portal to the new Search workflow. For the small history there was once a package named QuickSearch. This package was appreciated by a lot of users but being a package made it more difficult to discover. Lo and behold, QuickSearch package is dead and long live the new core Search workflow! Joke aside, QuickSearch package still works for version 20.3 but starting with 21.1 Search has become a core workflow that will be integral to your editor experience.
Public Service Announcement: The Search Workflow is really visual. And as they say: an image is worth a thousand words. So in this blog post I made liberal use of images and gifs. You have been warned.
There are multiple ways of opening the new Search Window. The button in the main toolbar is your main access. But you should train your muscle memory for the new Ctrl + K shortcut! Feel free to reassign this shortcut to your preferred key combinations using the Shortcut Manager. Also, notice that we added multiple Search related actions that can start the Search Window ready to search some specific type of items (assets, files, hierarchy and menus):
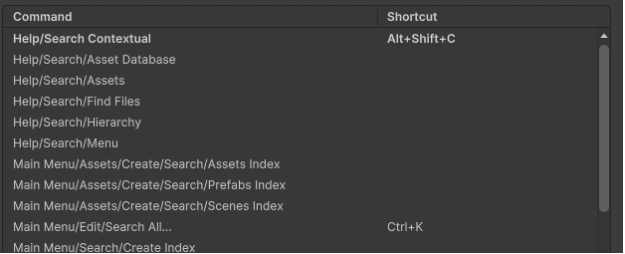
Our goal when we built QuickSearch and later the Search window was to create an accelerator that would help you get to your next task faster. Our vision was a user doing Ctrl + K, typing a few keystrokes then clicking on a filtered asset, gameobject or menu command. The Search Window would be your way of accessing any sort of items within the editor.
Here is an example of me looking to quickly open a scene:
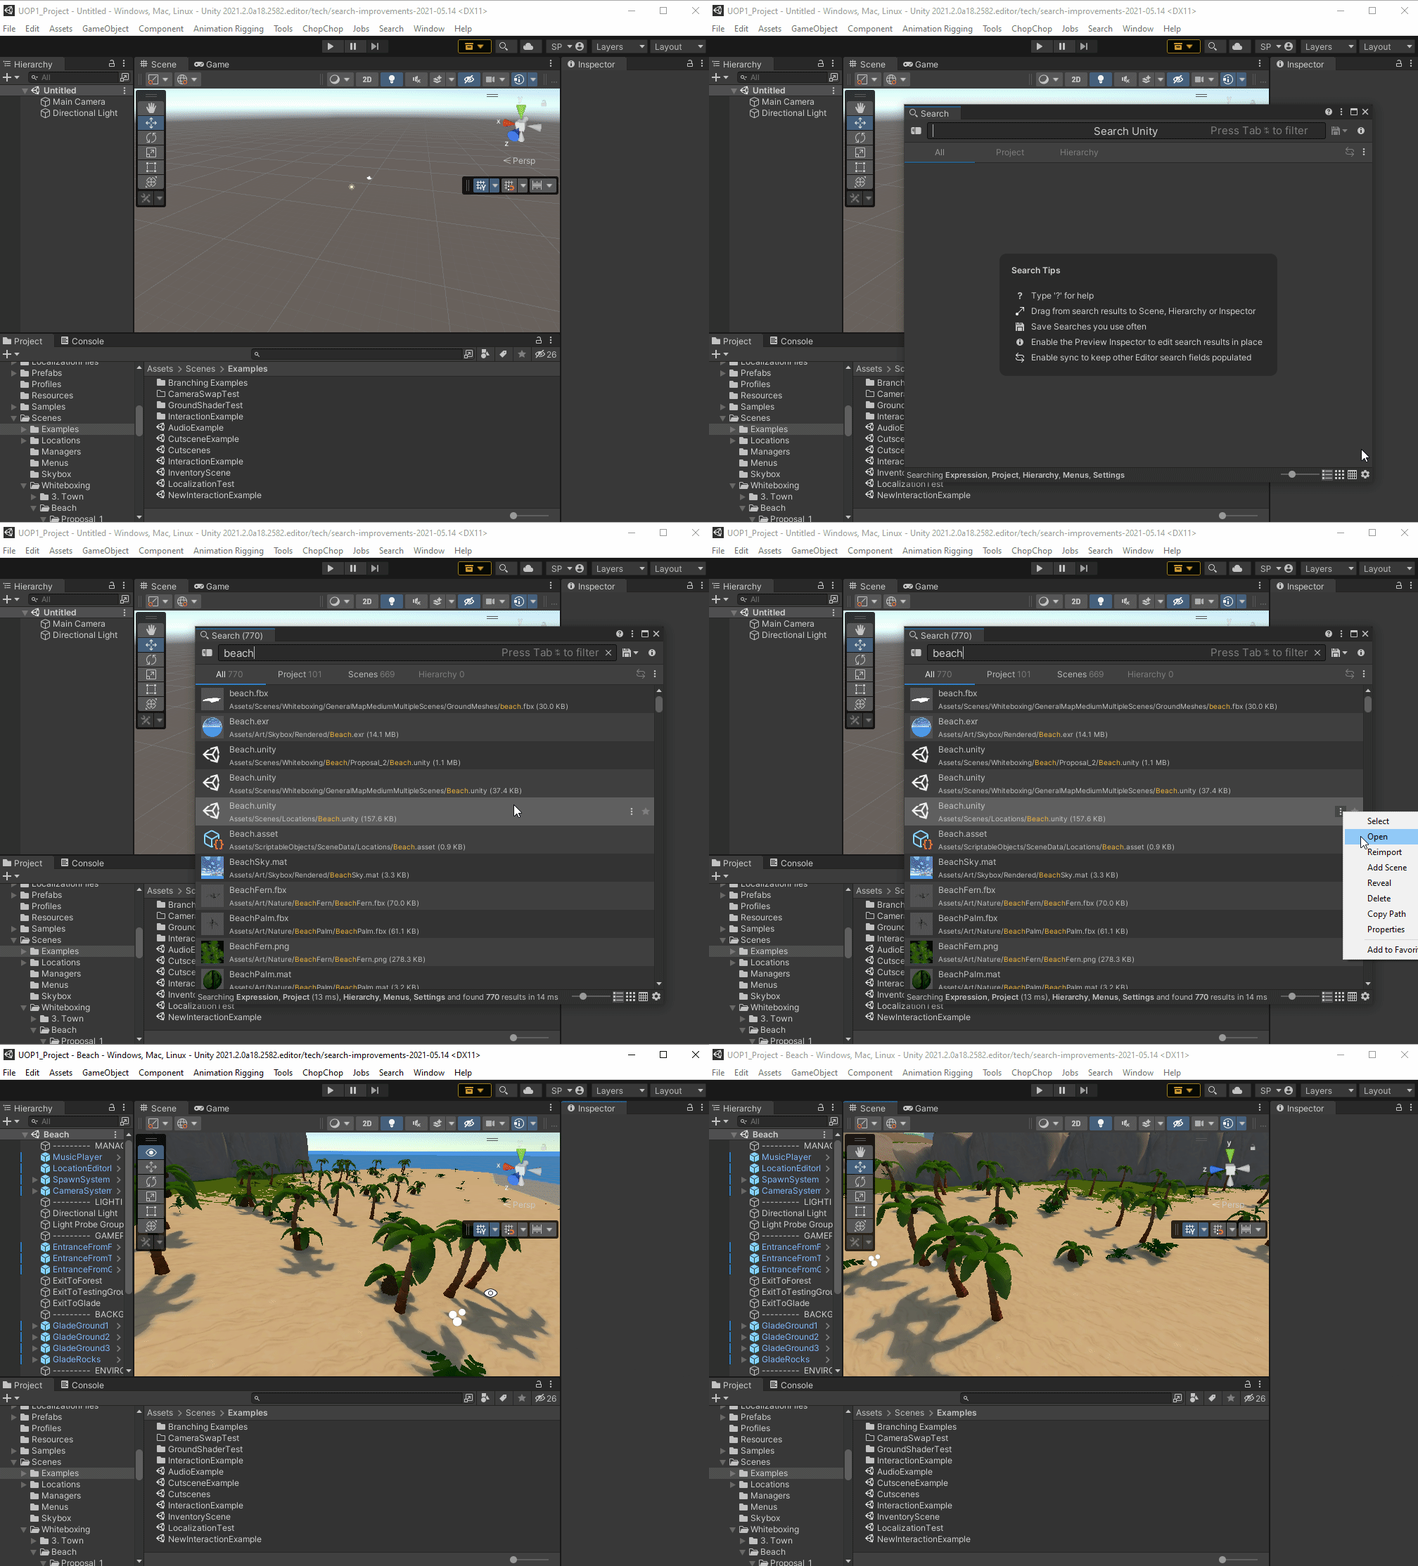
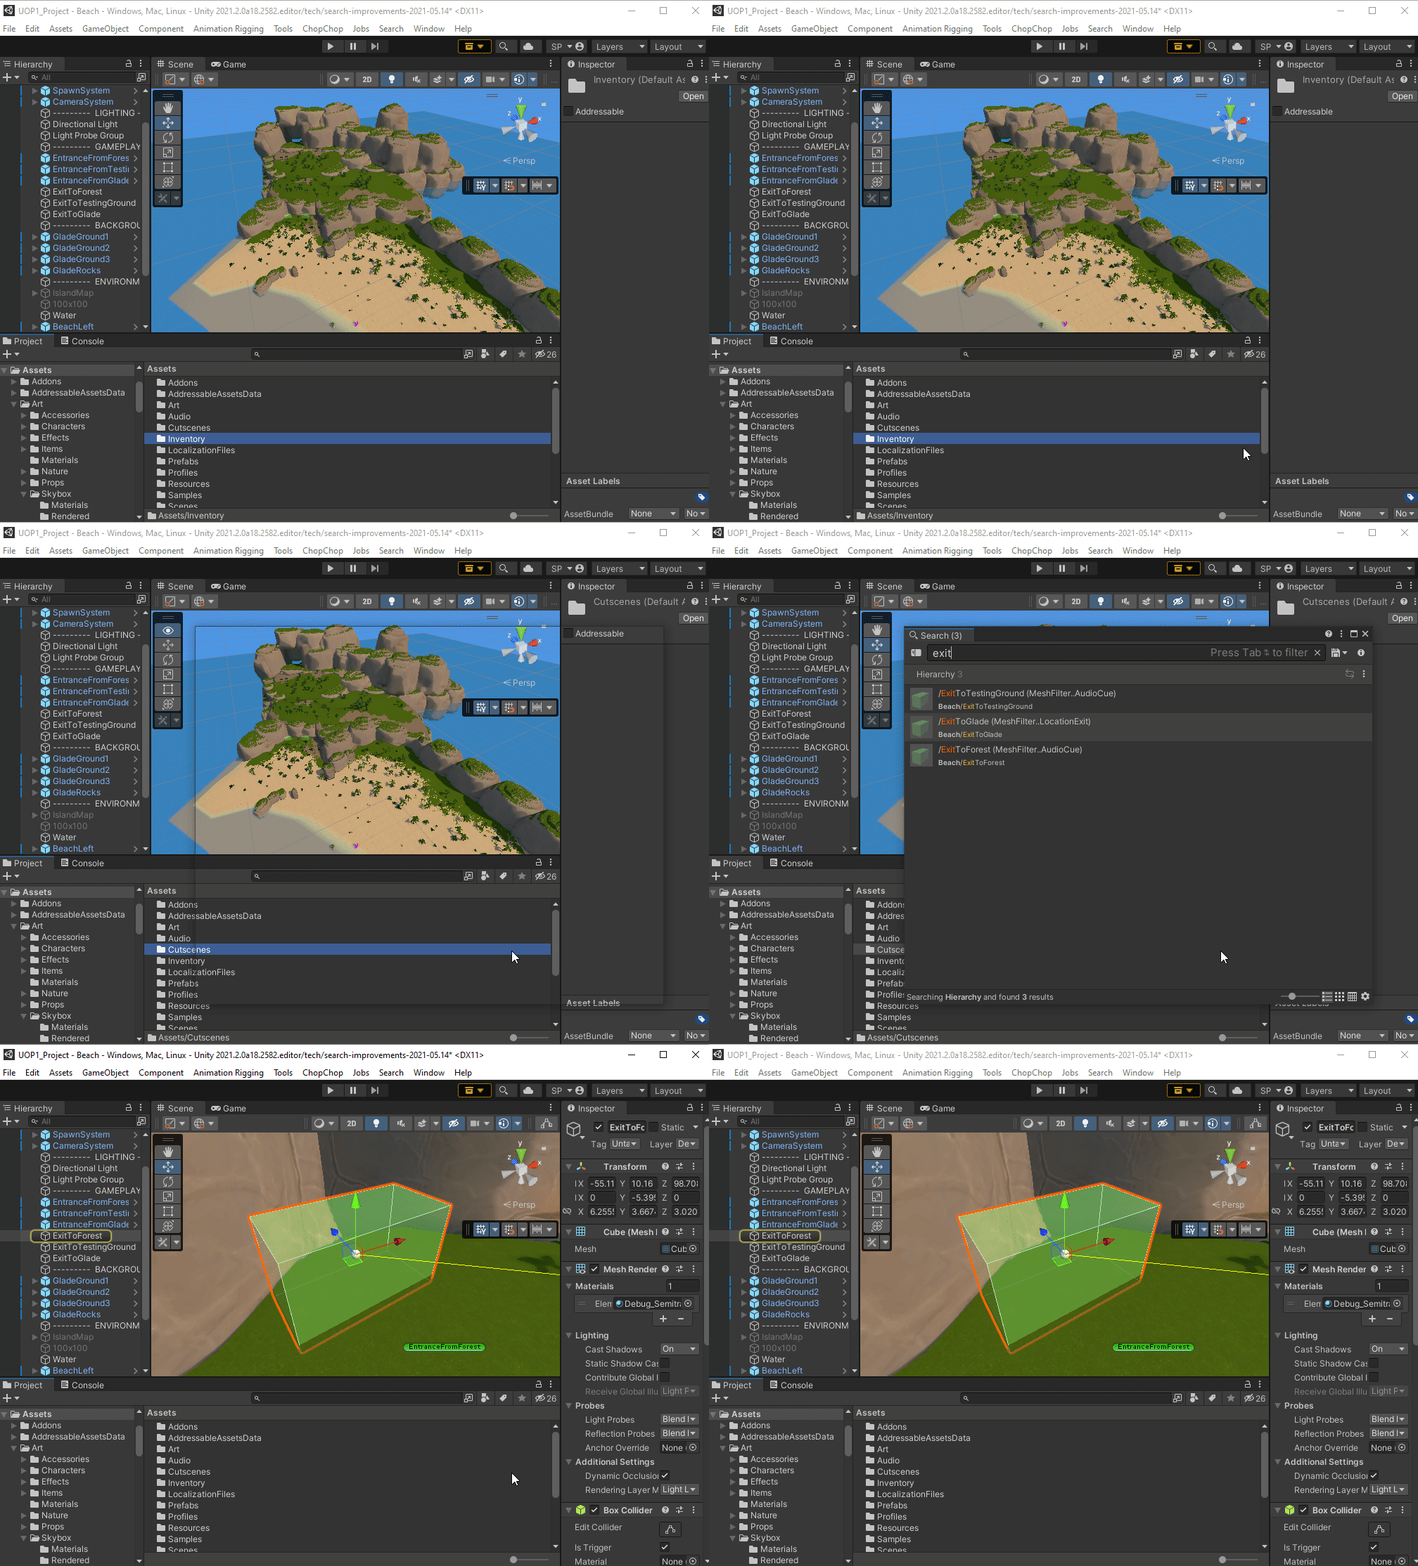
Here I want to find the Exit point of my scene. By memorizing a single shortcut I can search assets, gameobjects and much more.
When opening the Search Window, the first thing you will notice is the giant searchfield. Keyboard focus is put into the searchfield when the window pops up so you are ready to search. Each keystroke you type uses our SearchService to perform an asynchronous search. This asynchronicity is at the core of our Search APIs and ensures the UI is always responsive. When performing a query, each regular Search provider is getting asked to yield search items to populate the search window.
Those search items are available in the tabs underneath the search field. The “All” tab aggregates all search items regardless of their originating provider. Then each provider with results gets its own tab to allow easy categorization of search items.
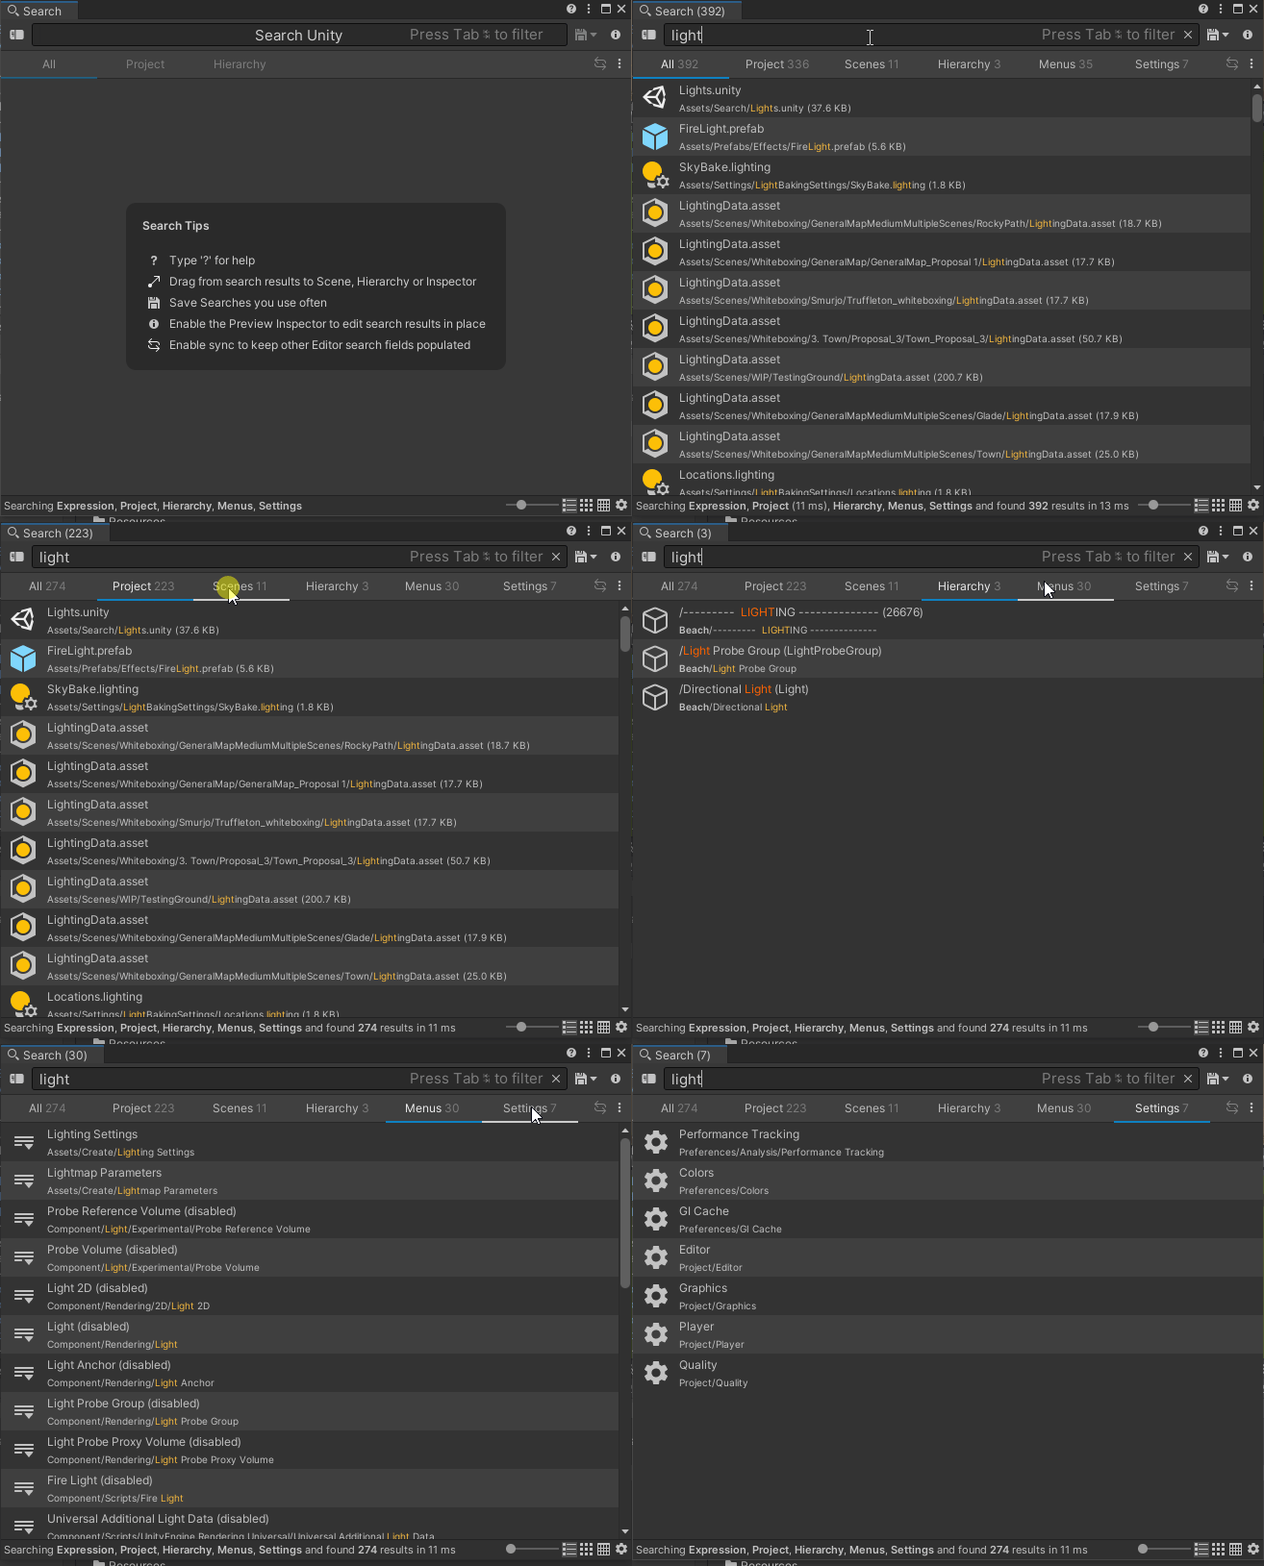
Note that you can quickly alternate between provider tabs using the shortcuts Alt + right/left arrow. We tried to make most of the workflows of Search be available through shortcuts to ensure you can be as efficient as possible when Searching.
The bulk of the Search window is occupied by a list (or grid) of Search Items. Those items have a label, a description and an icon (and some other properties that we will see later). You can right click on an item (or use the kebab menu) to access the list of SearchActions available for this item.
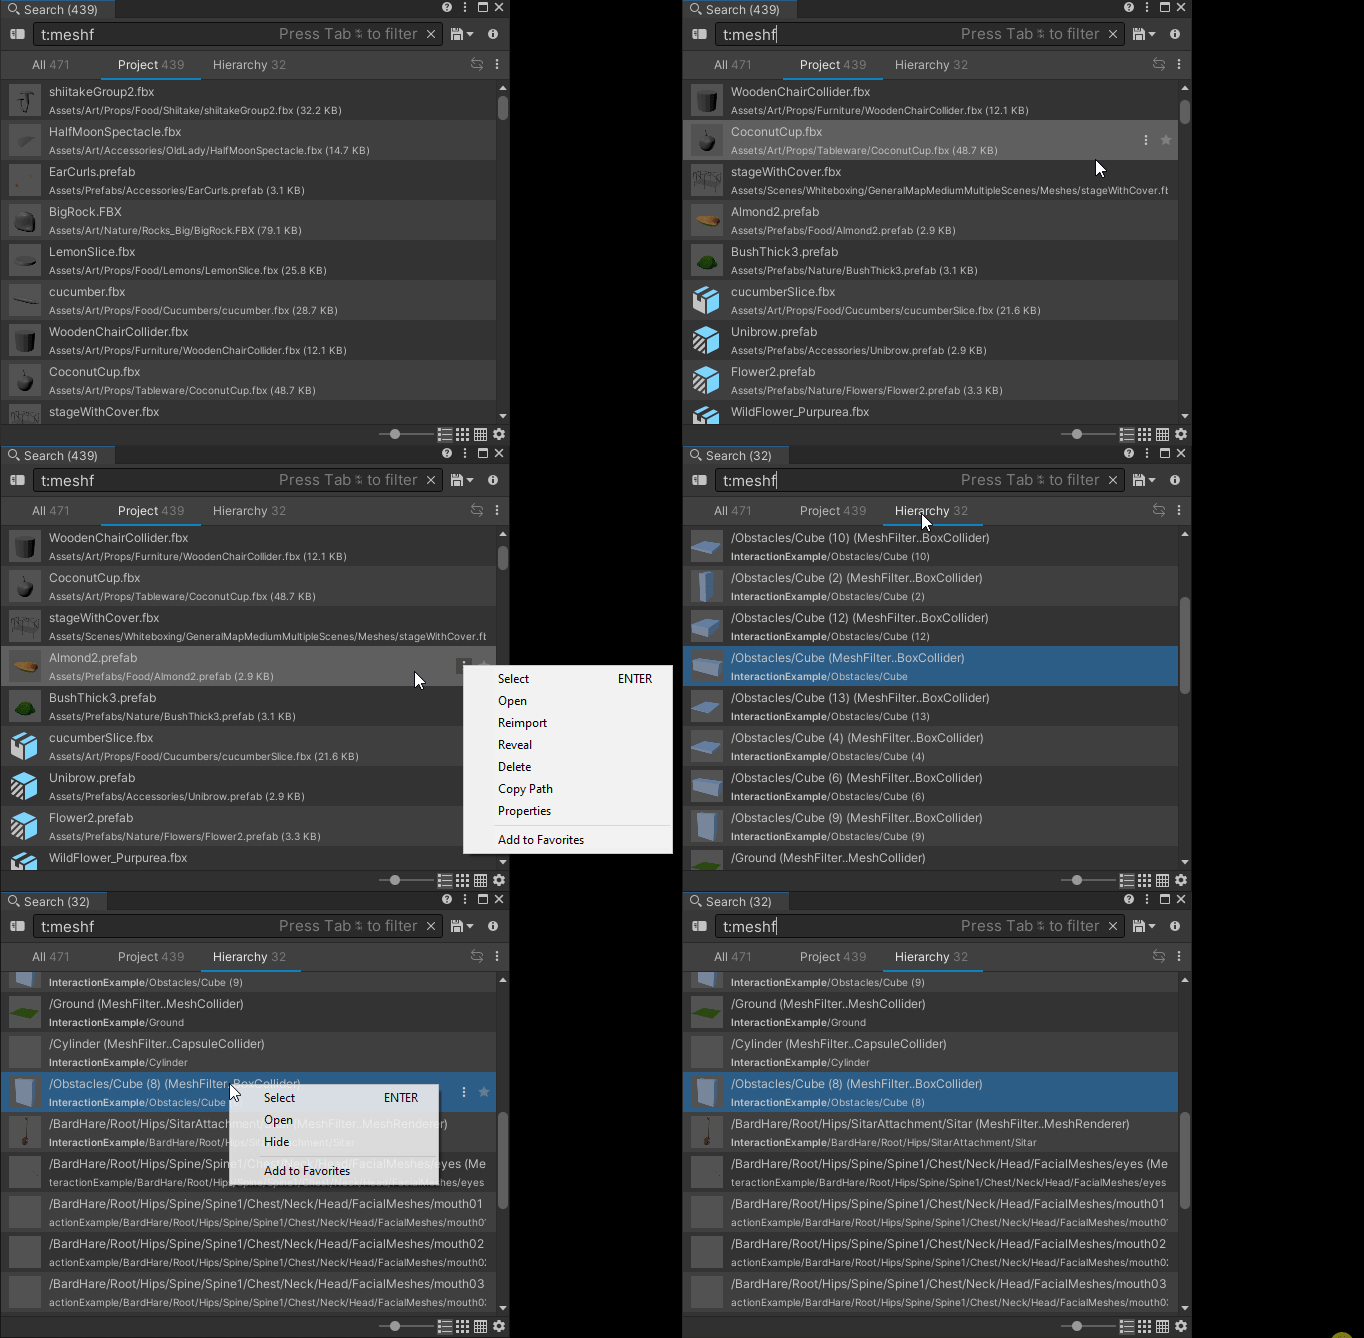
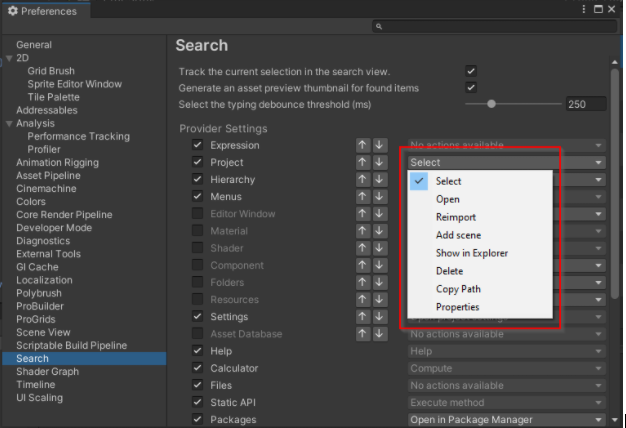
Each item has a default action that will be invoked when the item is double clicked or when you press enter while the item is selected. You can change the default actions for items of a specific provider in the Search Settings page:
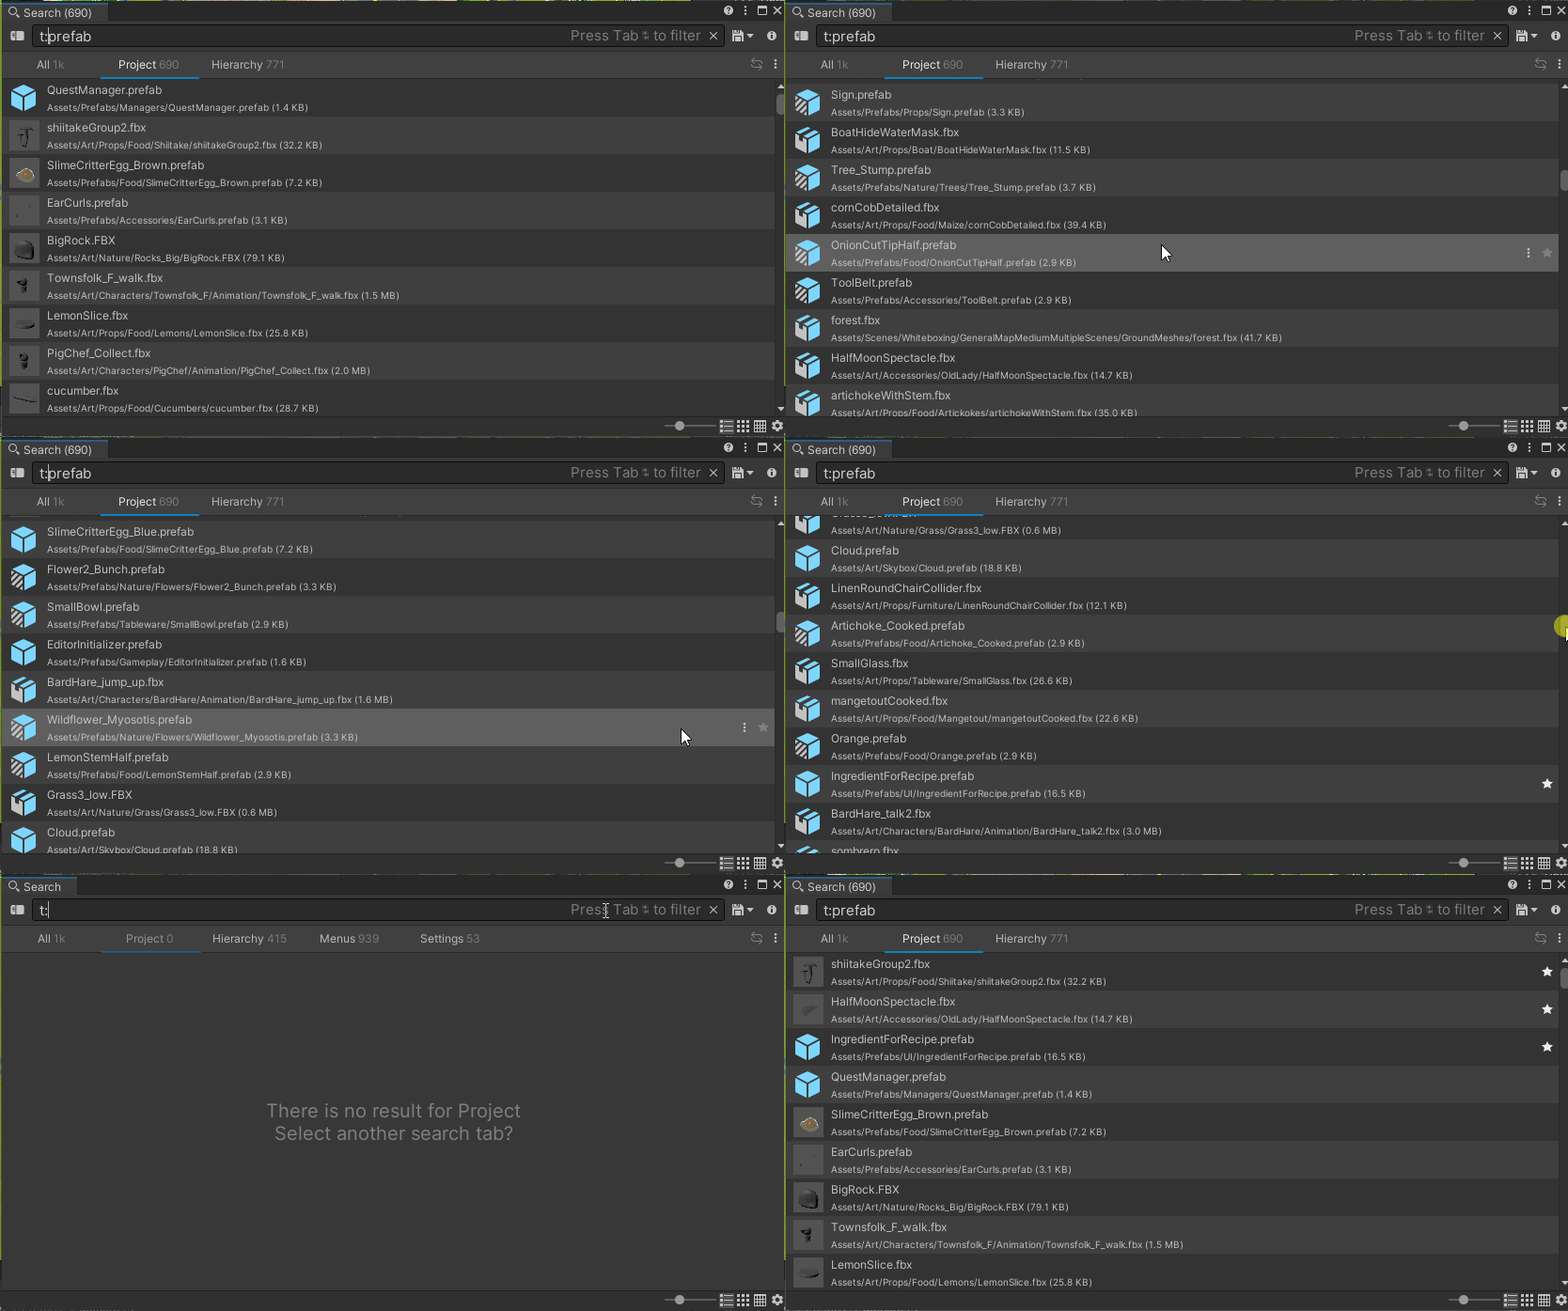
If there are items that you consider more important in your project you can press the Star Icon to favorite them. Each time any of those items are yielded by a query later, these items will be sorted on top:
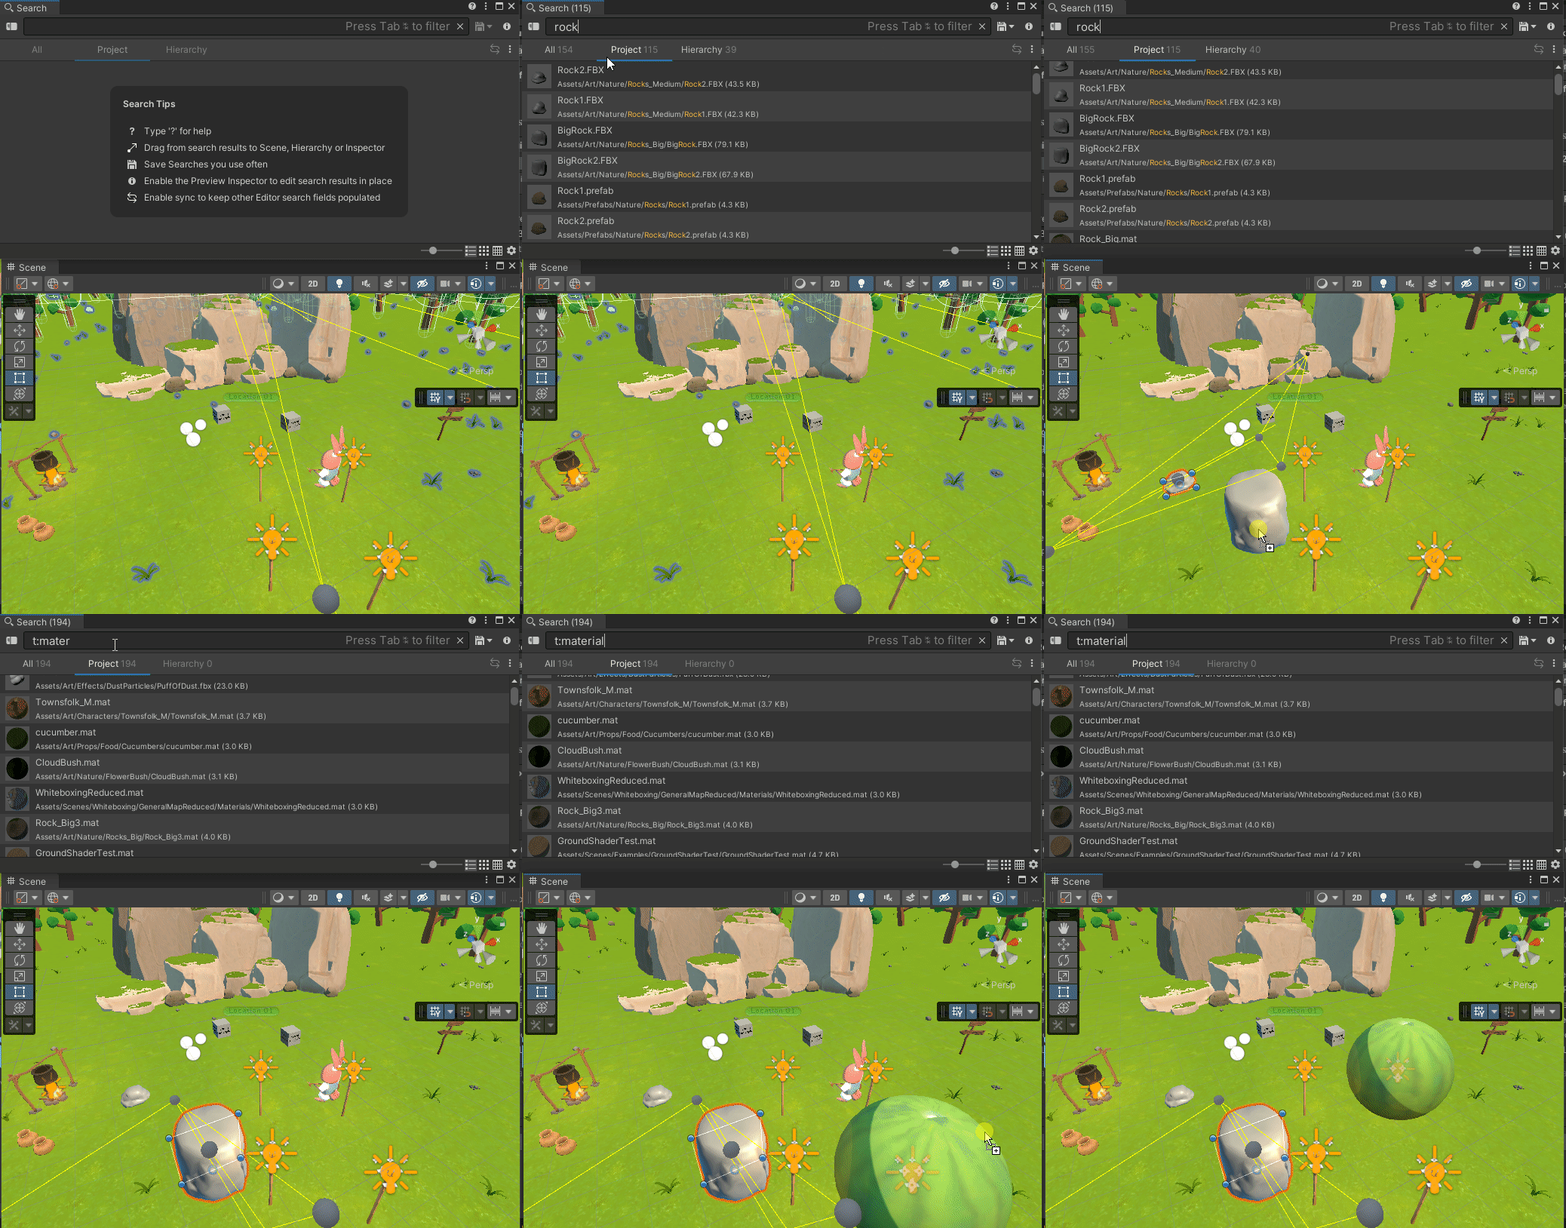
A nice feature that is easy to miss: Search Items support dragging! This means you can use the Search Window as a helper to find assets to instantiate in your scene:
The search query language is very broad and allows to create super powerful and precise queries. Knowing all the various filters by heart can be difficult though, but we have detailed documentation on the matter. That said, one habit you should acquire when typing a query is to press Tab often™. Our auto-completion window will help you write the query as you type. We provide auto-completion for filters, properties, recent searches and saved queries.
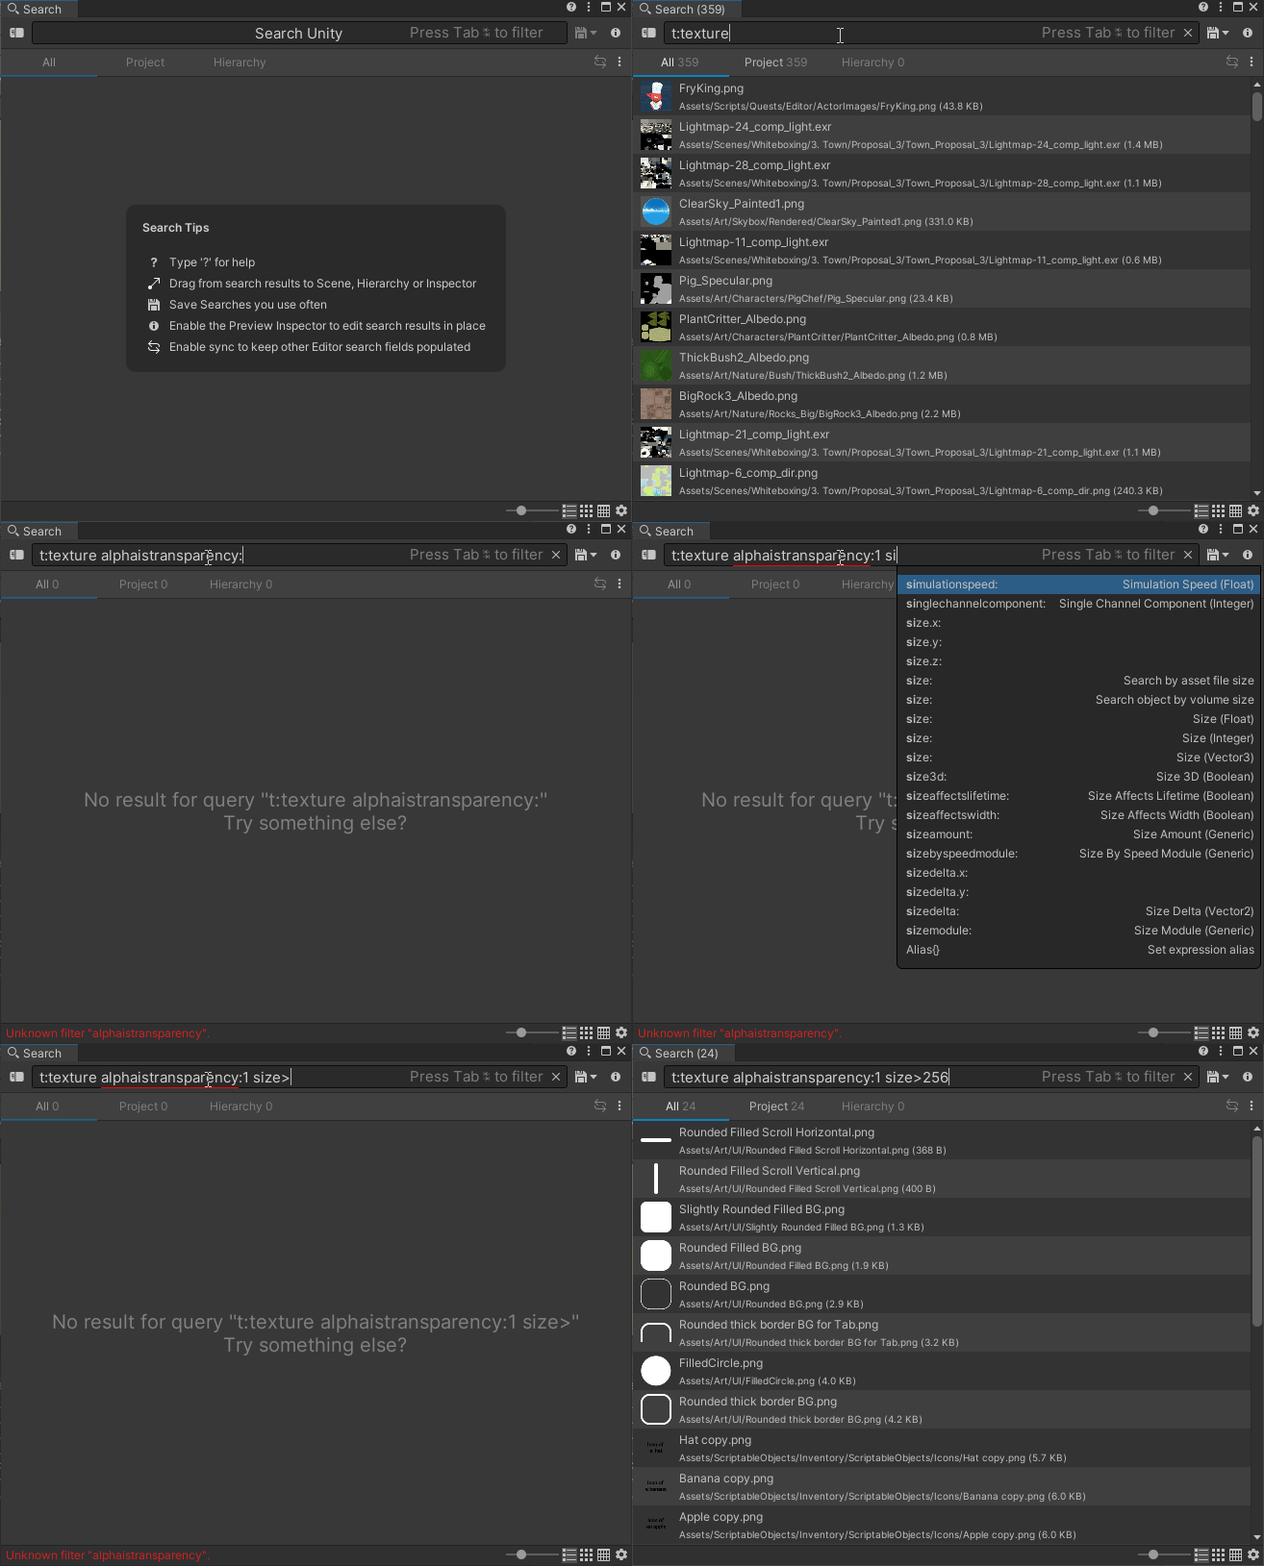
If you write an invalid query or if you use an unknown filter (because the filter itself doesn’t exist or because there is no such properties indexed in your project) you will get an hopefully understandable error message:

When you type a query, all regular search providers will try to process it and yield results. We created these search providers to support the core object types of Unity: Assets, GameObjects Menu items (I am looking at you Test Runner) and Settings.
If you are familiar with searching using the Project Browser or the Hierarchy View you know that Unity Editor supports some filters like “t:” (for type), “l:” (for labels) and some more obscure like “s:” (for softlock) or “ref:”. When building our Query language we chose to support the same syntax <token>:<value> but we have added a bunch of other filters that can help write even more complex queries.
In order to process rapidly complex queries on assets the Search workflow relies on indexing asset data. Don’t worry indexing is asynchronous and won’t block the UI. By default we index all sorts of file information (size, creationtime, last modification) and asset information (type, prefab, sub objects). You can also index additional properties and dependency references. I will cover indexing in more details a bit later. What interests us are what type of queries we can run on our project.
Let’s start simple. I want all my png containing the word sand
san png

We indexed file extension as part of the asset.
You can even use a minimal glob notation or a full regex pattern:
san*.png

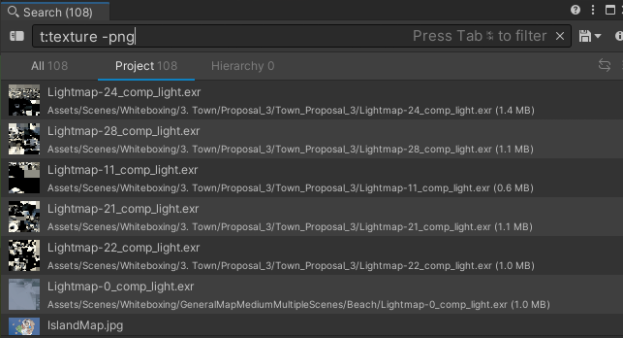
How about all my textures that are not png? Use the minus (-) operator to exclude objects from a dataset.
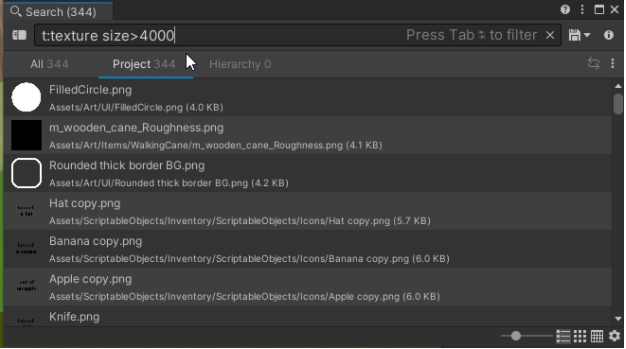
All my 4K textures?
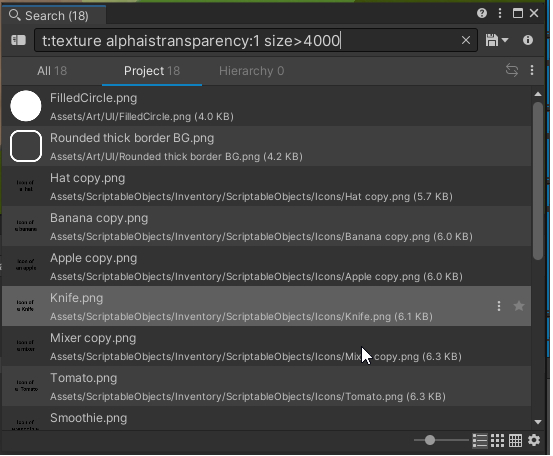
More complicated: find all textures where _alphatransparency _property is 1 and size on disk is over 4K:
t:texture alphaistransparency:1 size>4000
Find all prefabs with a _Damageable _component referencing the Basic Health object (all those queries are run in the Unity open project by the way).
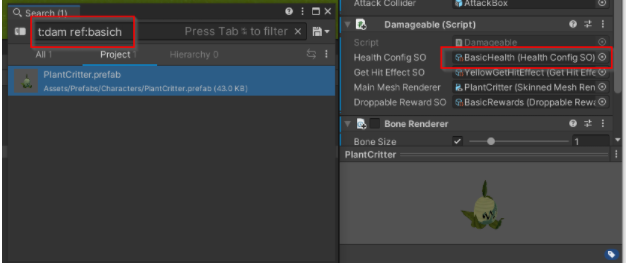
Notice how the colon (“:”) operator acts as a “contains”. This query means match object containing the word “dam” in their type (t:) and referencing an object containing the word “basich” in its name.
For more information on the various filters we support when searching for assets see this documentation page.
The hierarchy provider runs its queries on the currently loaded scenes. It means those queries are not indexed (though they use a progressive caching mechanism) but they can be more dynamic. You can query against any scene properties and you can even write your own scene query filter if you need a totally custom way of searching (find all objects within 3 units of my selection?). Here are a few examples of Scene queries:
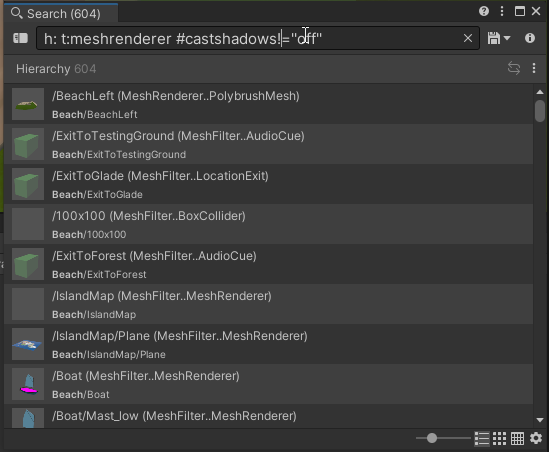
Find all Game Objects with a meshrenderer that are casting shadows:
h: t:meshrenderer #castshadows=on (or h: t:meshrenderer #castshadows!=off if you like more complex boolean algebra).
Find all lights with intensity higher or equal to 3:
t:light p(intensity)>=3
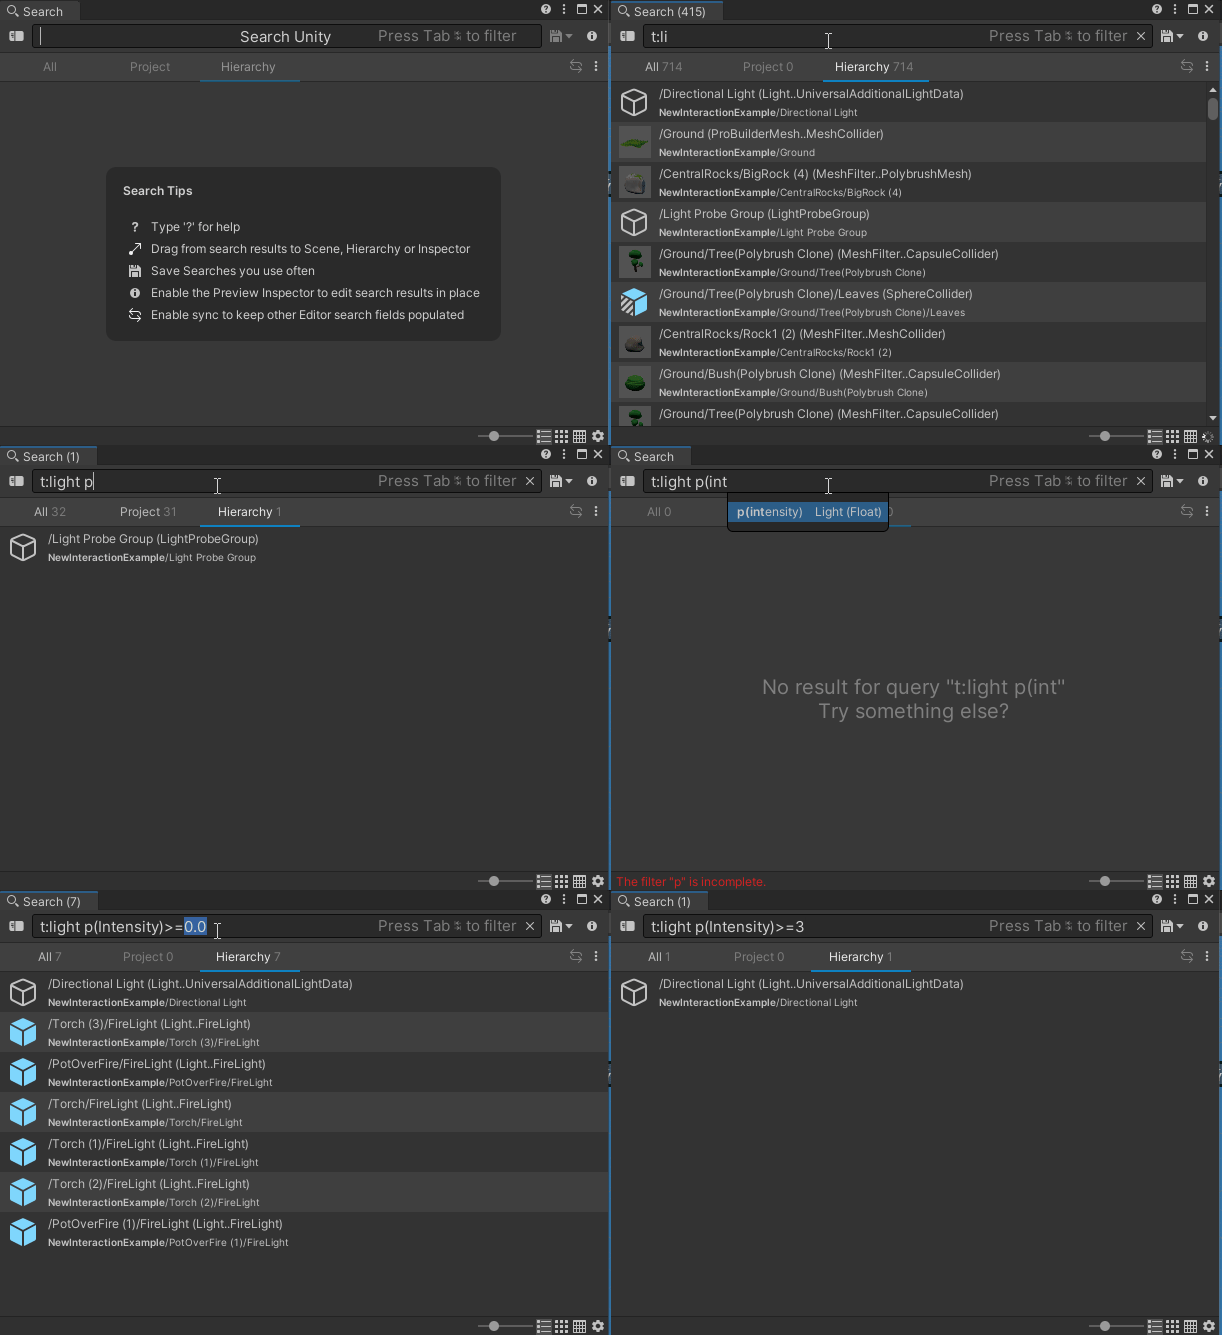
The notation p(<propertyname>) allows accessing any serialized properties of any objects in a scene. You can also use the alternative syntax: #propertyname (like #castshadows in the example above).
What happens if you are not sure about a property name and auto-completion _seems _to fail you but you know where the property you're trying to filter is located in the Inspector? Use our nifty:
Right click menu item -> Copy Property path feature!
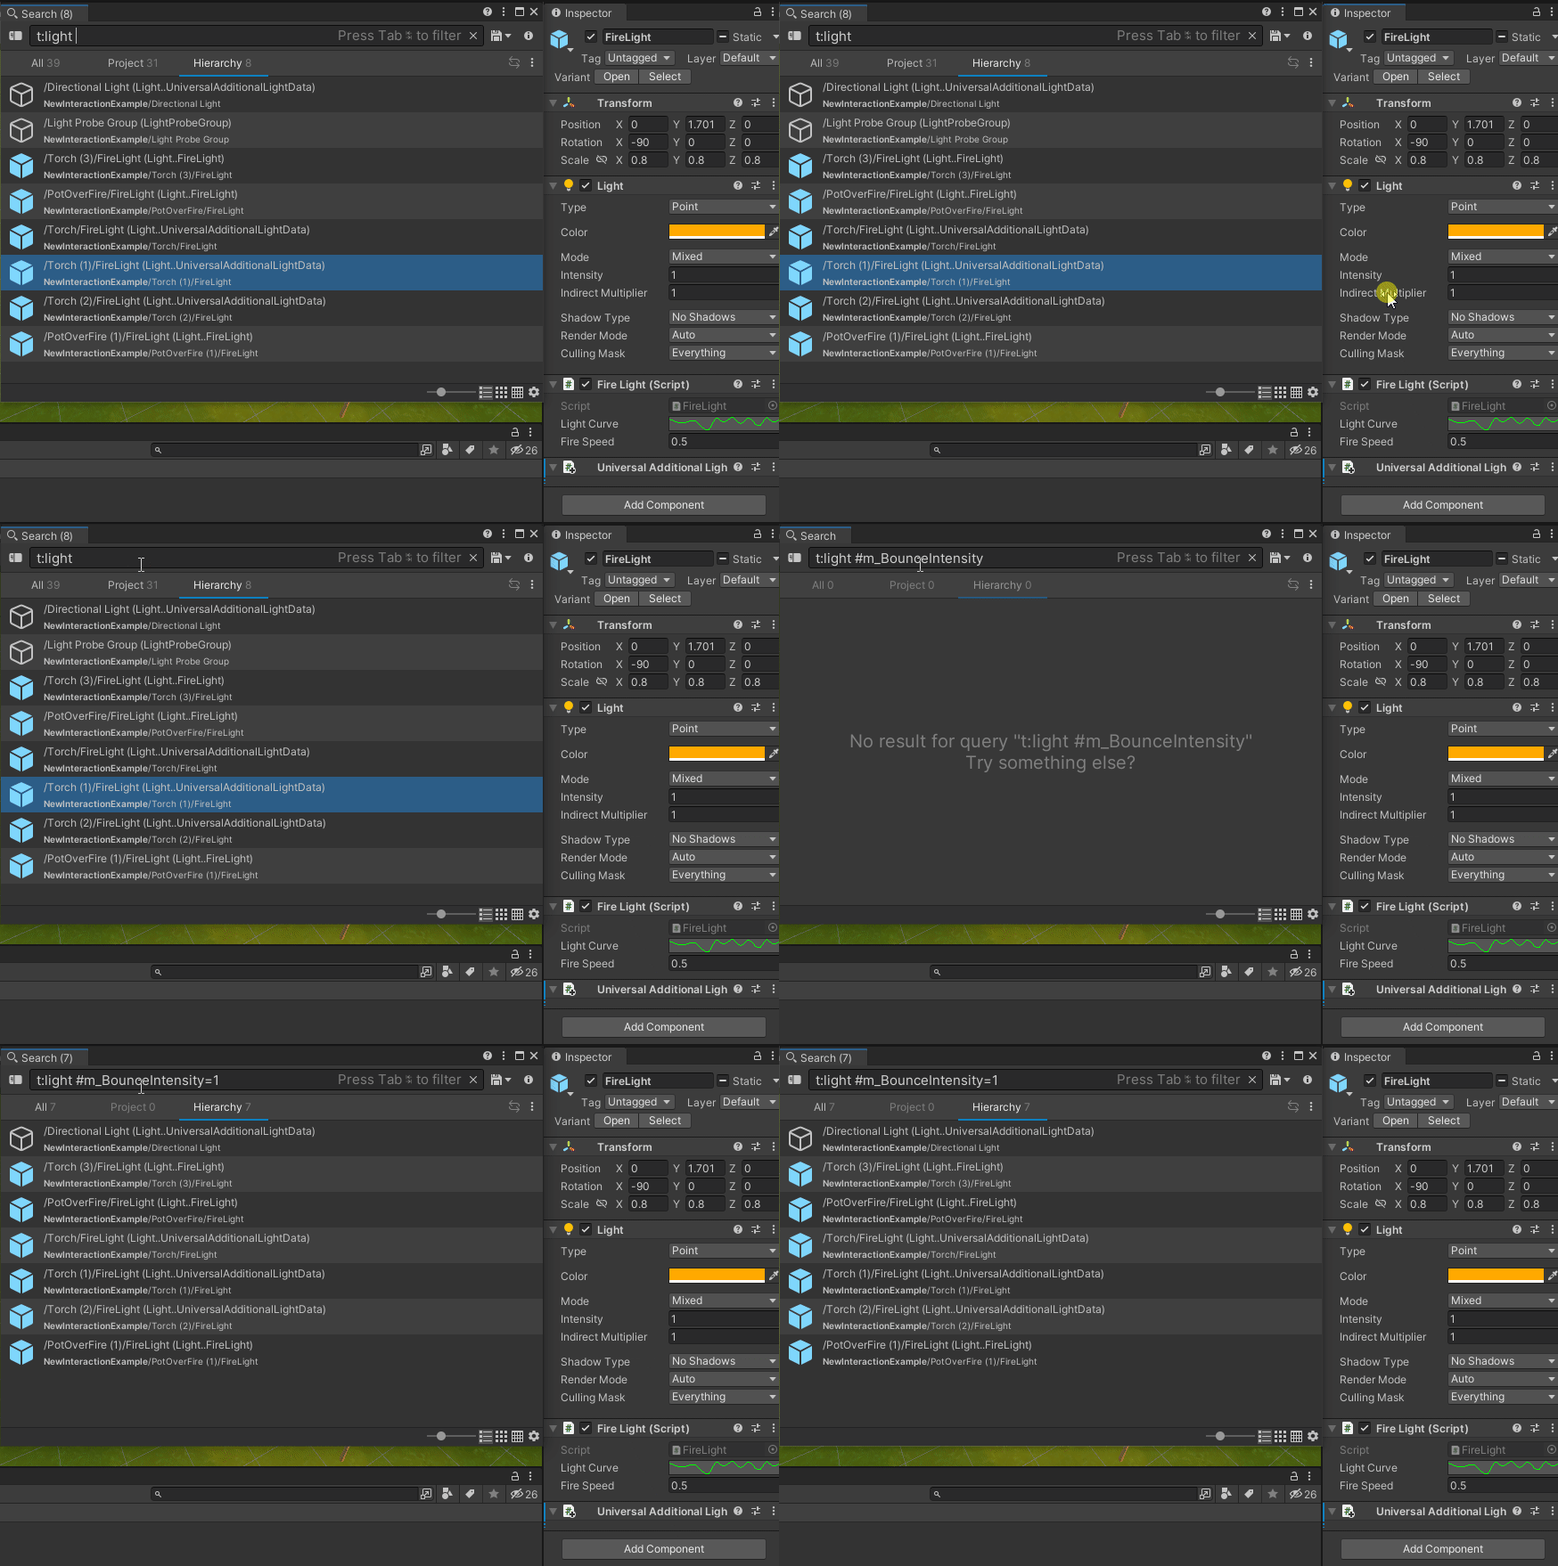
Who would have thought that the Indirect Multiplier property maps to a variable named m_BounceIntensity? Who!?
In Unity Editor not everything is a GameObject. Often you end up searching for menu items (like the Test Runner) or you are trying to find where a specific setting is located. Don’t sweat, we have you covered with the Menu and Settings providers.
You think the right click Create menu is too cluttered (you are not the only one)? Try this workflow:
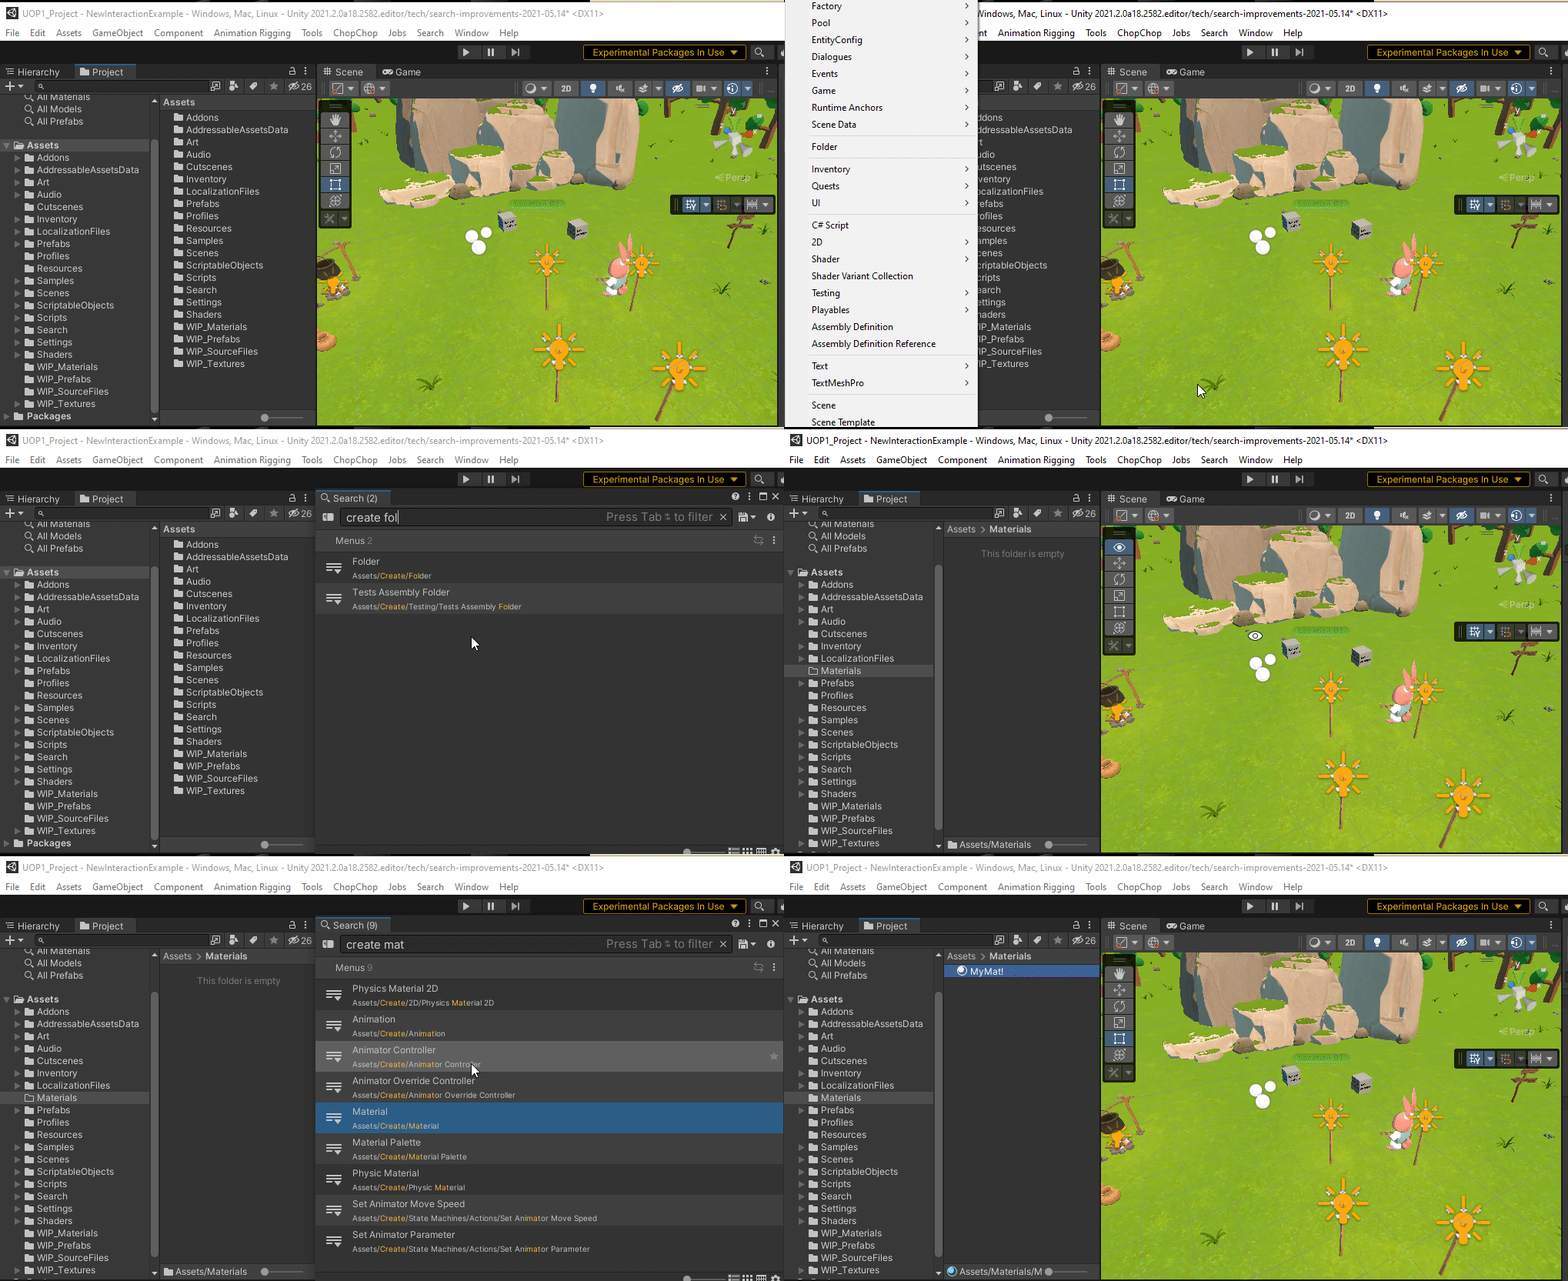
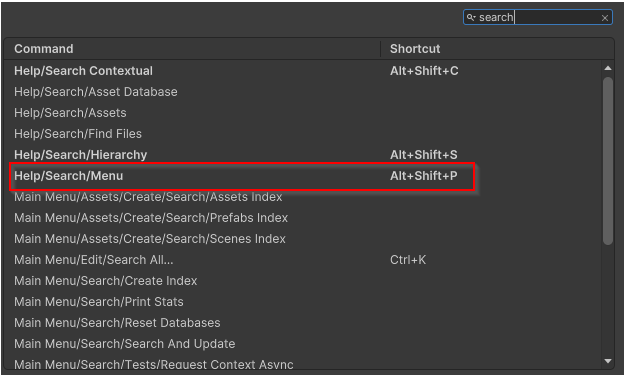
The first few seconds you see me looking at the create menu and bailing out. Then I create a folder and create a default material in it using a few keystrokes. Pro tip: I mapped the shortcut Alt + Shift + P to open the search window in Menu/Settings context:
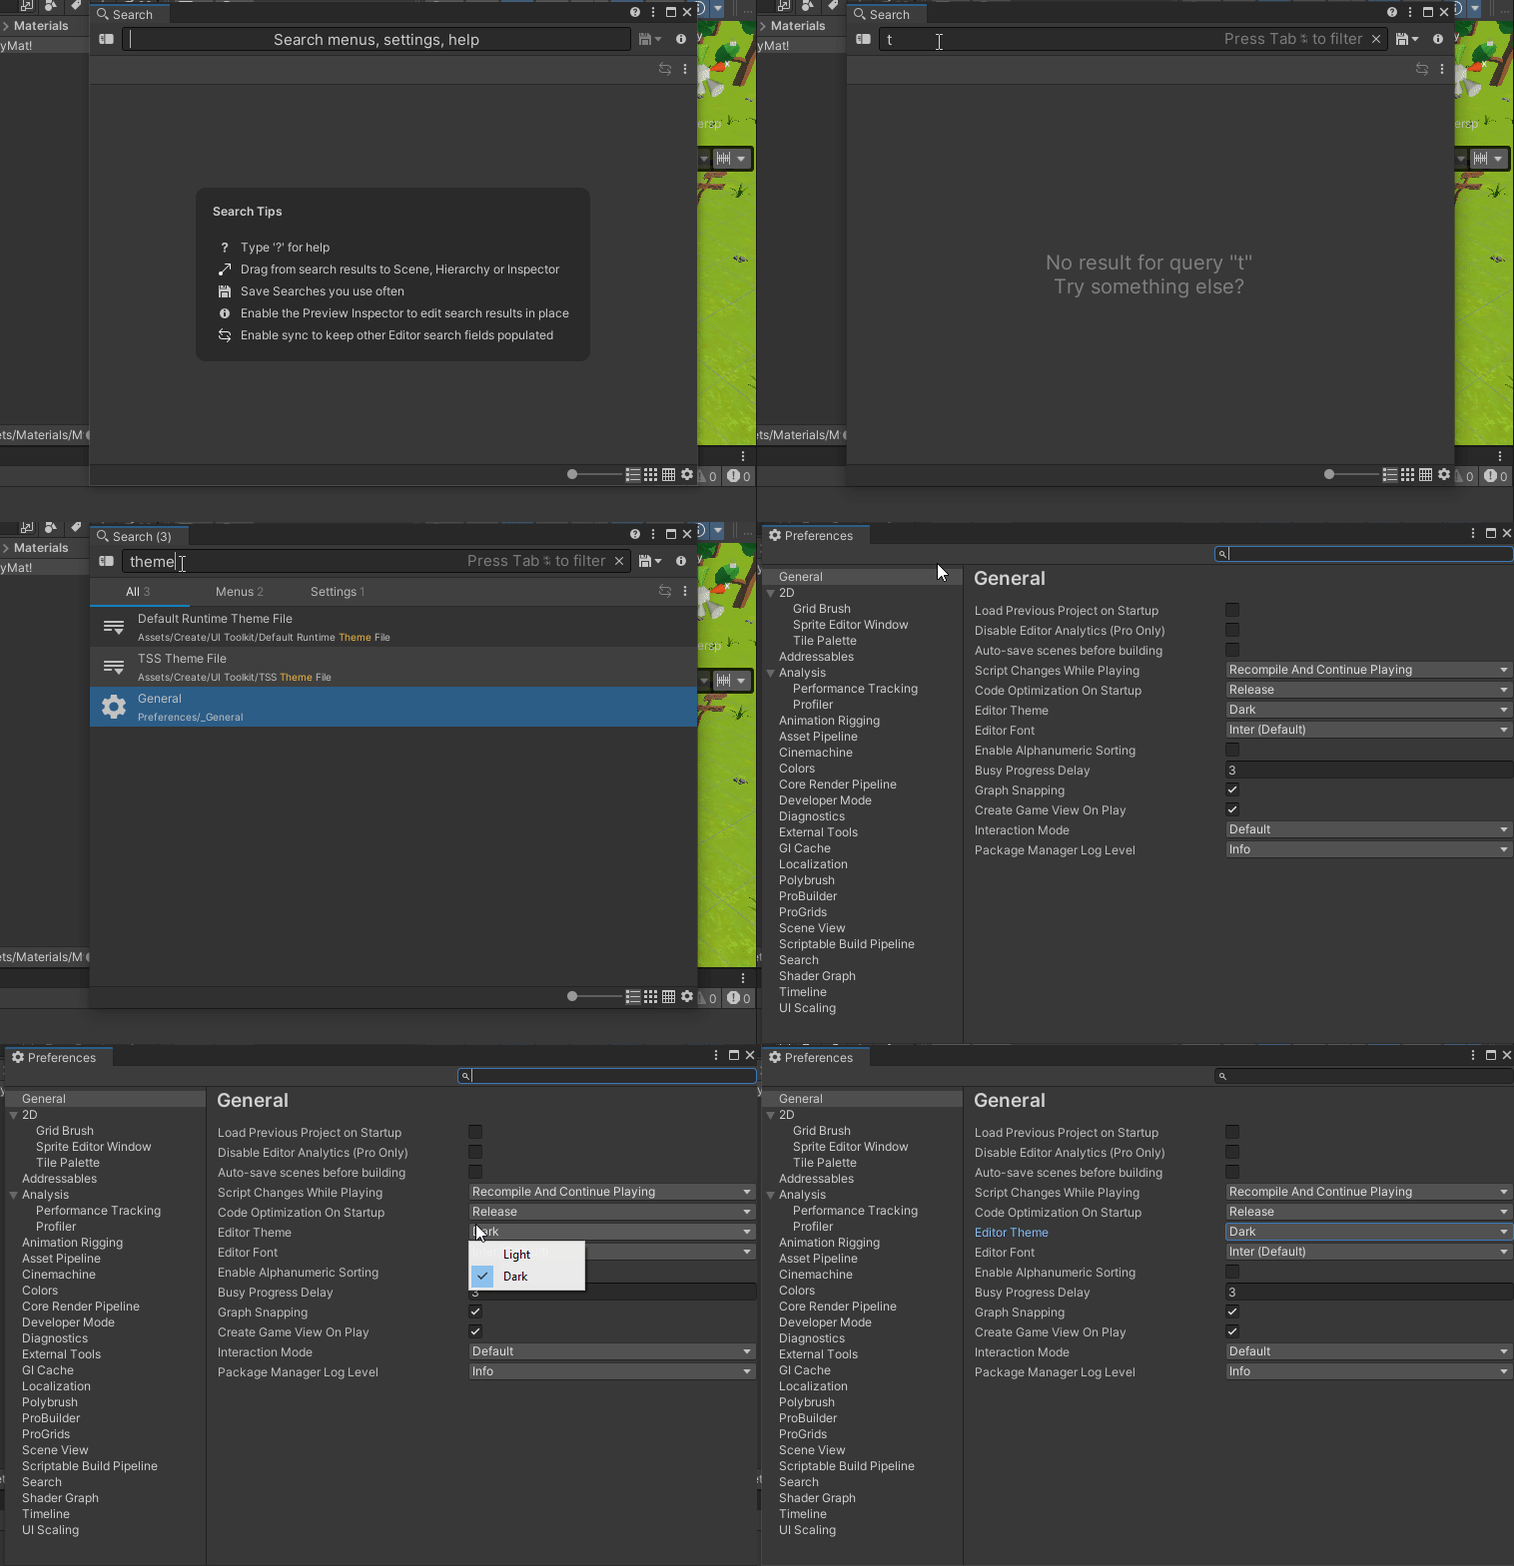
Finding a particular setting is as simple:
It is all well and good to be able to open the Search Window quickly (Ctrl + K for the win) then typing some characters and selecting an item. But if you find yourself typing the same query again and again we have a good workflow to save this query. This is especially useful when typing complex queries like: p:t:texture width>=1024 -png -lightmap.
Next to the search field is the diskette icon that will allow you to save the query and its view state (icon size, columns configuration, icons) either as a:
- User Query: saved in the user preferences folder. Available to all Unity projects on the same machine.
- Project Query: saved in the project as an asset. These queries will be shared to all contributors in your project.
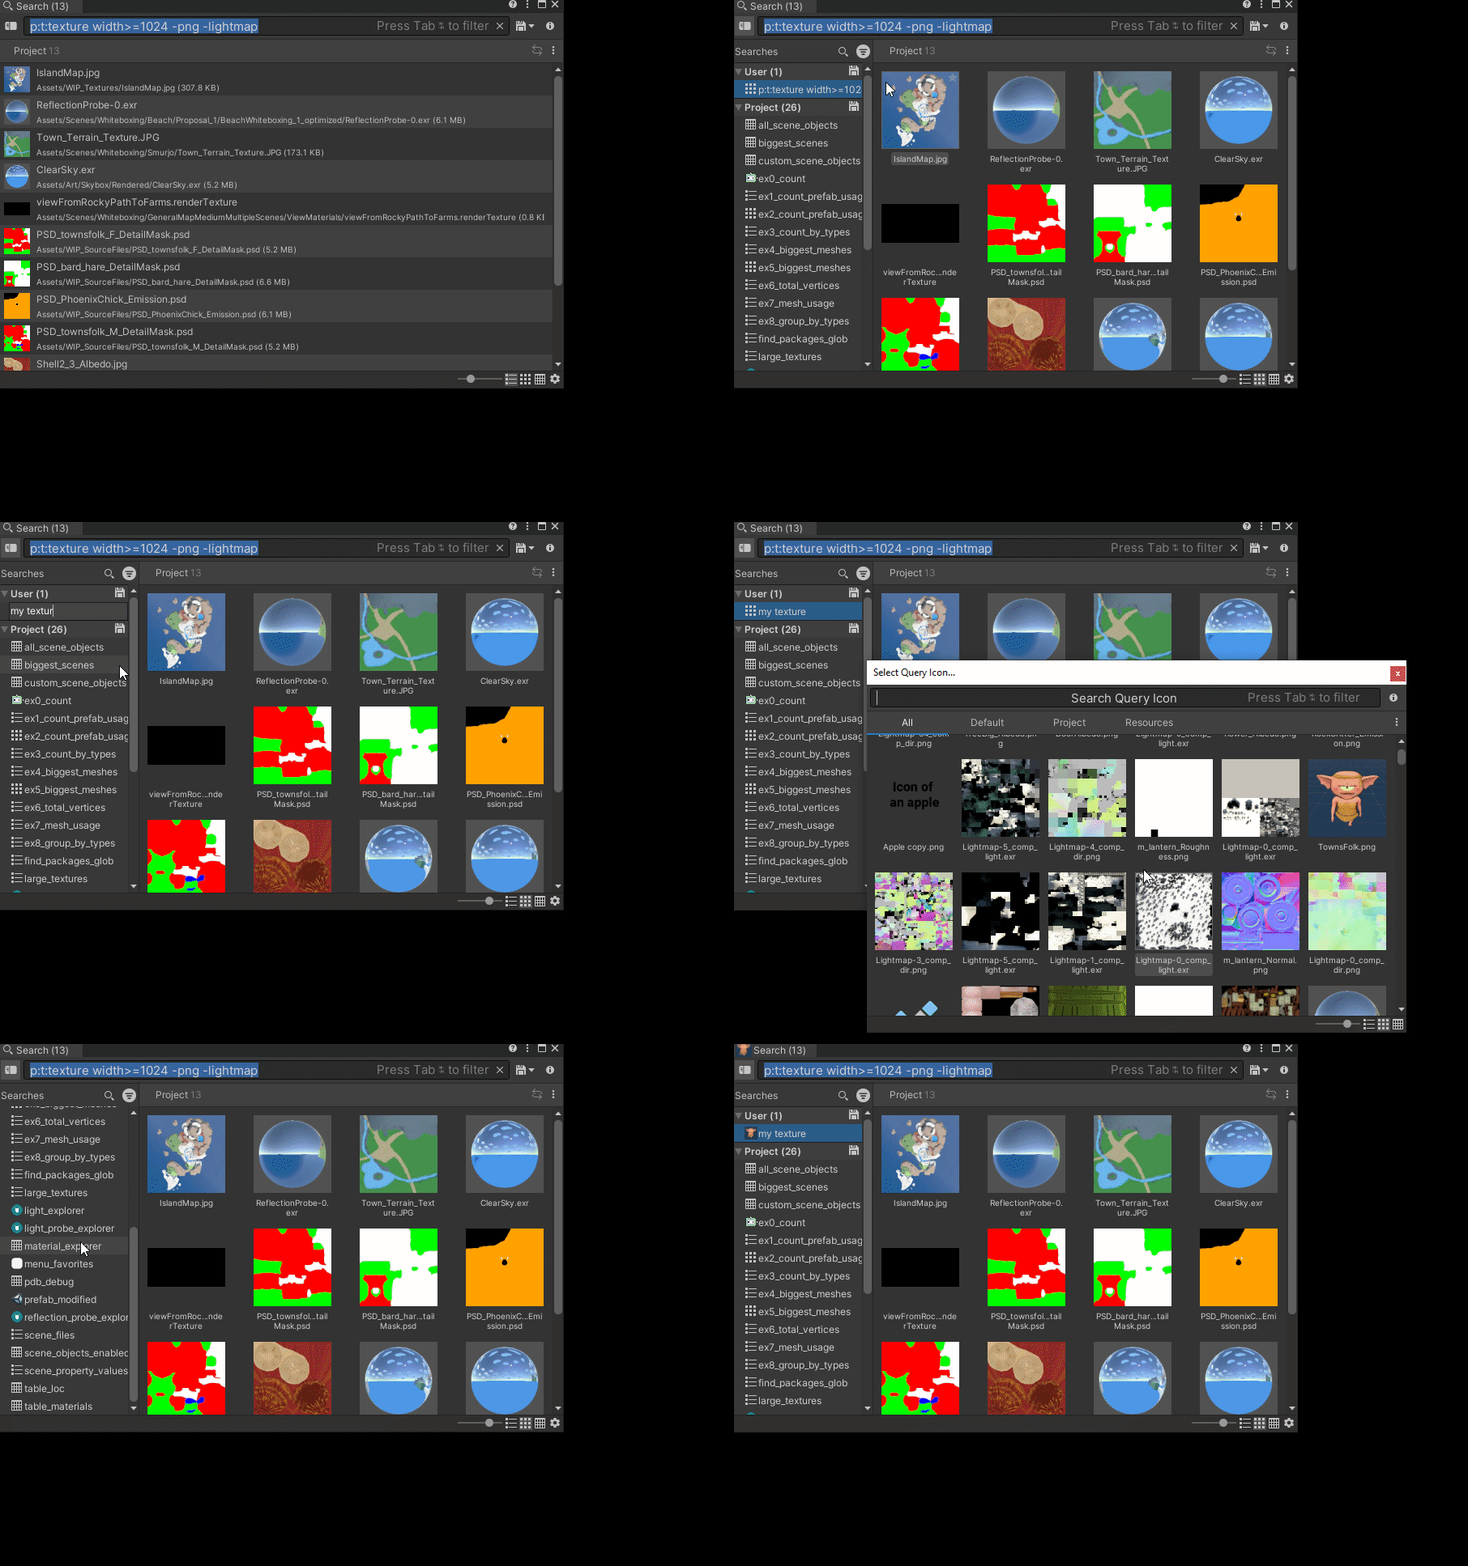
Search Query can be renamed and have their own icon. If you have been attentive, you might have noticed that we are using a special Search Window (our Search Picker as we call it) to allow selection of an icon. Search Window using a Search Window. You cannot get more meta than this.
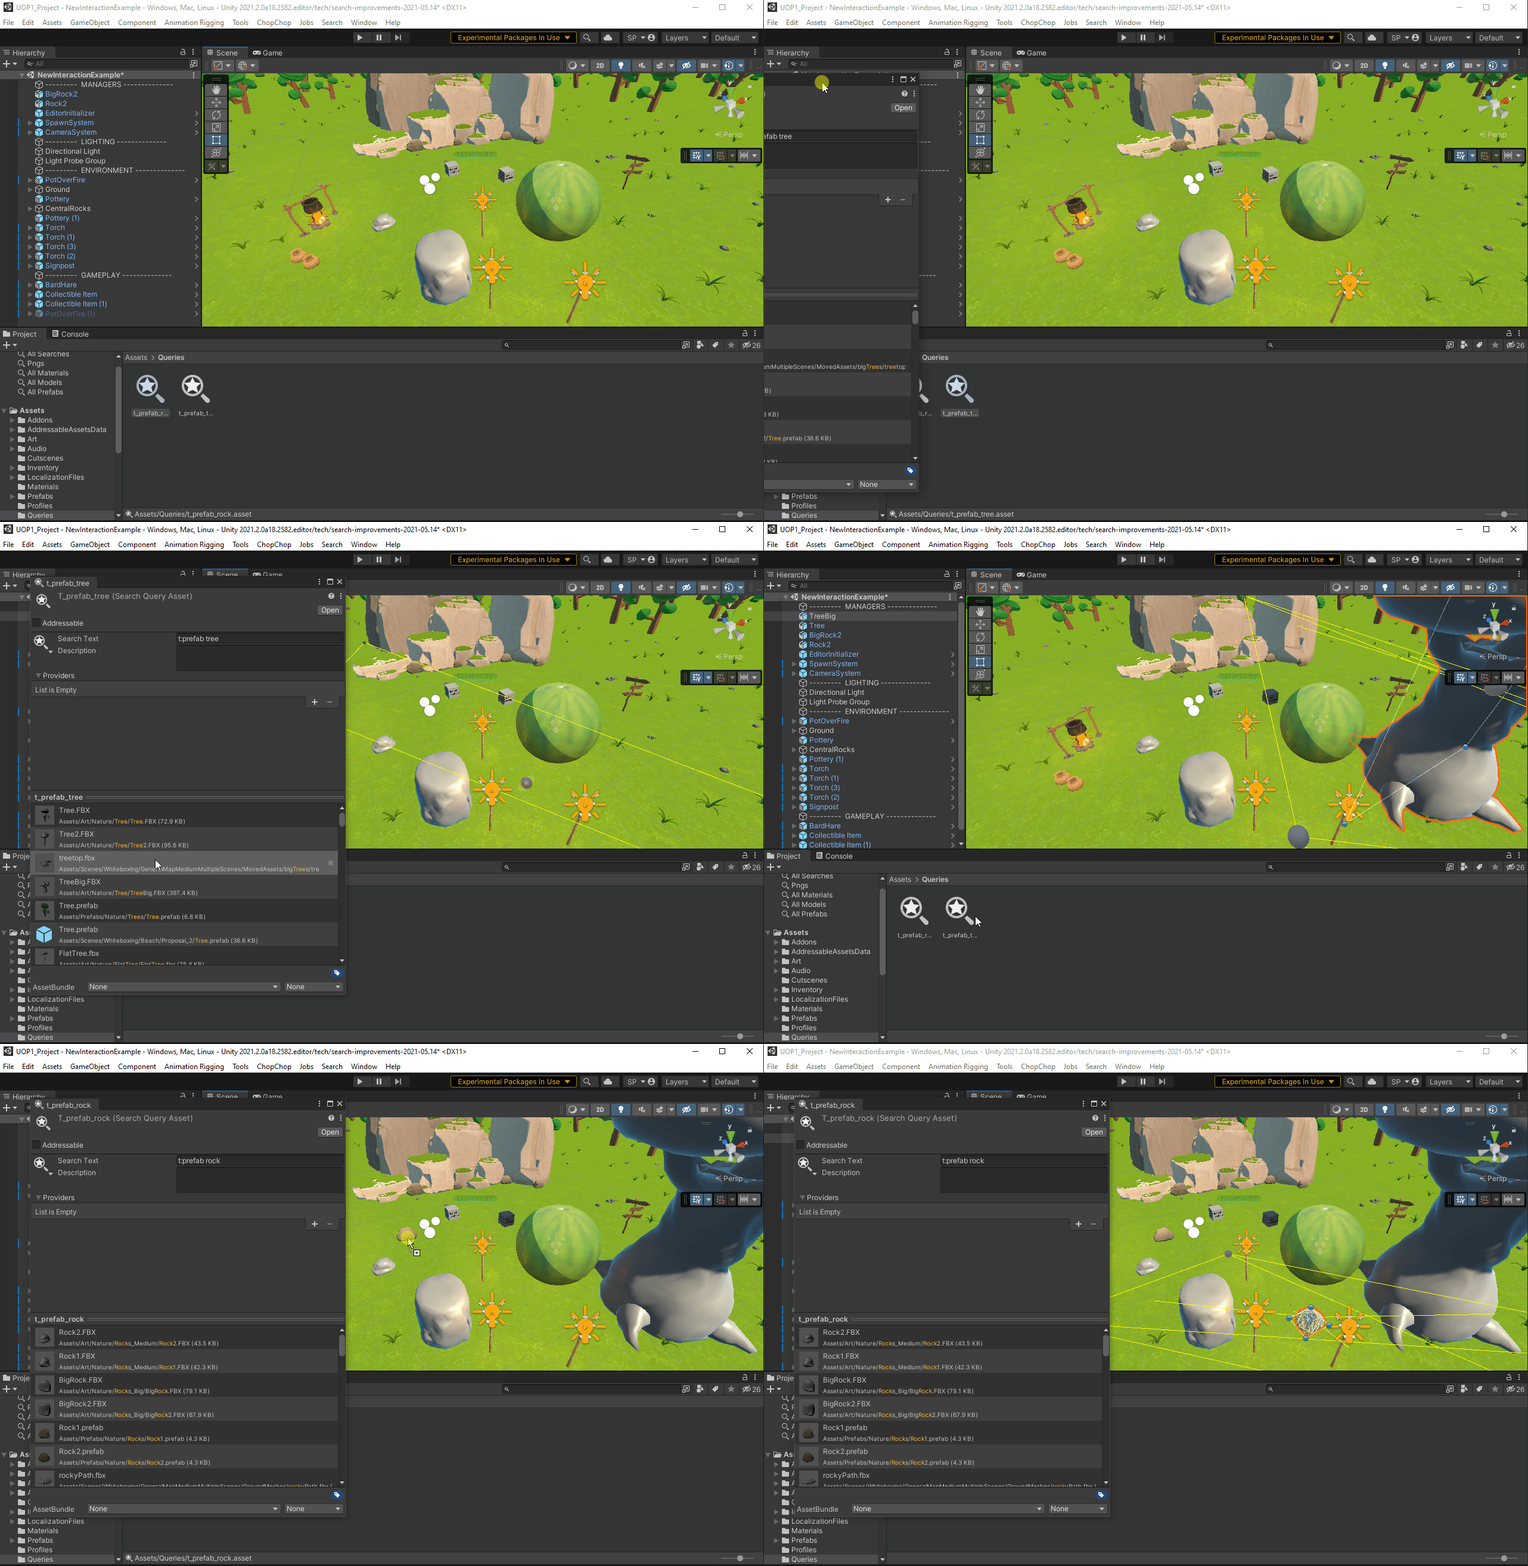
When a Search Query is saved in a project it comes with its own Custom Inspector allowing you to preview what would be yielded by the query and even drag items from it. This could act as (really) basic “dynamic collections” of items.
One button has been left unexplained in the toolbar near the searchfield and this is the one that looks eerily similar to the Inspector icon:

This button toggles an embedded Inspector that allows you to examine (and modify) the properties of an item without affecting the global selection. Depending on your opinion on the Global Selection this feature could be revolutionary or a bust. Regardless here it is in action:
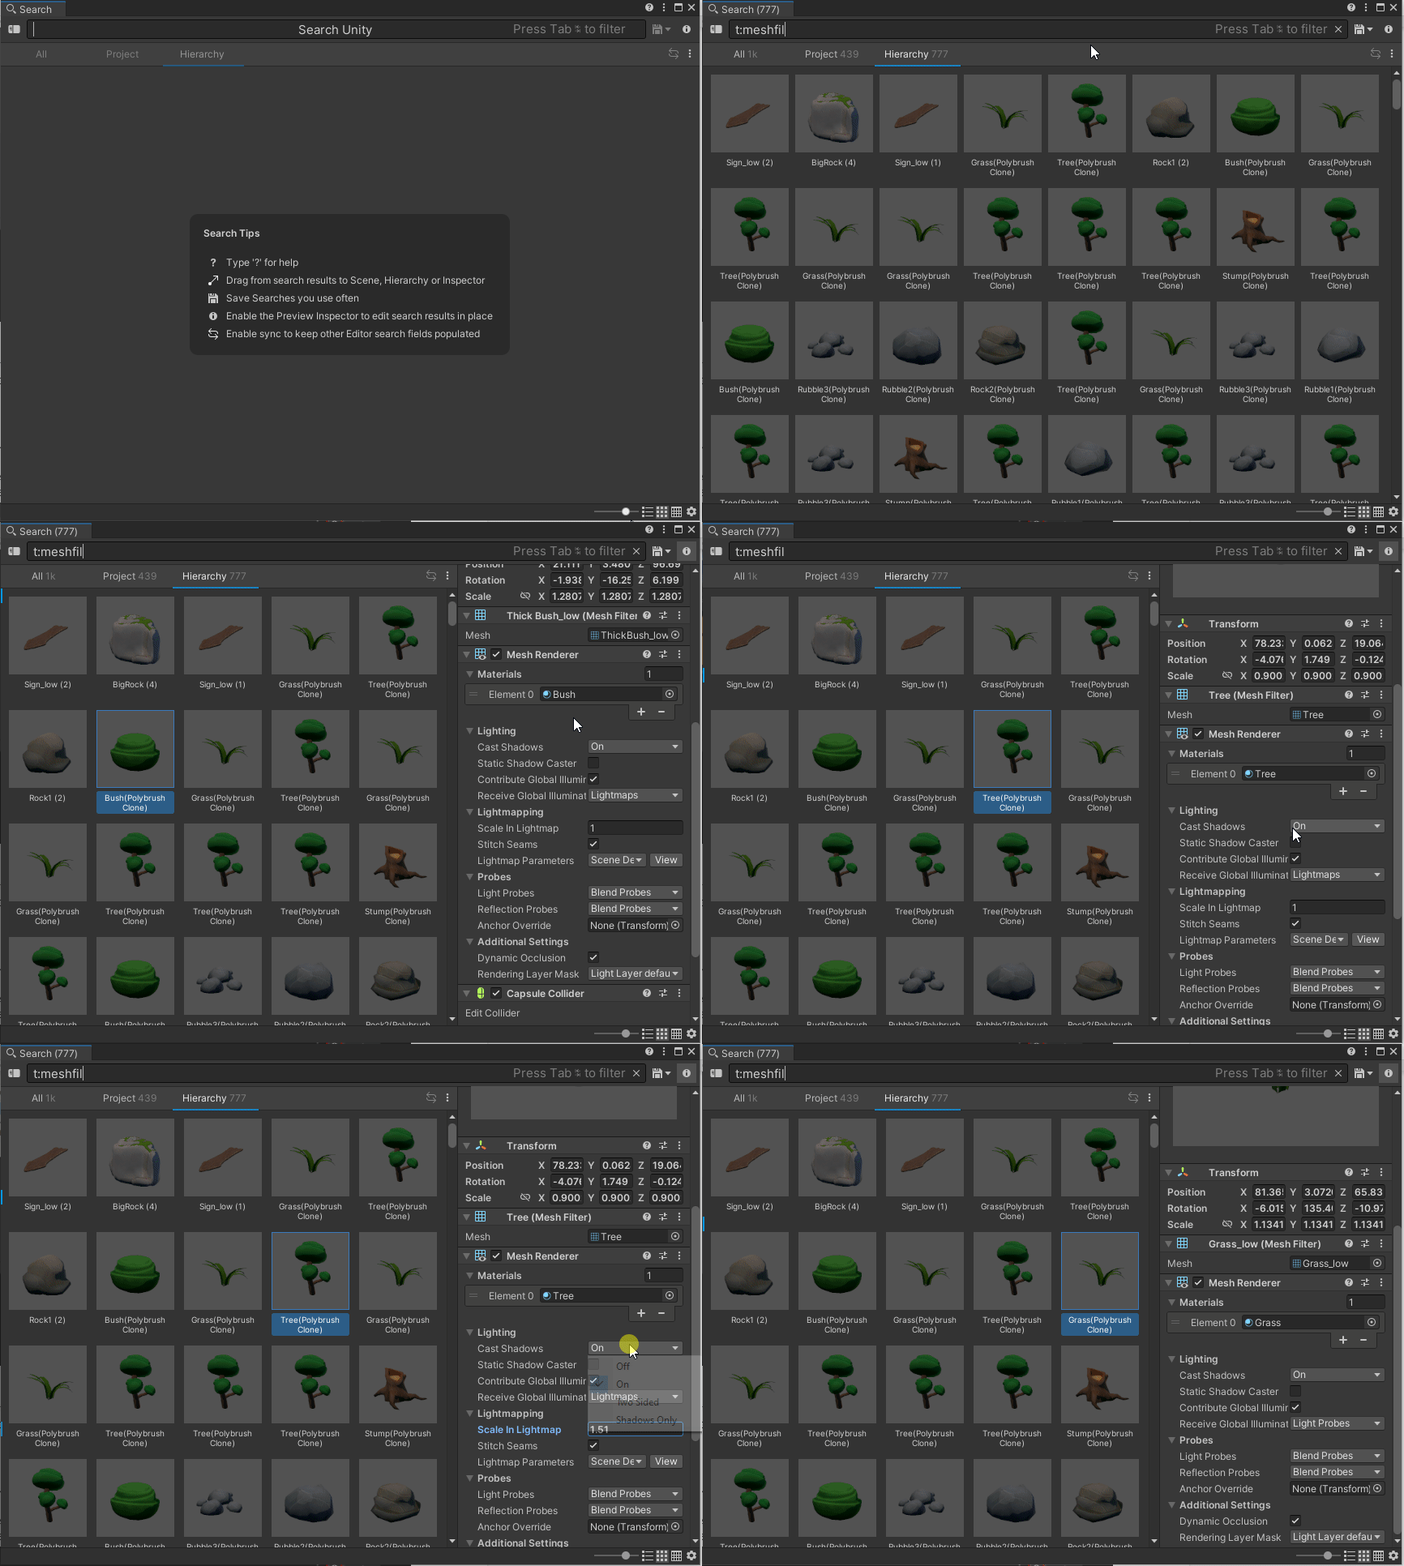
We basically embed a portable version of the Inspector directly in the Search Window making it easy to tweak and inspect values and previews.
To make the Project provider as fast as it is we rely on an indexing process that will crawl through all assets in a project to gather queryable data. On a brand new project, indexing will start when a user first opens the Search Window (thus if you do not want to use the search window, you do not pay for indexing).
Asset Indexing is driven by index settings files. Those files can be in your project or in UserSettings (the default index resides there). The index settings files are small json manifest files describing how indexing should happen. They are by no means monolithic blobs of indexed data! So do not be afraid of adding those files to your Source control management system.
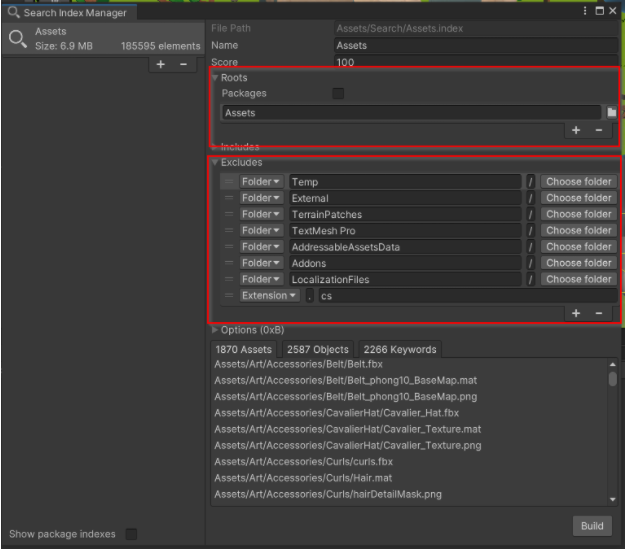
The Search Index Manager tool allows you to configure and create new indexes. You can open this tool from the menu Window -> Search -> Index Manager. An index settings file will specify which files (i.e assets) or folders to index or which files or folders NOT to index. By default we index everything except for Temp and External folders. Here I have tweaked my index a bit to skip specific folders of the Unity open project that are not worth indexing.
The Options section of an index allows you to specify how much data you want to be indexed.
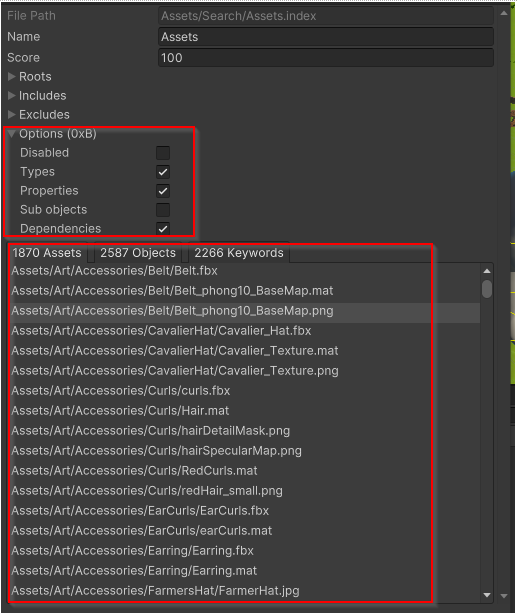
- Types: Index all basic asset information.
- Properties: Index most asset serialized properties.
- Sub Objects: Index scene and prefab sub objects (to allow offline querying of scenes and prefabs). Sub objects indexing should be reserved for CI, automated processes and explicitly chosen scenes and prefabs to prevent indexes from growing very large.
- Dependencies: Stores direct dependency references of assets allowing you to use the “ref:” filter.
The more options you select, the bigger an index will become and the more time the initial indexing will take. Here are a few interesting information on indexing:
- All indexing is done asynchronously in an Asset Worker process. The editor will never be blocked while indexing.
- After the first indexing is done, we support incremental indexing. So when any assets are saved on disk we will reindex them.
- All indexed data is stored in the Library folder. This workflow plays well with the Cache server allowing multiple team members to easily share the same set of indexed data.
- If you have a bunch of assets that do not change often, consider creating an index only for those assets. This index would be updated less frequently.
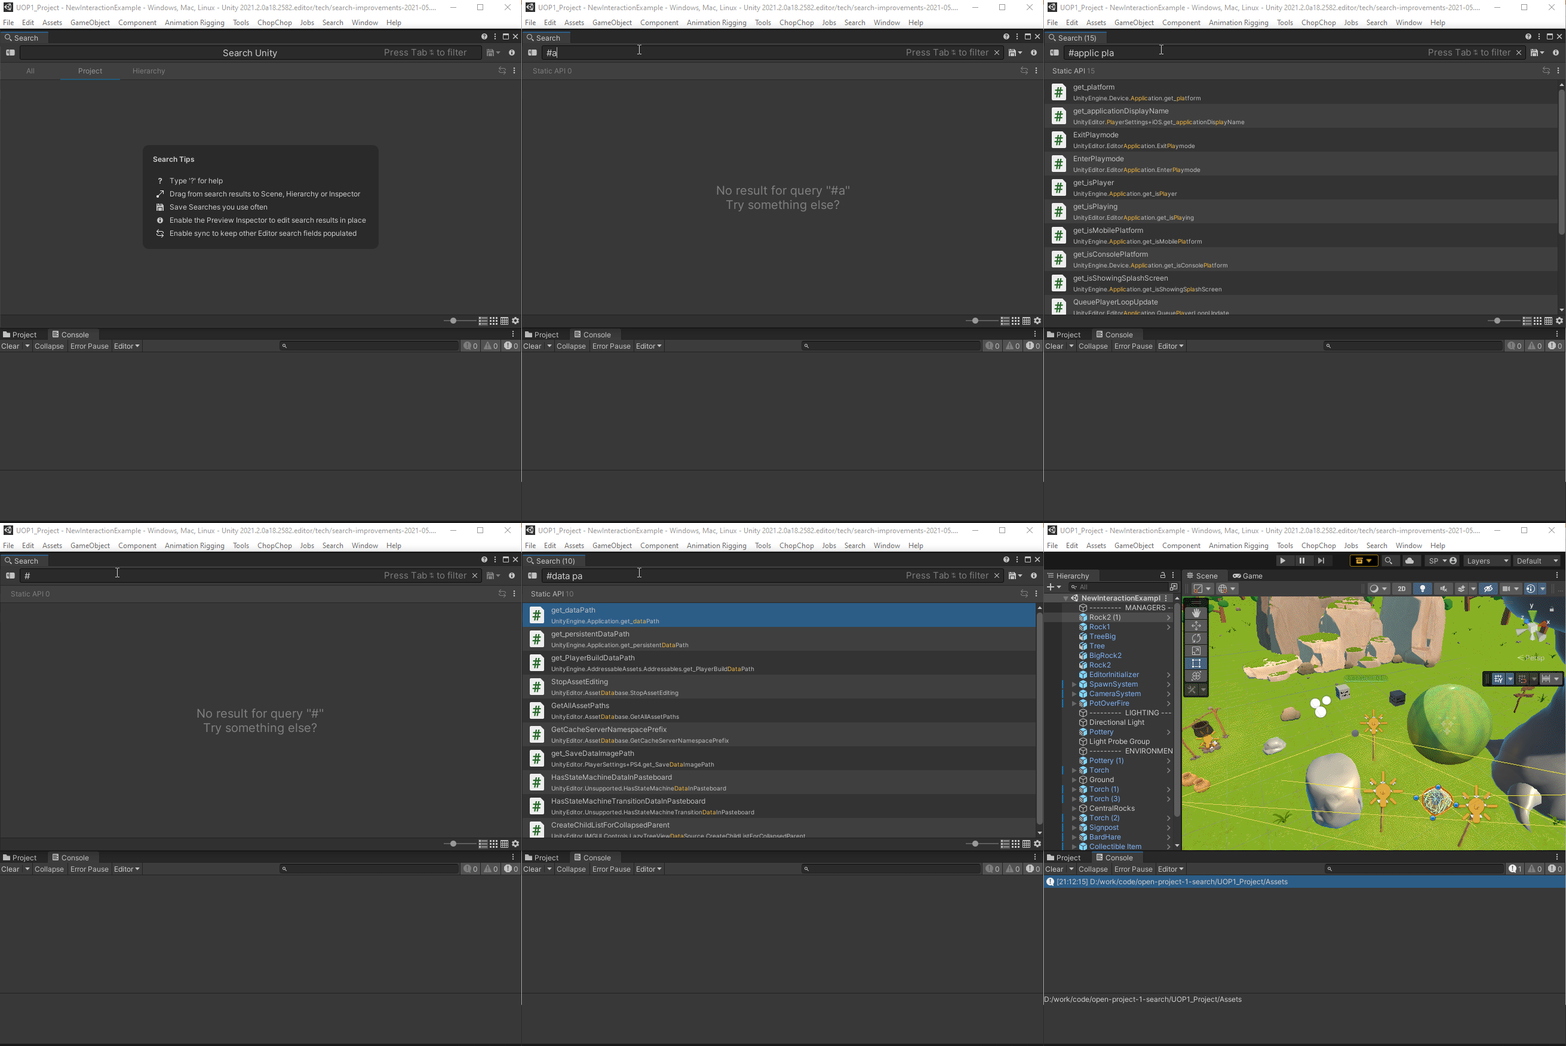
Some search providers are niche enough that it would be silly to have them available for all queries. Those Special Providers will be invoked if a query starts with their specific filter token. For example starting a query with # will invoke the static C# API provider and will allow you to invoke any static parameterless public C# functions in the editor:
We even have a provider to run Asset Store searches:
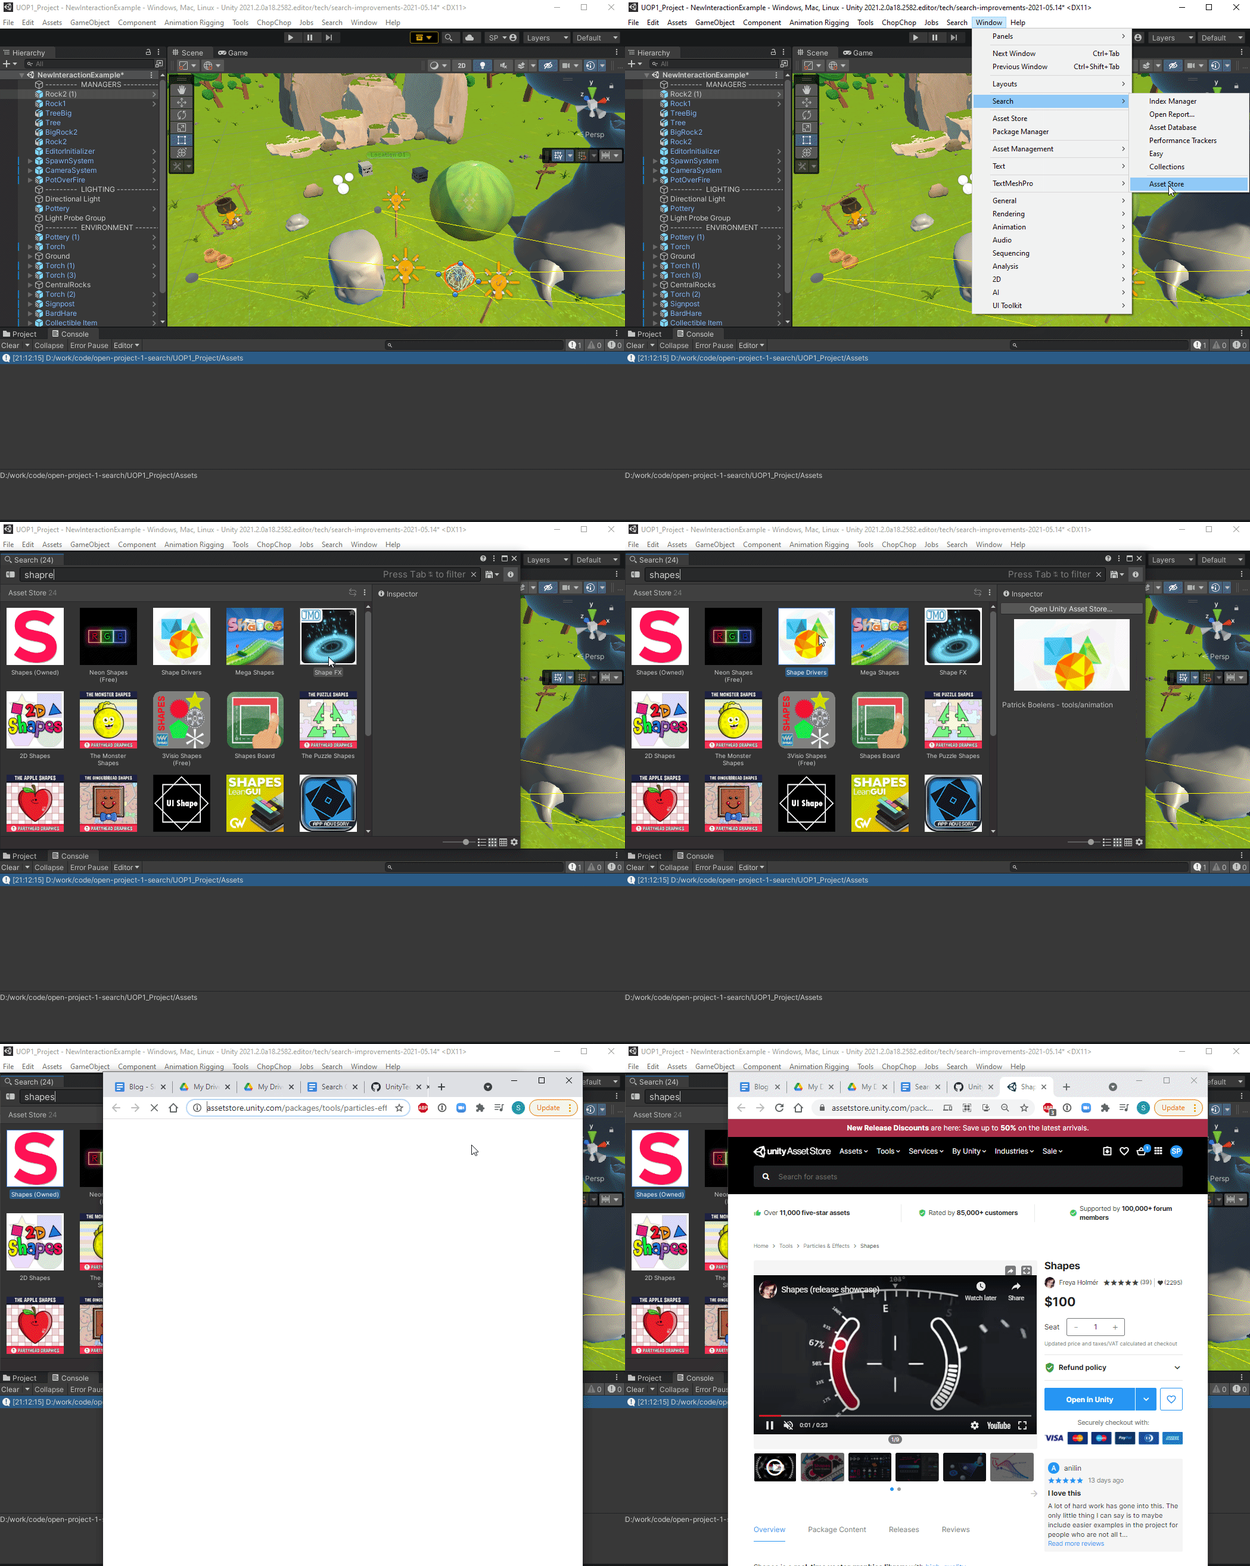
This workflow showcases the flexibility of the provider mechanism: we perform REST calls under hood to query the Asset Store for results. The fact that this search is asynchronous and through the web has no impact on the Search Window. As long as you can yield results we display them!
A lot of the features we have covered have been there since Search has become a core feature in 21.1. We will start covering the brand new workflows we have added to Search for 21.2. Now what are Search Expressions?
Search expressions are an extension to the Query Language to make it more powerful and more expressive. What do Search Expressions allow?
- Express a single statement query that might cross-reference multiple search providers and even run multiple queries at the same time. As an example: Give me all objects in my current scene that are referencing any shaders that do not compile?
- Apply transformation and filtering to a set of items yielded by a Query. Think of LINQ meets SQL meets Lisp (for the S-Expression syntax).
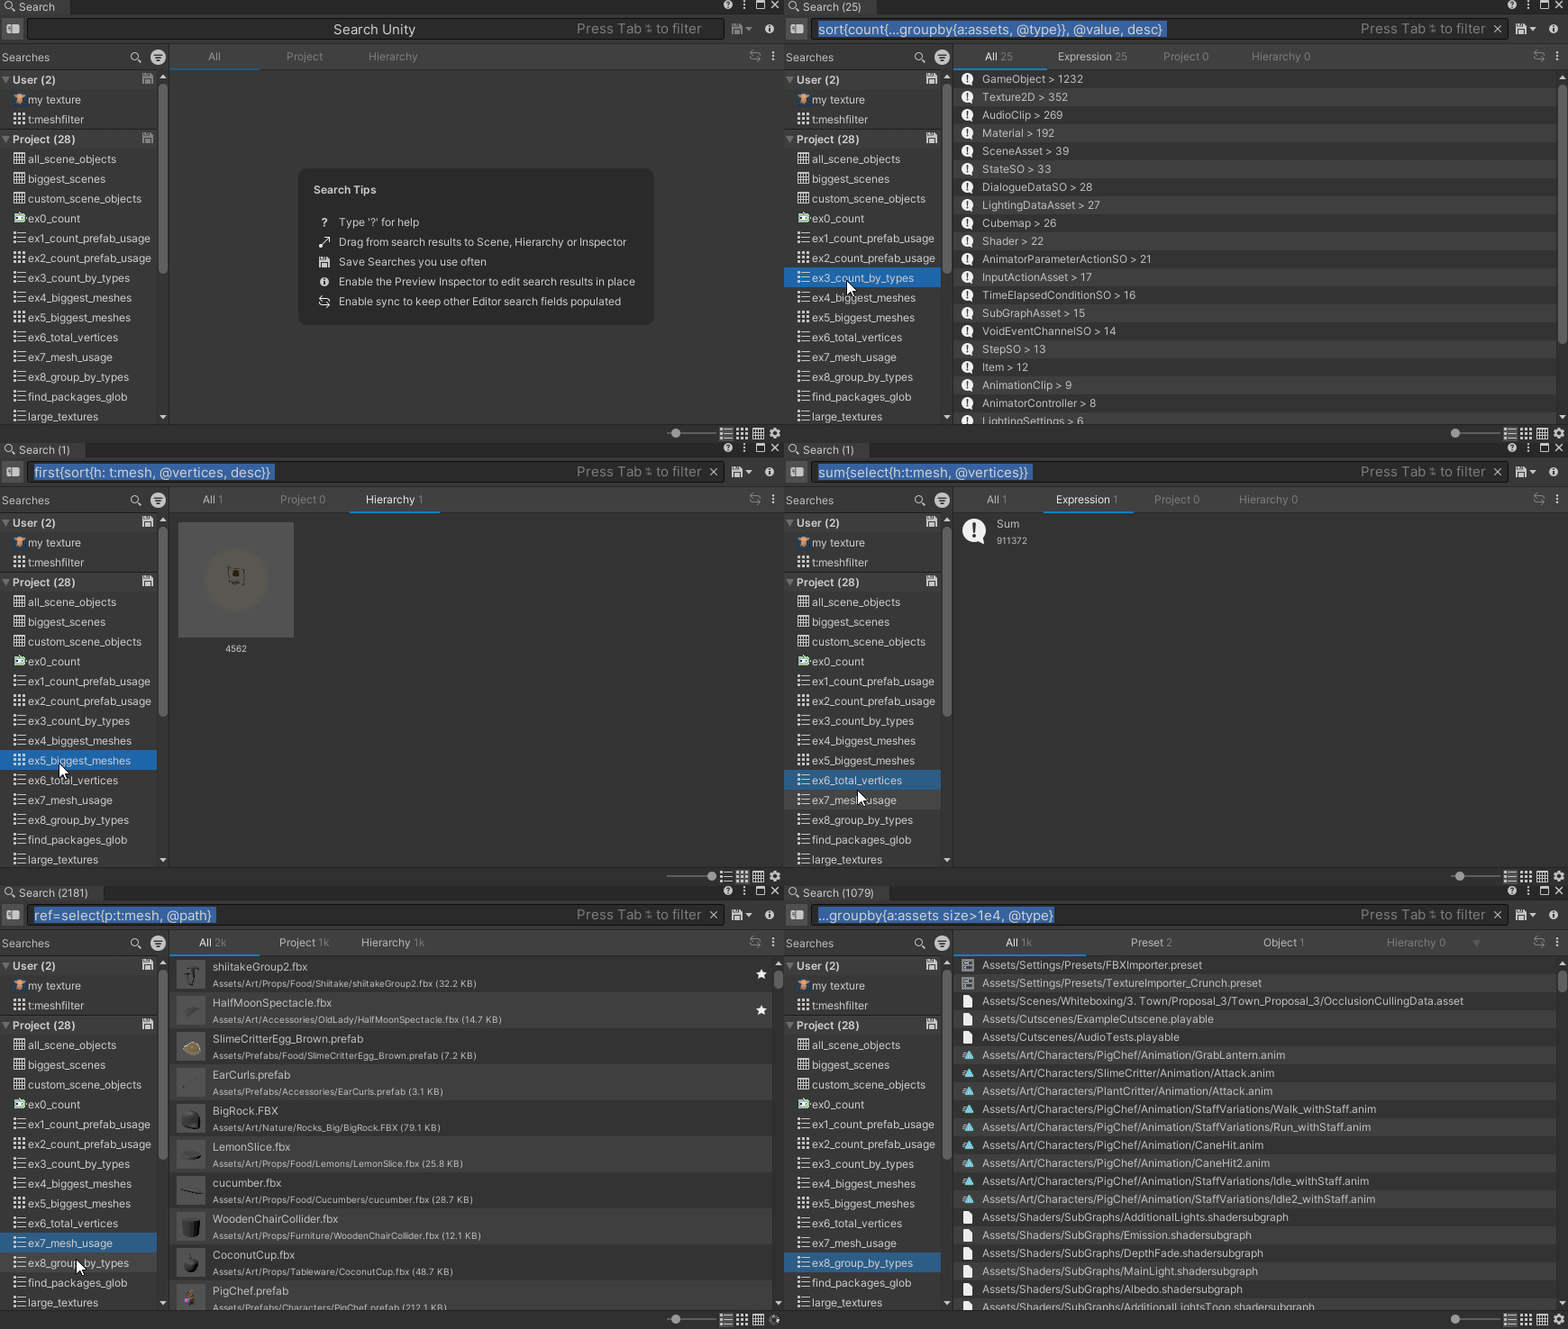
- sort{count{...groupby{a:assets, @type}}, @value, desc}
- select{t:LODGroup, @lodsize}
- Paired with the Search Table workflow (more on this later) Search Expressions allow a user to run complex queries on a project and display this information in a tabular fashion. Search Expression could be used as the backbone of a Continuous Integration or Validation system.
I don’t want to dig too deep into the various syntax of Search Expressions since it can be a really vast subject. But I want to give you a quick taste (good or bad) of the type of queries you could run:
Find all prefabs referencing any texture with the name rock.
t:prefab ref={t:texture rock}
This means the system will run the query _t:texture rock _and then for all those textures a query _t:prefab ref=<rock> _will be run. The results of all those queries will be aggregated and this will become the final results.
Find the number of each distinct types of assets in my project:
count{t={distinct{select{a:assets, @type}}}}
Compute the average lodsize of all LODGroup assets in my project:
avg{select{t:LODGroup, @lodsize}}
Basically if you see curly braces, think Search Expression. And think of all evaluators: avg, select, distinct as processors for stream of items. All evaluation happens in a thread in the background of Unity so regardless of the complexity or the number of queries needing to be run, the Search Window will stay as responsive as possible.
Search Queries are a good way to save those long Search Expressions to make it easier to run them without retyping the whole statement:
The Search Window can visualize objects in various ways: compact list view, big list view or multiple sizes of grid icons.
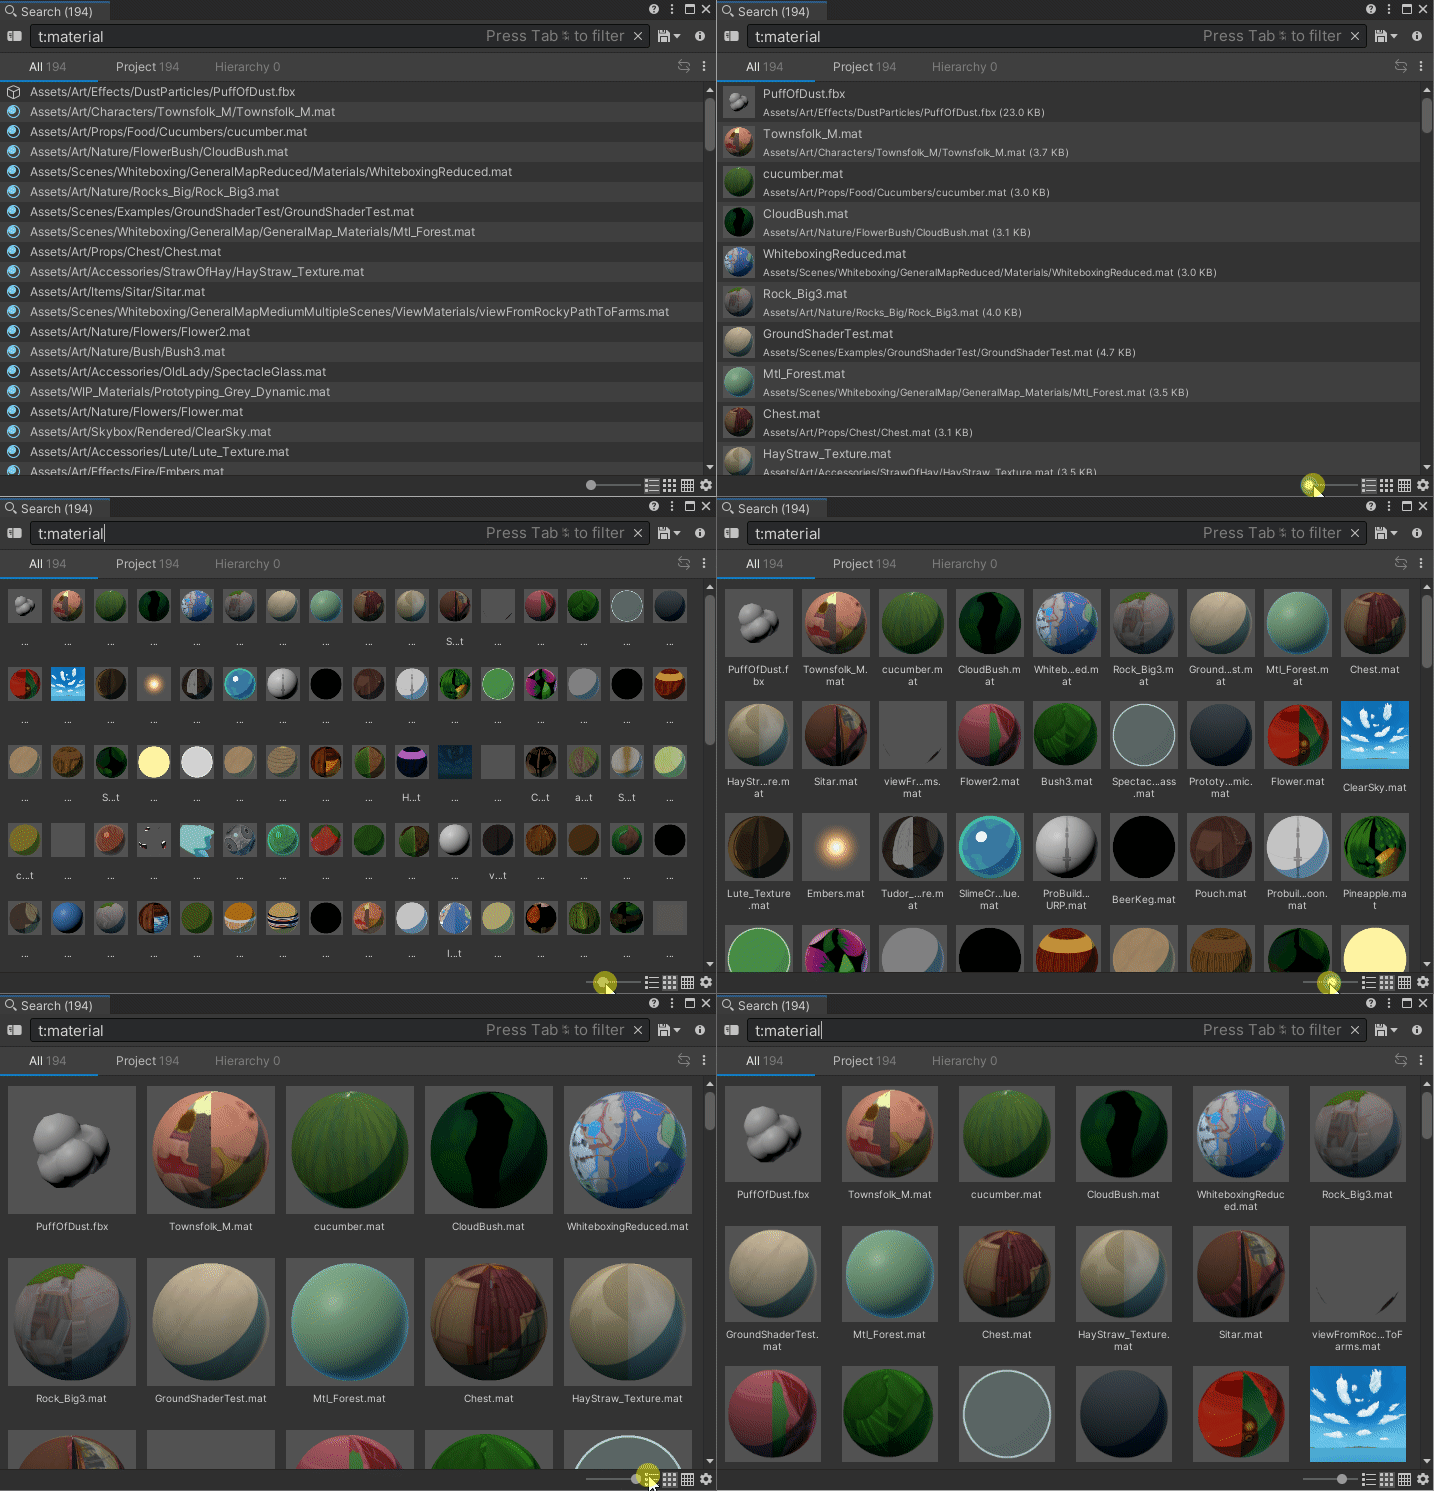
We decided for 21.2 to go bold and allow user to display items in a table:
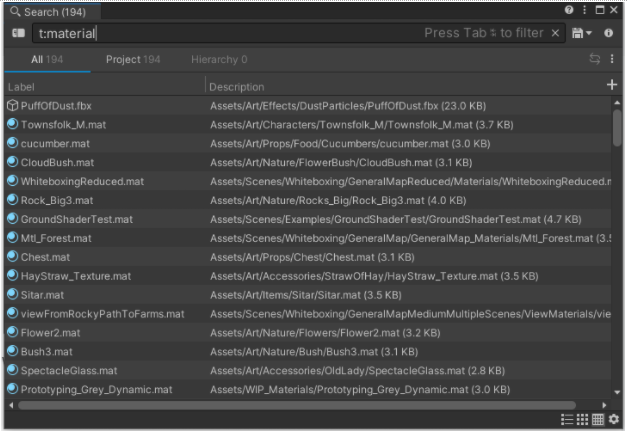
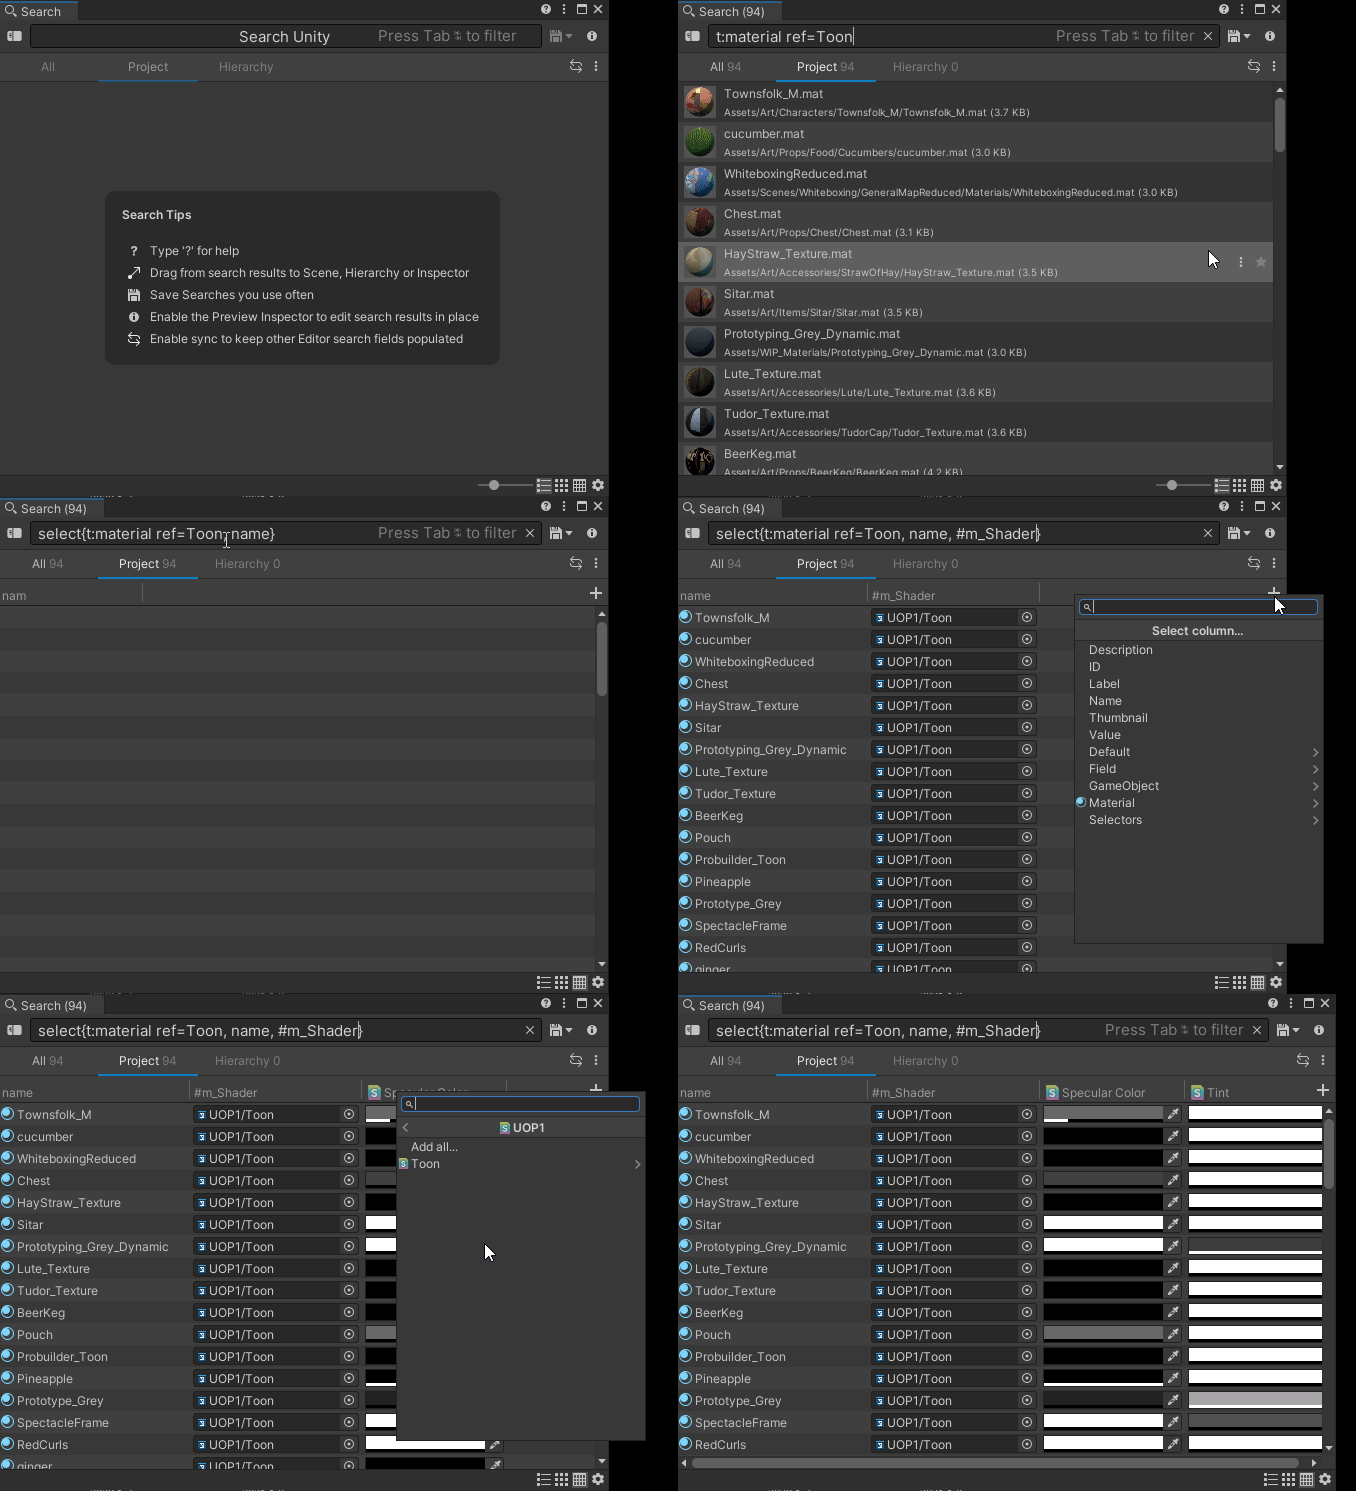
This is practical if you want to sort items by names (or description) but it gets even better when you can extract properties from SearchItems using a Search Expression and create a Column Layout that look like this:
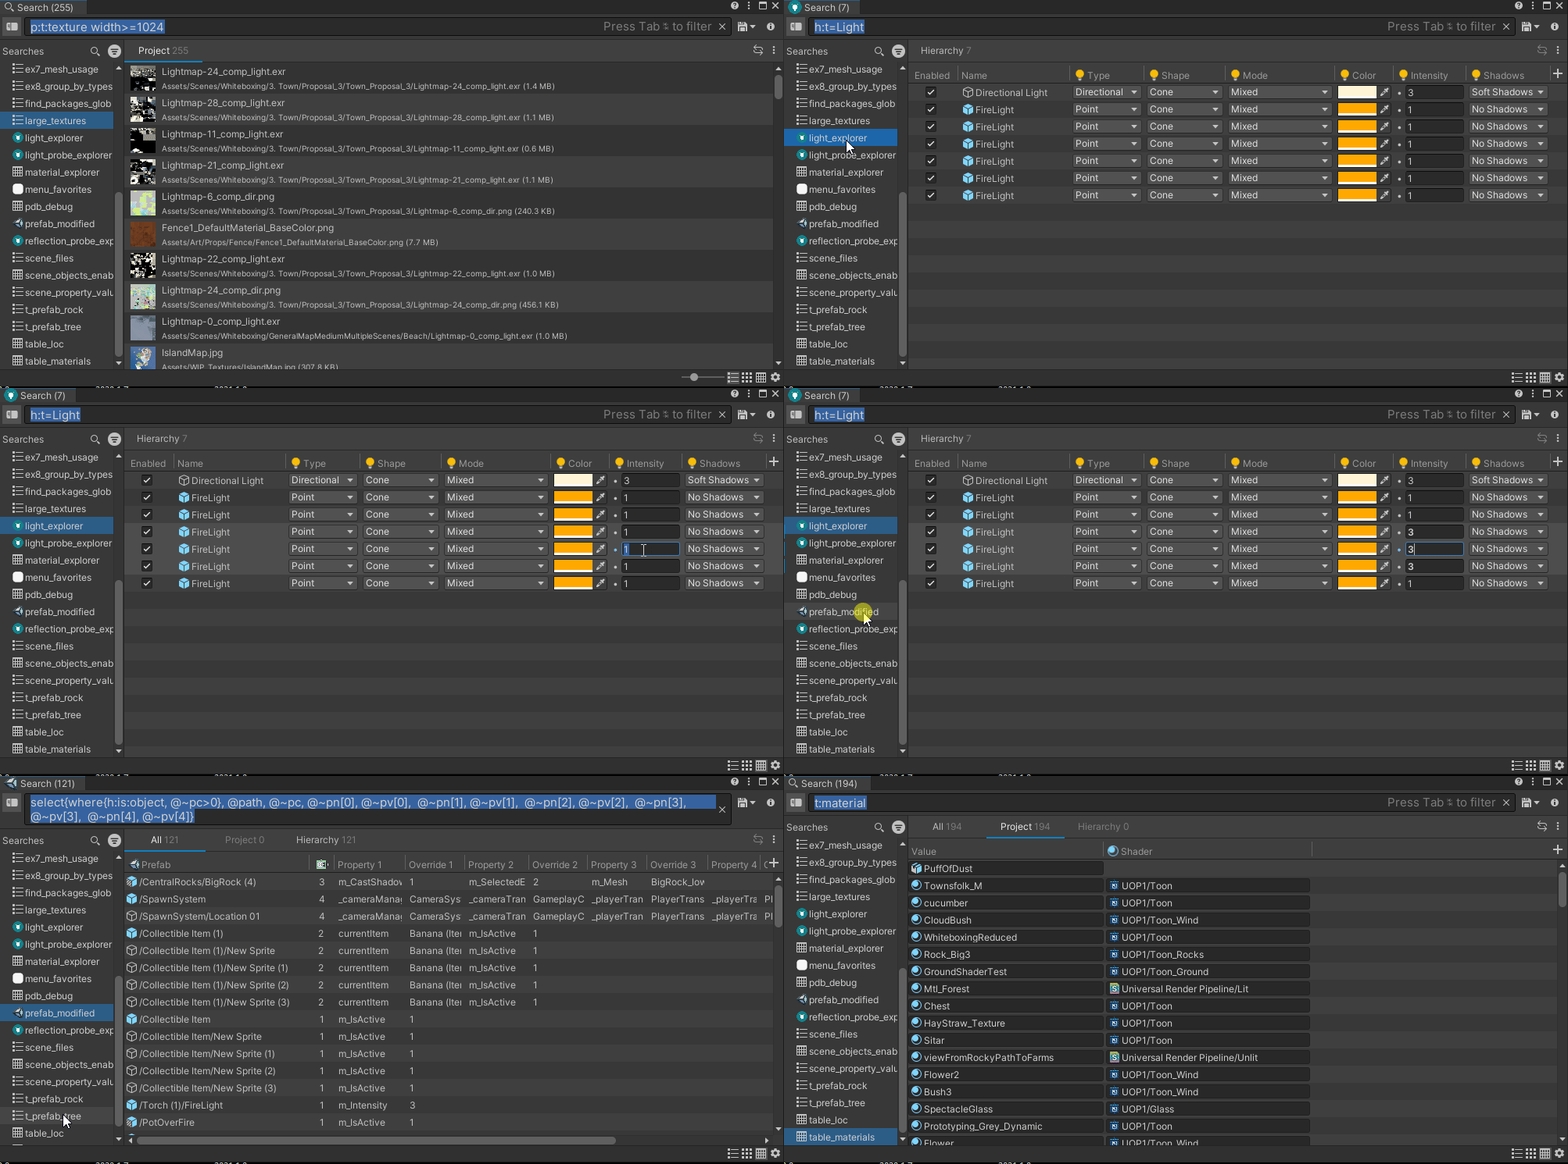
Of course taking this much time to set up a column layout would be really bad if you couldn’t save the layout on disk. Fear not: when saving a Search Queries we persist all the Search view state which includes any column specification! This allows you to create your own “Data Explorer” that is useful to compare multiple property values against each other:
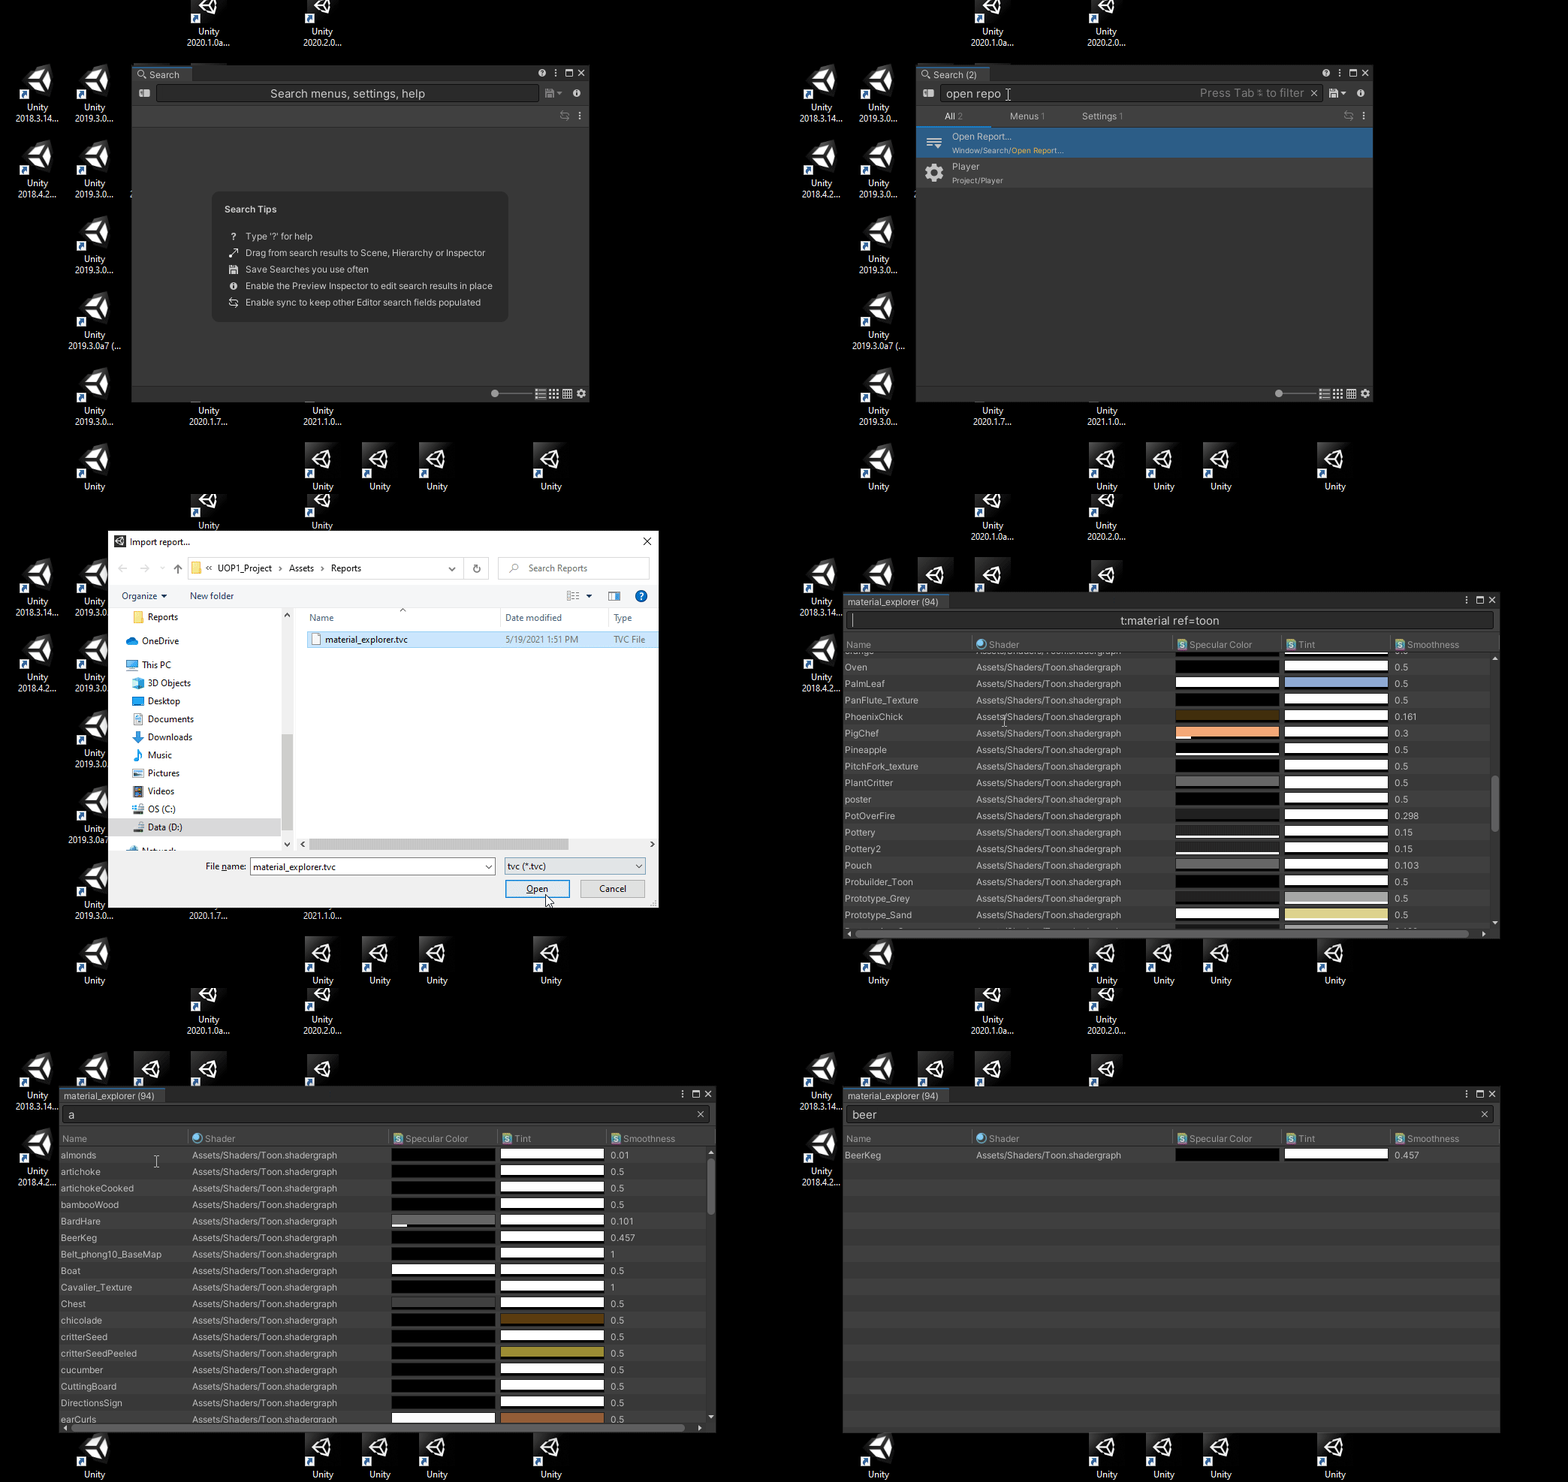
When a table is properly set up, it can be used to investigate or even modify data. But it can also be used to export all of this data either in a CSV file to easily open in Spreadsheet or to a json file which could easily be consumed by a webapp.
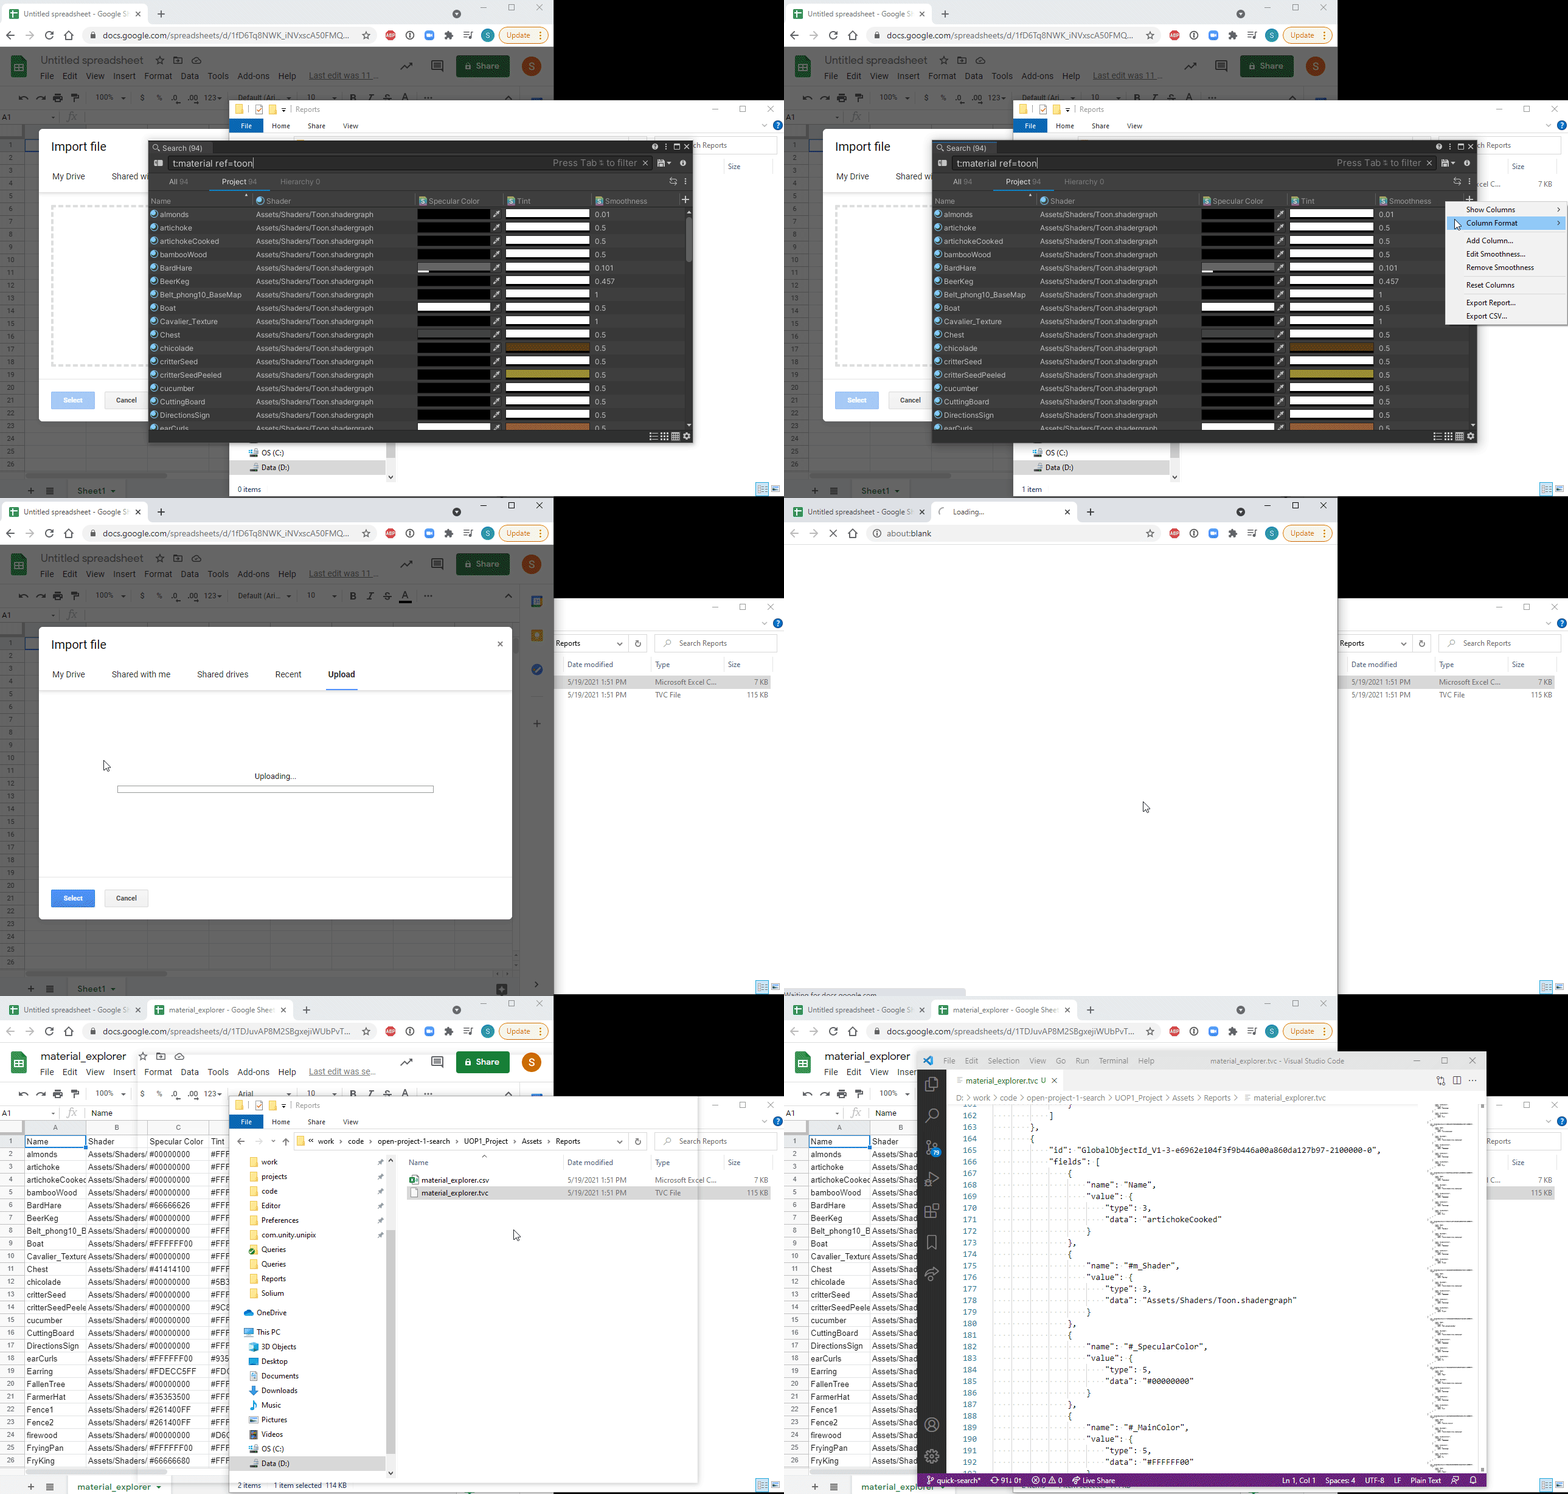
You can open the json (tvc) report within Unity if you would like to compare multiple reports together or against a live query. Please be advised that opening a report works with static data and represents the state of a query in time. You can search for values in the report but this is not a live query run against your project.
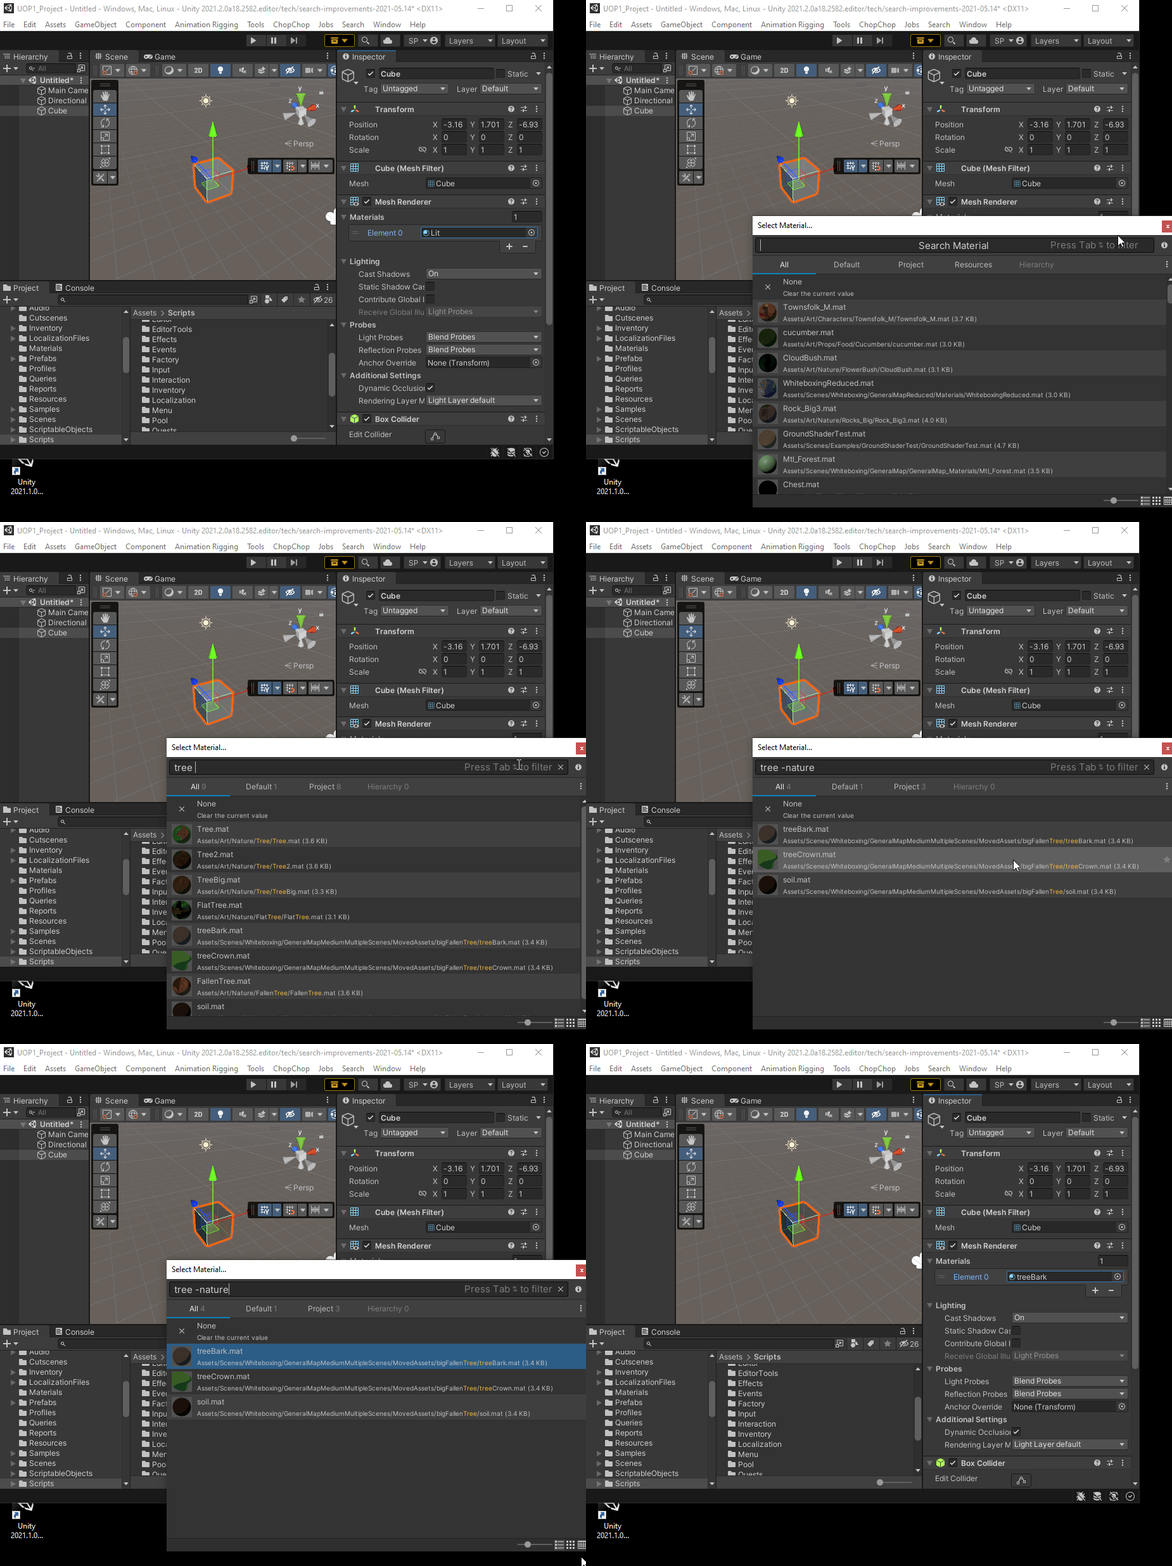
When developing for 21.2 we felt the Search Window experience was good enough that it could be used as an Object Picker. We have decided not to replace the Legacy Object picker (at first) but to provide various opt-in ways of using the Search Picker when needed.
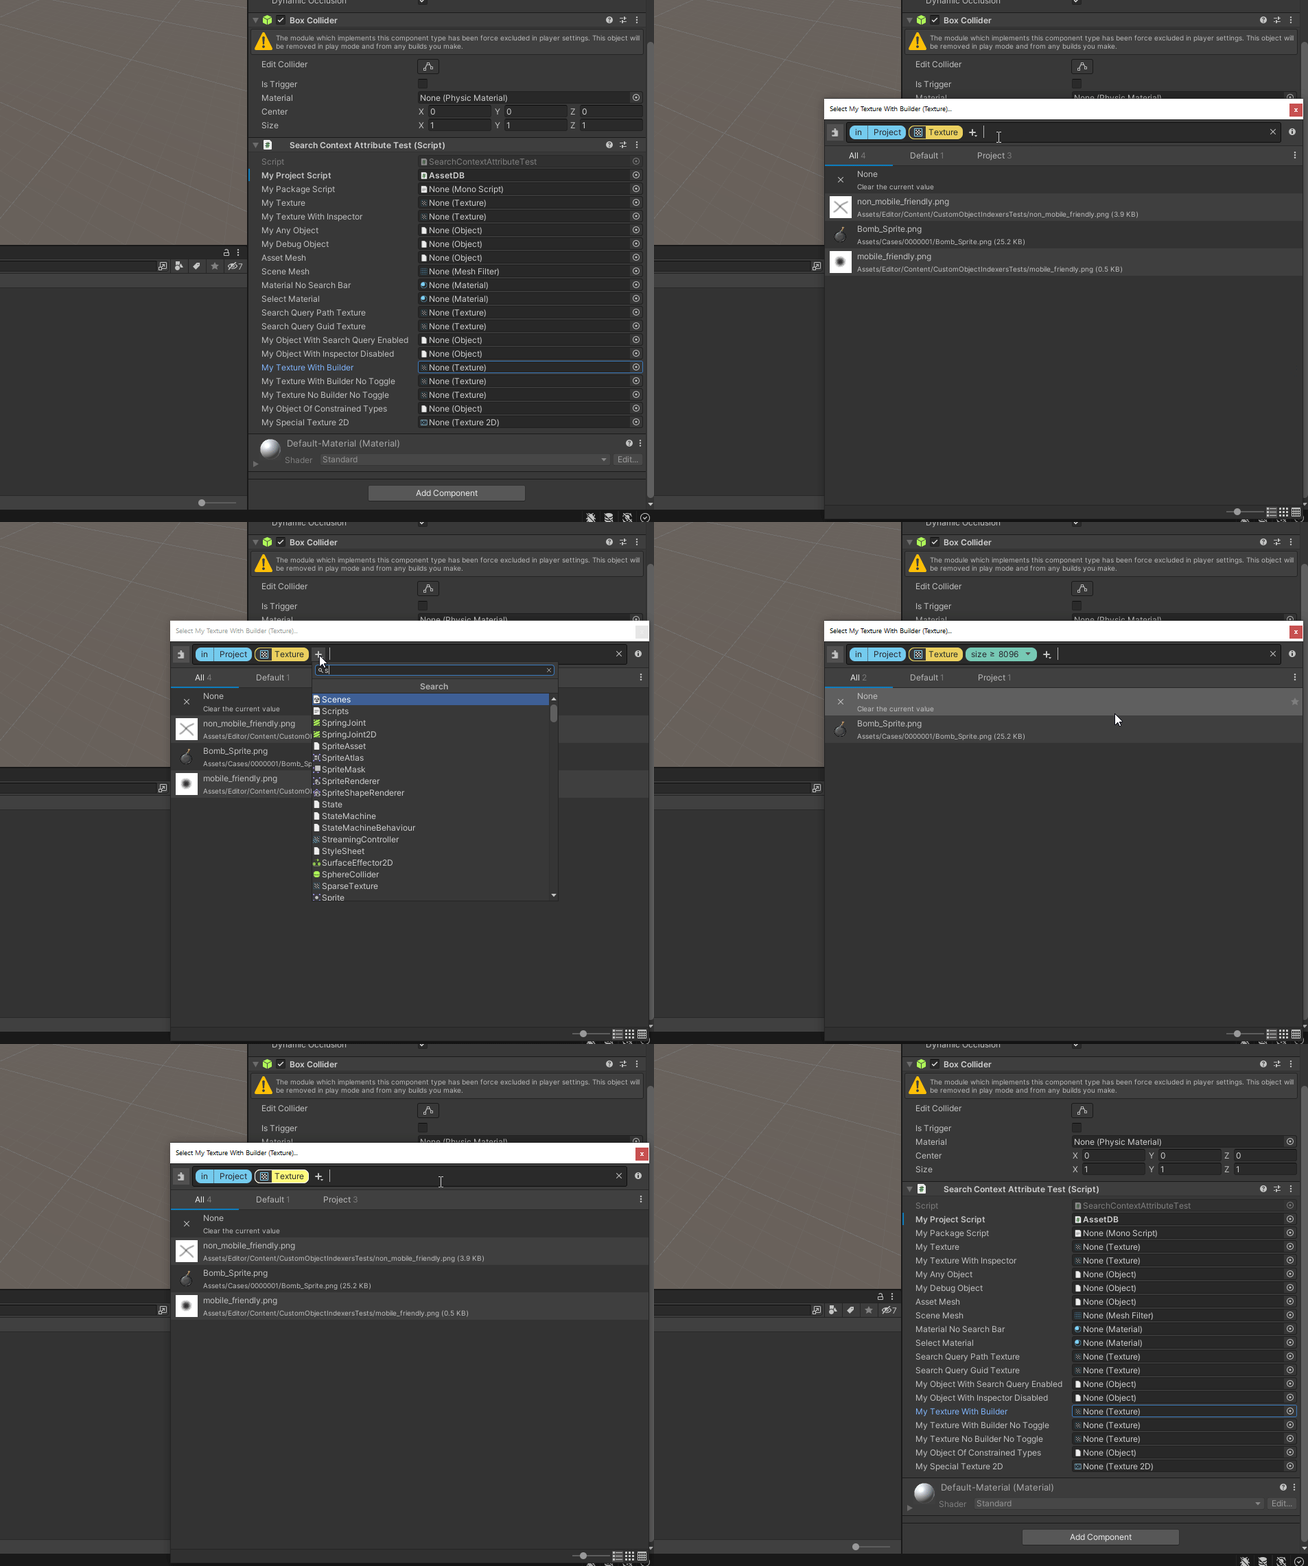
The first way to use the Search picker is to decorate objects properties in your MonoBehaviour with the SearchContextAttribute:
public class Weapon : MonoBehaviour
{
    [SearchContext("_t:texture width>=1024 -png -lightmap_", SearchViewFlags.GridView, "asset")]
    public Texture2D icon;
    public int damage;
This snippet of code would pop a Search Picker with a pre-populated query (t:texture width>=1024 -png -lightmap) in GridView allowing you to leverage the Search Window to choose a texture.

If you are building custom UI using either IMGUI or UIToolkit you can invoke our dedicated ObjectField that takes a SearchContext as parameter allowing you to customize what is the initial query and which providers should be available (scene, assets, yourOwnCustomProvider). We hope this workflow will help add more context to the Object Selection mechanism.
We finally support a thermonuclear option to replace all Object pickers with the Search Picker. You can go to the Search Settings page and select Advanced as the Object Selector.
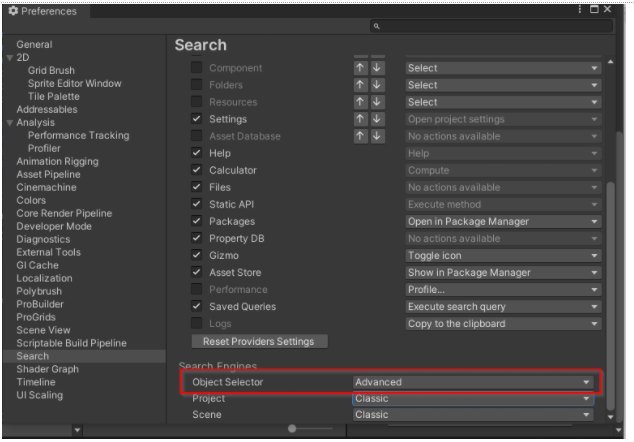
If this setting is set to Advanced, any ObjectField used anywhere in Unity will use the new Search picker.
When opening the Search Window, the Landing page helps you start building a query in a more efficient fashion.
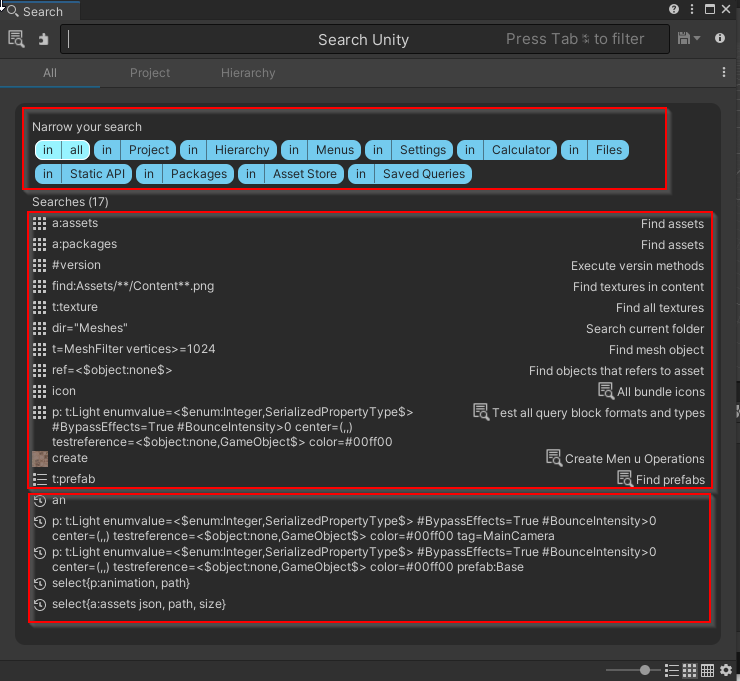
This page is available when the Search field is empty. It allows these workflows:
- The top section of the Landing page allows to select a search area (AKA a Search provider) for your search. Clicking on a search area block will filter out the queries and recent searches below. Double clicking on a search area block will insert the filter token of this area in the search field to help you narrow down your search.

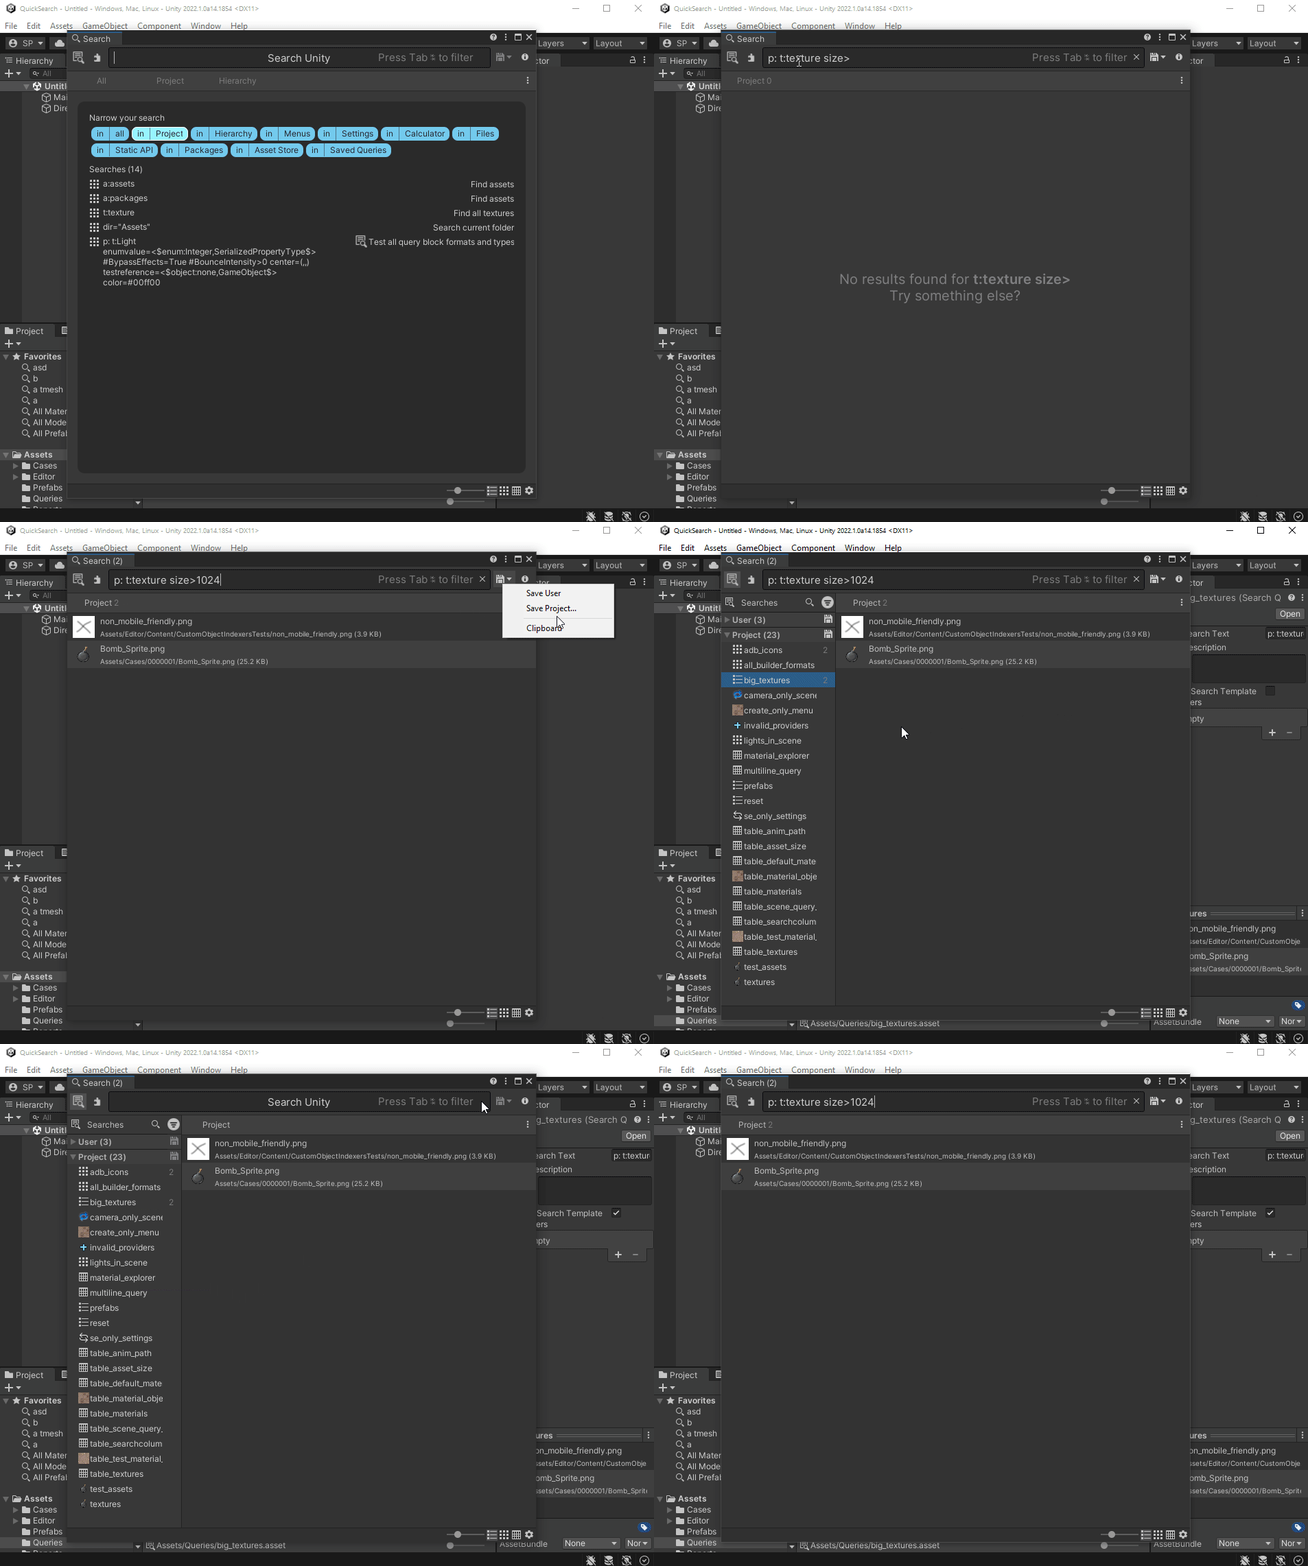
- The middle section shows a list of Queries available for the currently selected Search Area. You can click any of those queries to have them be executed. Those queries are either SearchTemplates: queries generated dynamically for a given Search Area when the [SearchTemplate] attribute is used in code. Or these can be normal SearchQuery that have been tagged with the Scene Template attribute.
Here is how to tag a SearchQuery so it appears in the Landing page:
- The bottom section shows recent queries that match the selected Search Area:
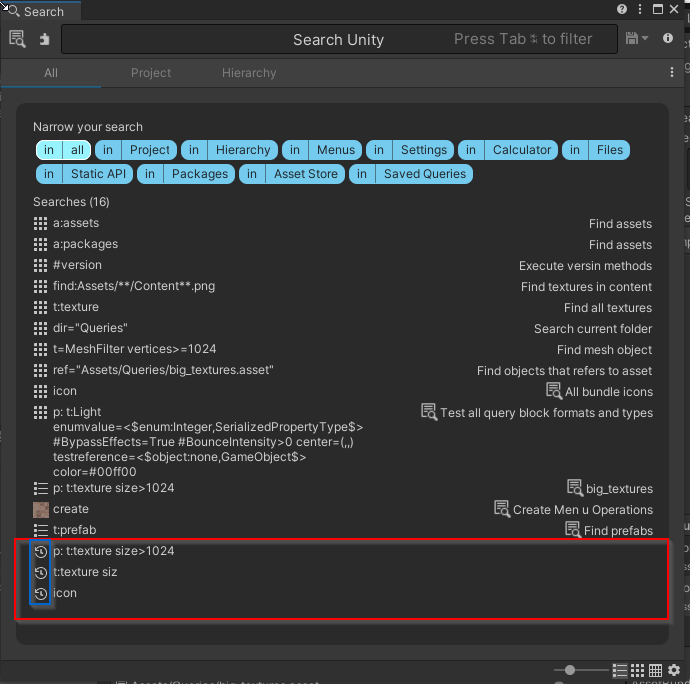
The Search Window can easily be used to type a few characters and help you find some objects quickly. But as we saw above, the Search Language Syntax is rich and powerful and allows for really complicated and precise queries. The trouble is often remembering which filters are available for a specific Search provider or what is the name of a property of a specific type so you can compare it agains a threshold value.
The new Query Builder workflow should help you craft complicated queries and explore your project:
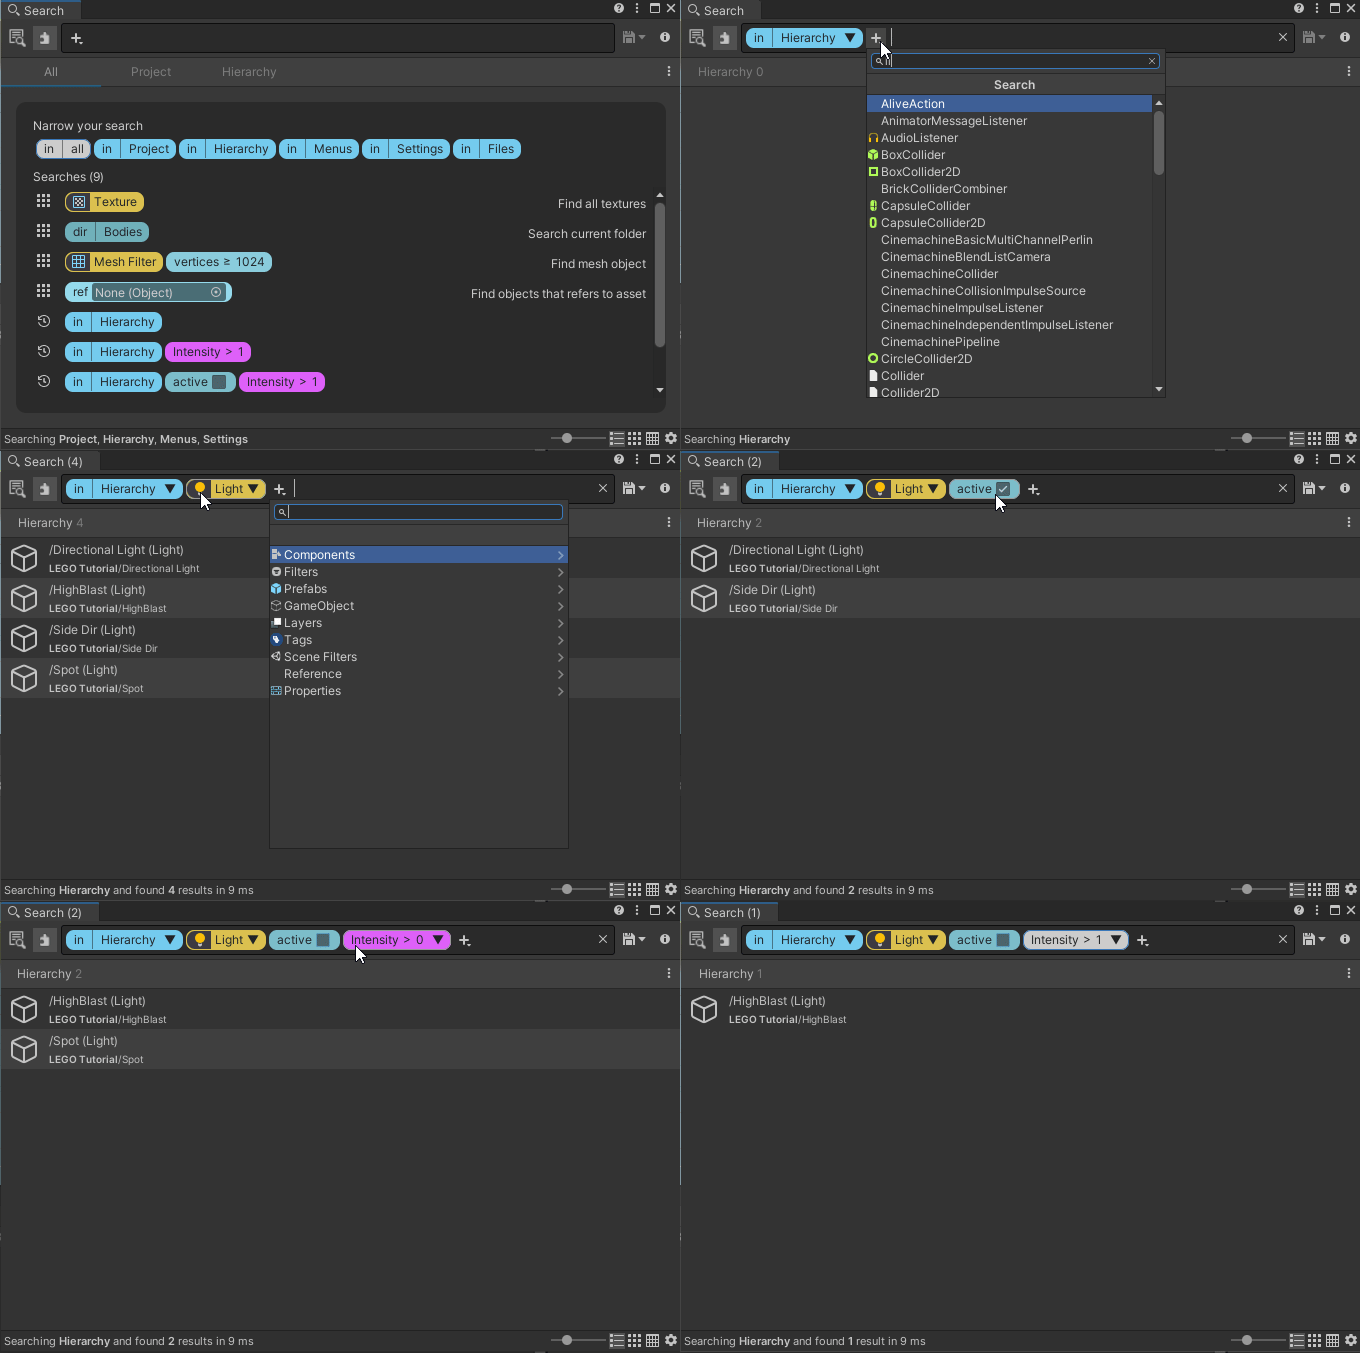
The Query builder can be activated with the builder toggle (see puzzle button next to the Search Field). Notice how the builder workflow plays well with the new Search Landing page:
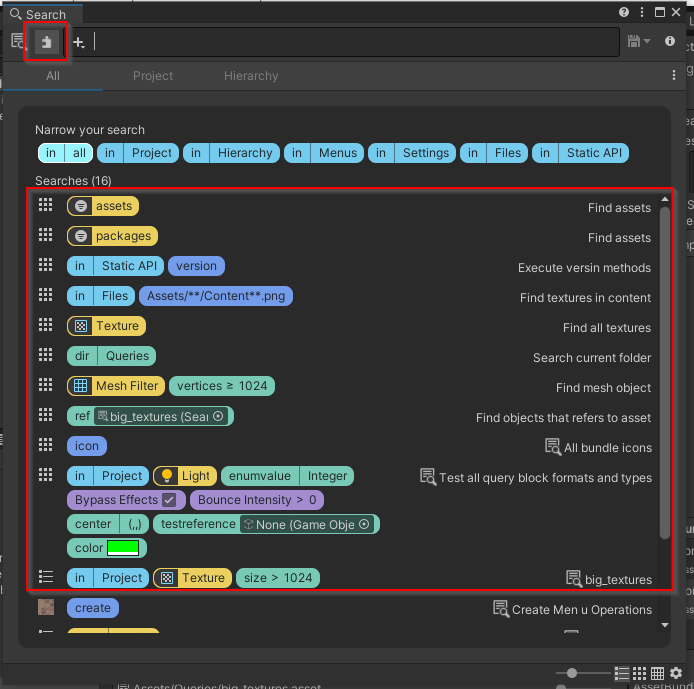
When workking with the Builder we suggest double clicking on a Search Area (Search provider) and then type Tab (or press the + button) to get search propositions contextual to that Search provider.
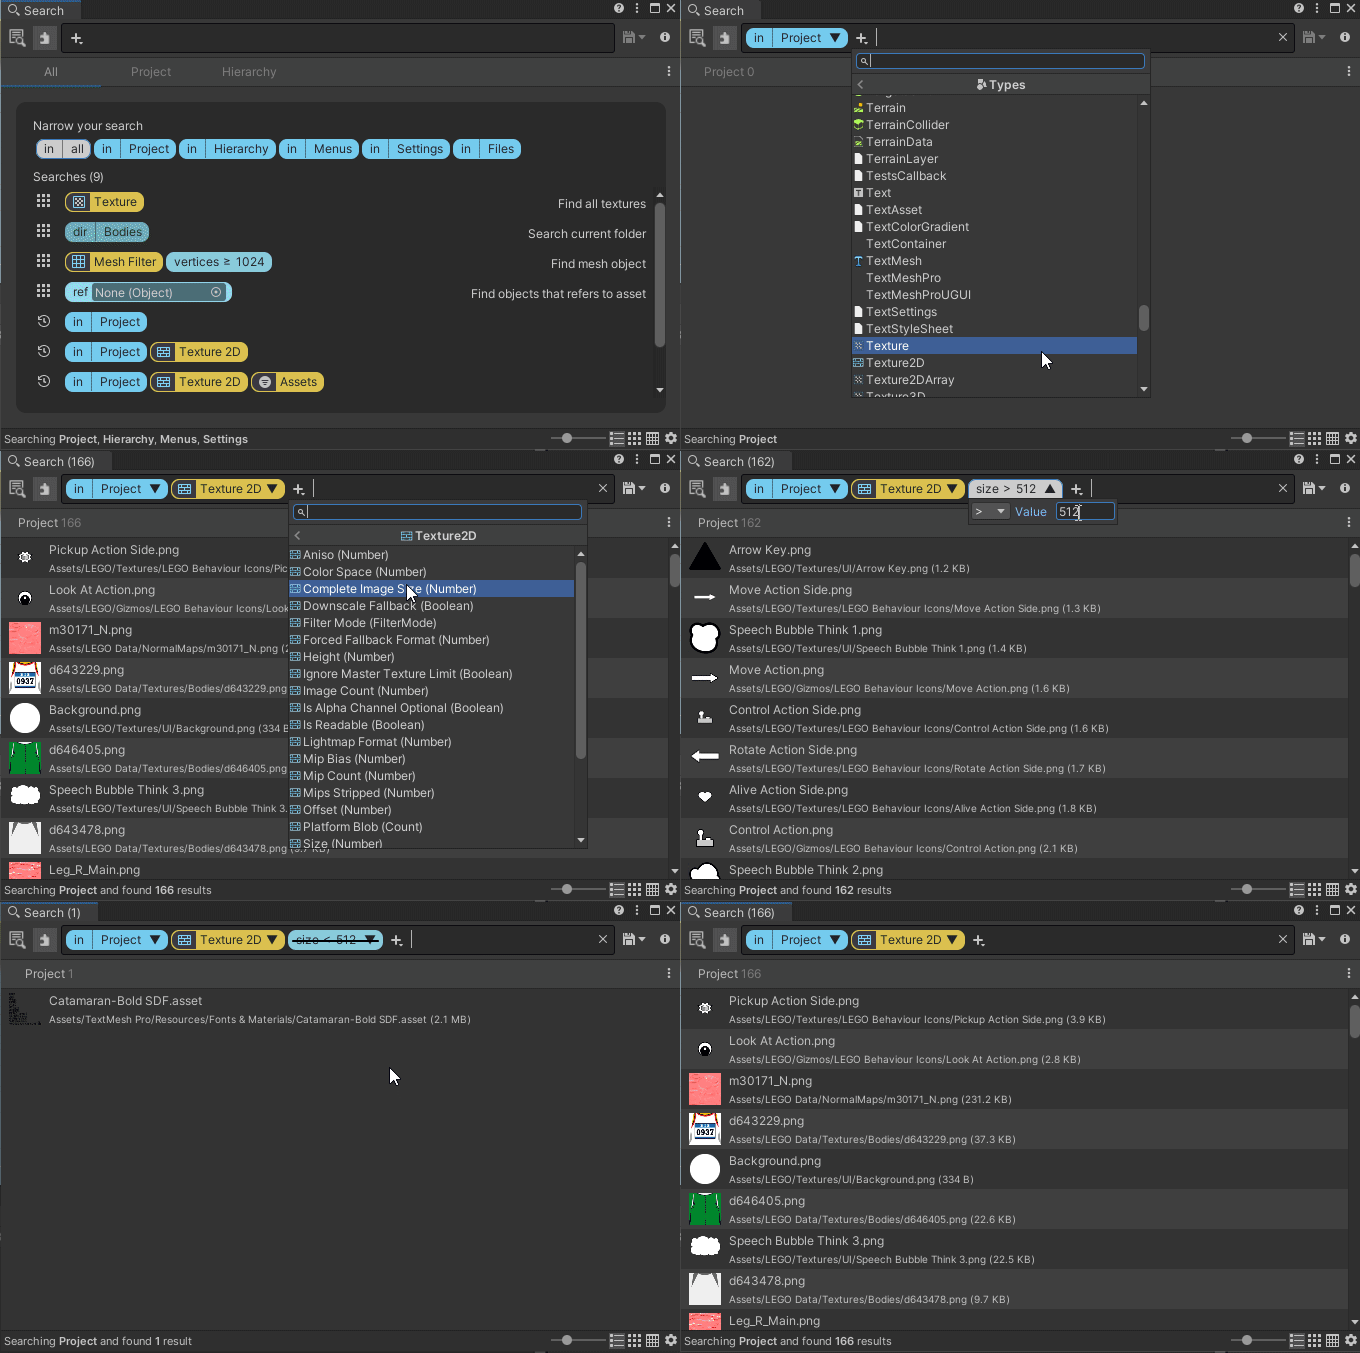
Notice how a Query block can be enabled, excluded or live edited using a decidated Block Editor. In the example if you modify the tweak the size filter the search results update automatically.
We have seen it is possible to use the Search window has a more customizable Object picker. the new Query Builder plays well with this workflow as you can pop the Search Picker with an initial query shown as readonly blocks:
If you have stuck this long, thanks a lot! I hope you liked this epic tour of the Search workflow. Be sure to tell us what you like and don’t like in our dedicated (Quick)Search forum thread. Don’t forget to try the various Search APIs. We sure would like to see new Asset store plugins containing dedicated Search Providers or Search Actions.