This is a Docker build context to build the Docker image for Magento2 CE 2.1.3 which contains all the running prerequisite ( Apache2, PHP7.0, MySQL, Redis).
It may cause unexpect issues to scale out your App Service Plan to more than 1 instances if your App use storage tools like MySQL and Redis in the Docker container. Since several instances of Docker container will be created after App Service Plan scaled out to mutiple instances, and every instance of Docker container will have 1 MySQL server in it, it's hard to synchronize data in serveral database servers. As a result, we recommend you use 1 instance of App Service Plan if you are using MySQL or Redis in the Docker container, to scale out you would need to use Cleardb or external MySQL server.
- Ubuntu 16.04 (as base image)
- Apache2
- PHP7.0
- Redis
- MySQL
- phpmyadmin
- Magento2 CE 2.1.3
- Here we've downloaded the Magento2 CE 2.1.3 package from Magento Tech Resource and put it to our github repository which was referenced by our Dockerfile.
- If you want use the package from your own location, just put this argument in your docker build command:
--build-arg PACKAGE_URL=<your package location>.
And please note that:- Please ensure that the package you download is from Magento Tech Resource and the format of the package is Magento Community Edition 2.1.3.tar.gz.
- You need to login with your account to download the Magento2 CE 2.1.3 package from Magento Tech Resource.
At the same directory level with Dockerfile, run the command:
$sudo docker build [--build-arg PACKAGE_URL=<your package location>] -t [image name] .
run the command:
$sudo docker run -t -p 80:80 -e BASE_URL=http://<your host name>/ [-e ADMIN_USER=<your admin user> ...] [--name <the Docker container name>] <image name>
You may need to set environment variables to run the image, here are all the environment variables and their default values:
ADMIN_FIRSTNAME         firstname             <admin first name>
ADMIN_LASTNAME          lastname              <admin last name>
ADMIN_EMAIL             [email protected]    <admin email>
ADMIN_USER              root                  <admin user>
ADMIN_PASSWORD          MS173m_QN             <admin password>
DB_NAME                 magento               <database name for magento>
DB_USER                 magento               <database user name for magento>
DB_PASSWORD             MS173m_QN             <database password for magento>
MYSQL_ROOT_PASWORD      MS173m_QN             <the password of MySQL root user>
BACKEND_FRONTNAME       admin_1qn                 <backend frontname>
APACHE_USER             apache                <the user name of apache2 authentication for phpmyadmin>
APACHE_PASSWORD         MS173m_QN             <the password of apache2 authentication for phpmyadmin>
PHPMYADMIN_PASSWORD     MS173m_QN             <the password of phpmyadmin>
BASE_URL                http://127.0.0.1/     <site base url>
USE_REWRITES            true                  <whether to use web server rewrites for generated links>
ADMIN_USE_SECURITY_KEY  true                  <whether to use a randomly generated key value to access pages in the Magento Admin and in forms>
PRODUCTION_MODE         false                 <whether to set the site to production mode>
####Note:
- The variable BASE_URL must be set the same with your host name to avoid issues on accessing the Magento2 Admin Panel, for more details, please see the introduction of the parameter
base-urlin Magento2 command line installation instruction. - If the environment variables listed above haven't been set, the default values will be used, however, it's recommended to use different values for security reasons.
- It's not recommended to simply use 'admin' as the value of BACKEND_FRONTNAME, for more details, see the introduction of the parameter
backend-frontnamein Magento2 command line installation instruction. - By default, the Magento2 site will be deployed with default mode, you can choose to make it deployed with production mode by set the PRODUCTION_MODE to true, for more details of Magento2 mode, plase see here.
- The environment variables DB_NAME, DB_USER and DB_PASSWORD are used for magento database, changing password for magento database from phpmyadmin panel during website running will cause database connection error.
- For more details of the environment variables USE_REWRITES and ADMIN_USE_SECURITY_KEY, please see the introduction of the parameters 'use-rewrites' and
admin-use-security-keyin Magento2 command line installation instruction. - The password must be complex enough to meet the requirement for Magento2 and MySQL, or all the applications cannot be run normally.
##How to manage your MySQL database
You can visit phpmyadmin page from the URL http://<your host name>/phpmyadmin to manage your database.
####Note:
- We've enabled the apache authentication for phpmyadmin, so you need to set the apache anthentication username, password and phpmyadmin password by setting the value of environment variables APACHE_USER, APACHE_PASSWORD, PHPMYADMIN_PASSWORD.
- The website cannot run if your password complexity cannot meet the requirement of MySQL.
- The username of phpmyadmin is
phpmyadmin, to magante all the databases, please login to phpmyadmin with therootuser of MySQL. - For security reasons, plase do not use default values of environment variables above.
- You can login to phpmyadmin with these 3 uers:
root,phpmyadminand<magento database user>, for security reasons, please set different passwords for them. - changing password of magento database from phpmyadmin panel during website running will cause database connection error, because the application use it to connect to database.
- Push the image to the Docker Hub after you build it.
- Change the value of the parameter 'dockerRegistryImageName' (located at azuredeploy.json file) to the name of your pushed image (or change it during the deployment).
- Press this button.
- Create the resource Azure web app on Linux (Preview).
- Add these application settings from azure portal:
DOCKER_CUSTOM_IMAGE_NAME     <Docker image name in Docker Hub>                               <Required>
ADMIN_FIRSTNAME              <admin first name>
ADMIN_LASTNAME               <admin last name>
ADMIN_EMAIL                  <admin email>
ADMIN_USER                   <admin user>
ADMIN_PASSWORD               <admin password>
DB_NAME                      <database name for magento>
DB_USER                      <database user name for magento>
DB_PASSWORD                  <database password for magento>
MYSQL_ROOT_PASWORD           <the password of MySQL root user>
BACKEND_FRONTN               <backend frontname>
APACHE_USER                  <the user name of apache2 authentication for phpmyadmin>
APACHE_PASSWORD              <the password of apache2 authentication for phpmyadmin>
PHPMYADMIN_PASSWORD          <the password of phpmyadmin>
BASE_URL                     <site base url>                                                 <Required>
USE_REWRITES                 <whether to use web server rewrites for generated links>
ADMIN_USE_SECURITY_KEY       <whether to use a randomly generated key value to access pages in the Magento Admin and in forms>
PRODUCTION_MODE              <whether to set the site to production mode>
Make sure the application settings of the web app are all conform the rules.
The Docker image will be pulled and run while the first request reach the server according to the value of DOCKER_CUSTOM_IMAGE_NAME, so you have to wait the web broswer to show the website page.
It will take less than 1 minute to show this page, it means the docker container has been run and the apache server has been enabled.

If you choose not to deploy Magento to production mode by setting PRODUCTION_MODE to false, you need to wait for about 3 minutes and refresh the web page to see Magento home page, however, if you choose to deploy Magento to production mode, for the time costing of switching to production mode, you have to wait for about 8 minutes and refresh the web page to see the Magento home page.
If the Magento home page shows, you can try to visit the admin portal to check if the Magento run normally, what's more, you can optimize your website according to the tutorials below.
#####Note:
- If you don't set values for environment variables above, default vaules will be used.
- The website cannot run if your password complexity cannot meet the requirement of Magento2 and MySQL.
- Your Docker image will be pulled and run while the first request reach the server, so the cold start process will be quite long.
- The environment variables set in application settings will be read by the docker container at the first running, so modification during the website running is noeffective.
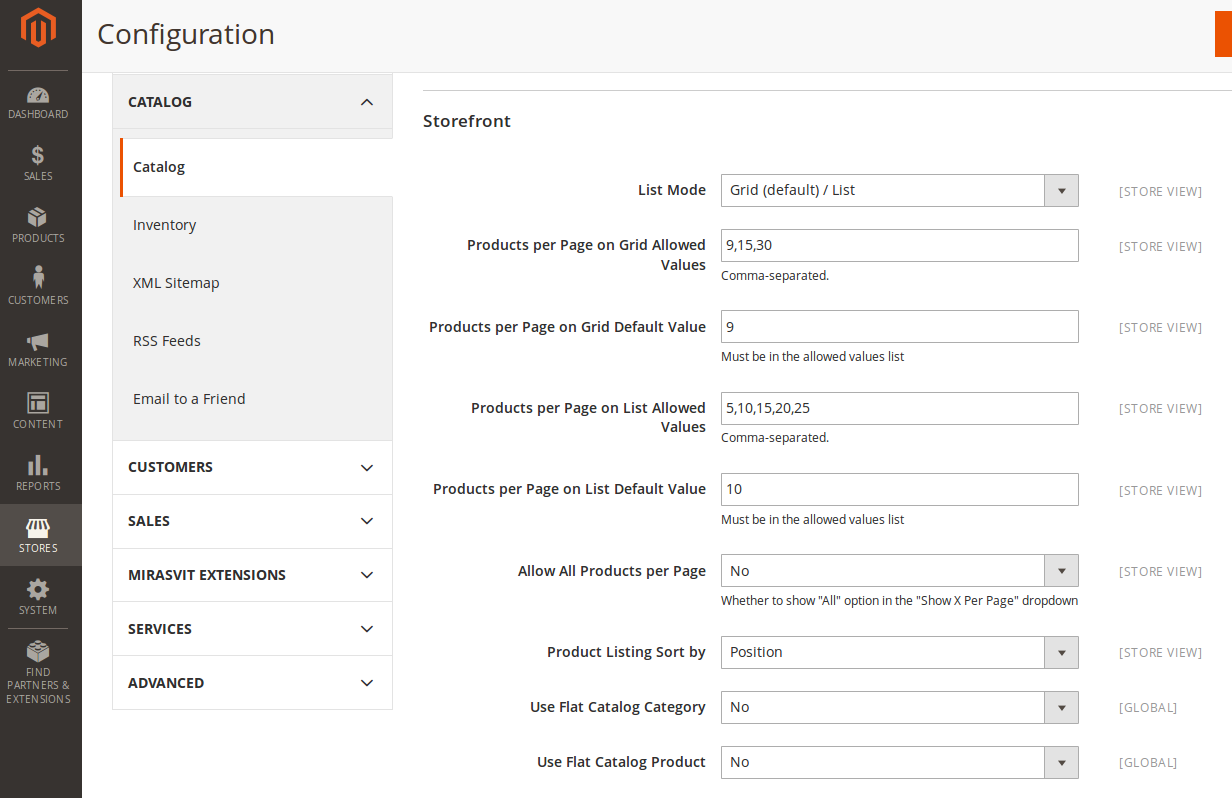
Go to the admin panel, STORES -> Configuration -> CATALOG -> Catalog -> Use Flat Catalog Category and put Yes .

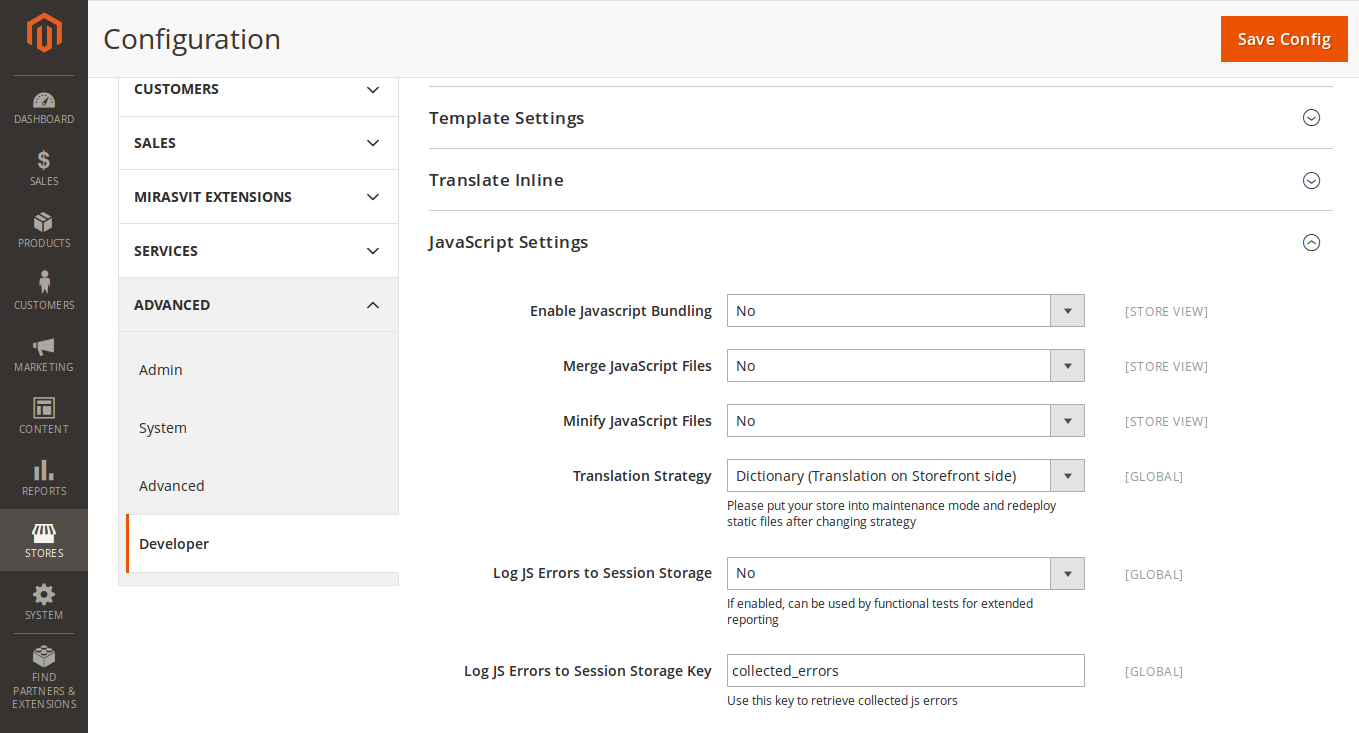
For JS:
- Go to the admin panel, STORES -> Configuration -> ADVANCED -> Developer -> JavaScript Settings
- Merge JavaScript Files -> Yes
- Minify JavaScript Files -> Yes

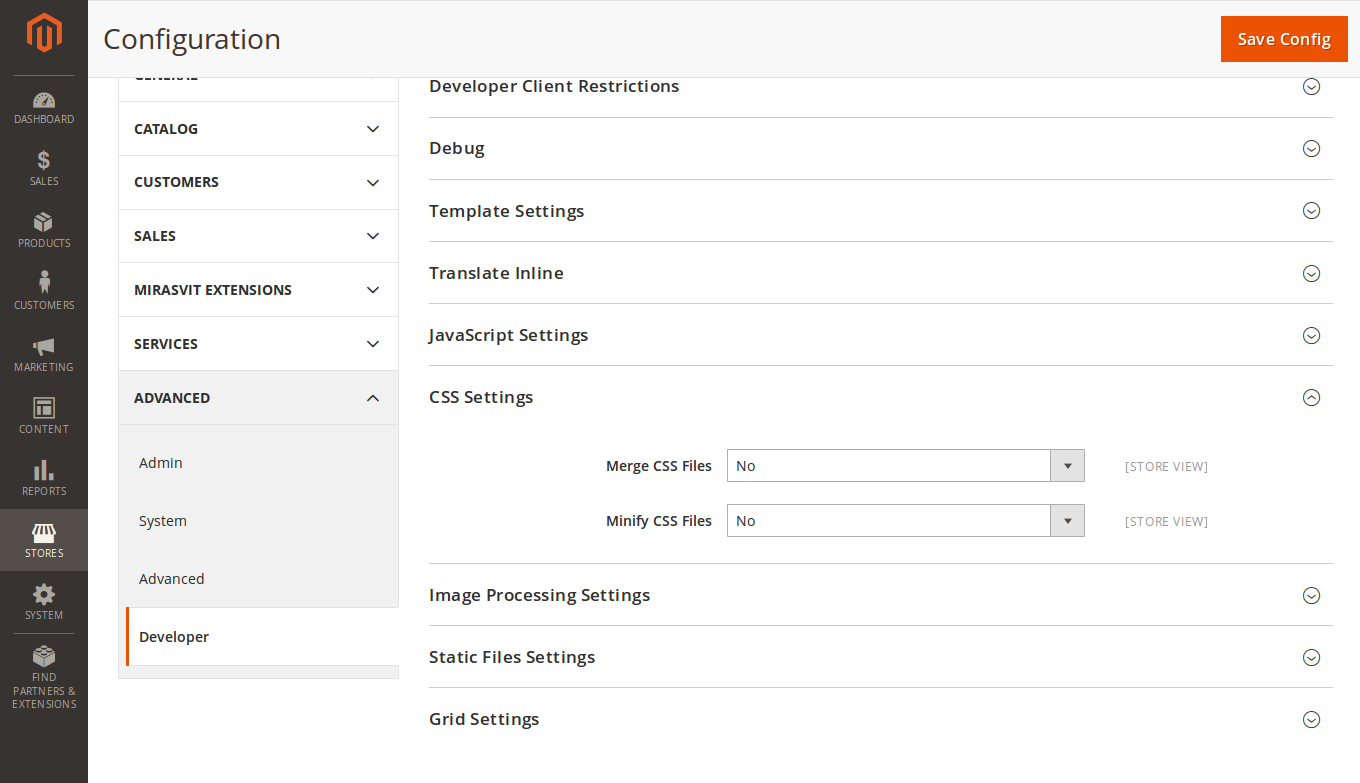
For CSS:
- Go to the admin panel, STORES -> Configuration -> ADVANCED -> Developer -> CSS Settings
- Merge CSS Files -> Yes
- Minify CSS Files -> Yes

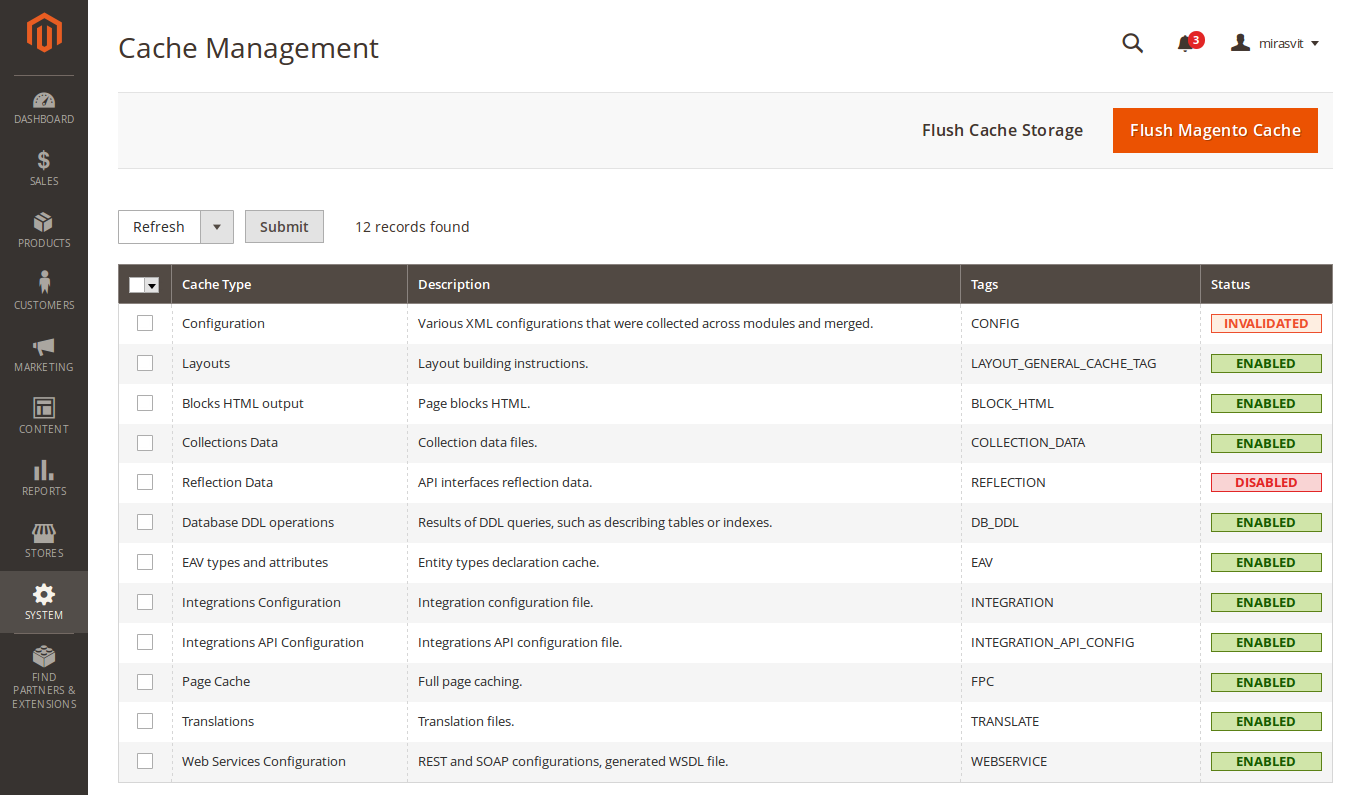
Go to admin portal, SYSTEM -> Cache Management

Content Delivery Network (CDN) is a special system that can connect all cache servers. In addition to supported geographical proximity, CDN will take over the delivering web content and fasten the page loading.
Go to admin portal, Stores -> Configuration > General > Web > Base URLs (Secure)

