-
Notifications
You must be signed in to change notification settings - Fork 63
Skyminer Skywire Installation Guide

This guide assumes that you have read and understood the readme.md, downloaded the official images and do every step exactly the way it is described. Misconduct will lead to the inability to connect and to potential reflashing. It is very important that there is no IP collision with your existing home router subnet. The default settings of the official images, as well as the router of the skyminer, are using the 192.168.0.0/24 subnet. Installation from source does not demand certain prevalent network settings.
The following guide will describe the necessary steps to install Skywire using the prepared official images on orange pi primes or other H5 boards.
For stable operation of Skywire, we suggest not deploying Skyminer to any type of public networks, including those in the café, on the campus, in the office towers etc.
When Skyminer nodes run for the first time, it takes them a while to finish the initialization process. Don’t switch them off in 5 minutes after power on, otherwise, the Micro SD cards need to be flashed again with the images.
- orange pi prime or similar H5 chipboard
- etcher or similar software to flash images on sd cards
- micro sd card adapter + sd card reader
- laptop/computer with LAN port + LAN cable
- Image of a Linux distribution of your choice that matches the board(s) you are using
This section covers the installation of Skywire using the prepared images or installing it from source.
Follow this guide if you need any help using it.
The prepared images are yet to be updated and therefore come with the old user interface. The update script will be released very soon until then you are advised to install Skywire from source if you want to work with the new user interface right from the start.
First, you need to download the images, make sure to get all 8 images, each image is prepared to run on a separate orange pi prime.
- Unzip the downloaded 'tar.gz' files, you'll end up with '.img' file.
- Unzip one image at a time and rename them (!) to display the node they are representing. By default each images is called
OrangePiH5_Prime.imgand you are advised to rename them tomanager.img,node1.img,node2.img,node3.img,node4.img,node5.img,node6.img,node7.img.
Download balenaEtcher. BalenaEtcher is cross platform image flashing software that does all the hard work for you. Run balenaEtcher as administrator and select the manager image file while the Micro SD disk is inserted into your computer (you need a micro SD card reader/SD card reader + micro SD to SD card adapter) and click on ‘Flash’.
After flashing ended successfully, please eject the Micro SD and insert it into an Orange Pi Prime in Skyminer.
Repeat this procedure until all of the 8 images are flashed and inserted into the 8 Orange Pi Primes.
Once the flashing is done you have two options:
- connect only manager and node1-6 to the skyminer router and use the 8th port for your computer/laptop
- Use the networking guide beforehand to prepare the router for access from within your home network
This section will cover the setup choosing option 1, regardless of that, you need to make sure you don't have IP conflicts as mentioned in the beginning. Your home network needs to be different than 192.168.0.0/24*. By choosing option 1 you won't be able to view all 8 nodes in the manager, one LAN port of the skyminer router will be used for your computer/laptop to connect to it.
Plugin all previously flashed micro sd cards, connect all orange pi prime to the LAN ports of Skyminer router.
Make sure that all the switches next to Orange Pi and on the socket are OFF.
Connect the power cable, then turn on the socket switch, and wait until all the LEDs on the router go off, which indicates the finish of booting, before carrying out the next step.
Then connect Skyminer WAN port to one of the LAN ports of house router, with LEDs lighting up accordingly. Turn on the switch of the Skywire Manager node, and wait until its LAN status LED lights up on Skyminer router, before carrying out the next step. After that, turn on the switches of other nodes one by one, with a recommended interval of 15 seconds between booting any two nodes. When all the 8 LAN LEDs on Skyminer router goes on, all the nodes have booted up successfully.
Now you can unplug the Ethernet cable of a non-manager node (orange pi prime with images of node1-7) and connect your computer/laptop to the vacant port, in order to manage your nodes in the browser.
Open a new browser tab and visit 192.168.0.2:8000. The Skywire manager web interface will appear:
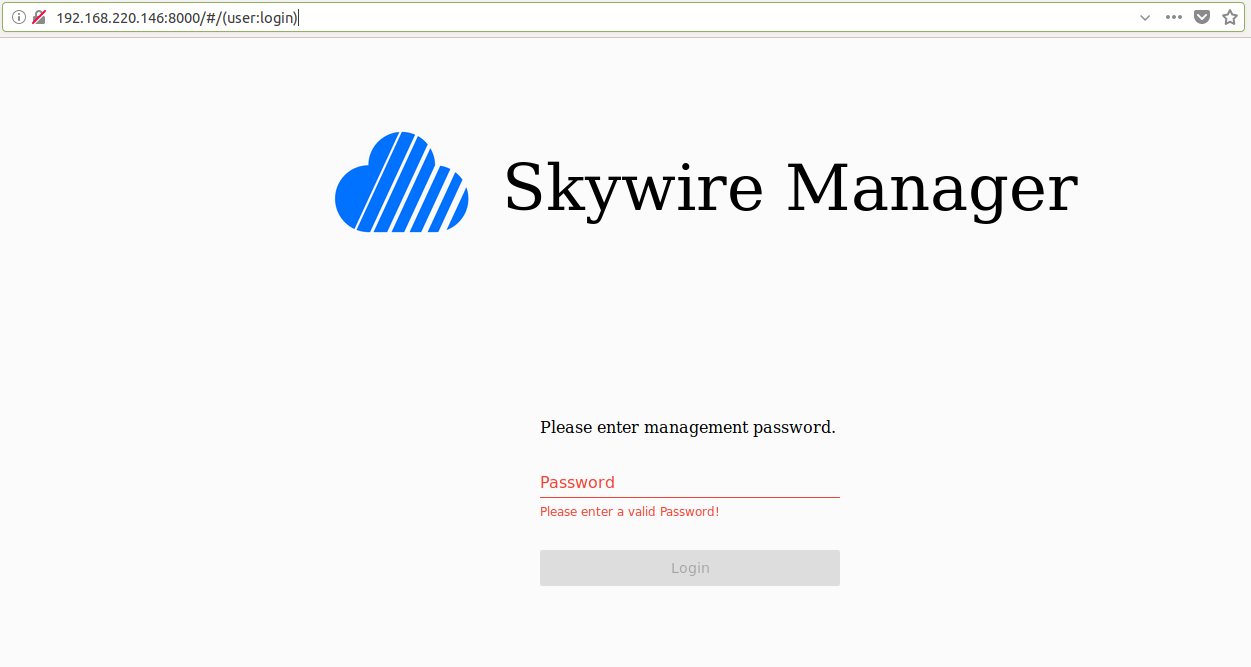
Login with the password 1234, you are forced to change it immediately and re-login afterwards. A successful installation should look like this:
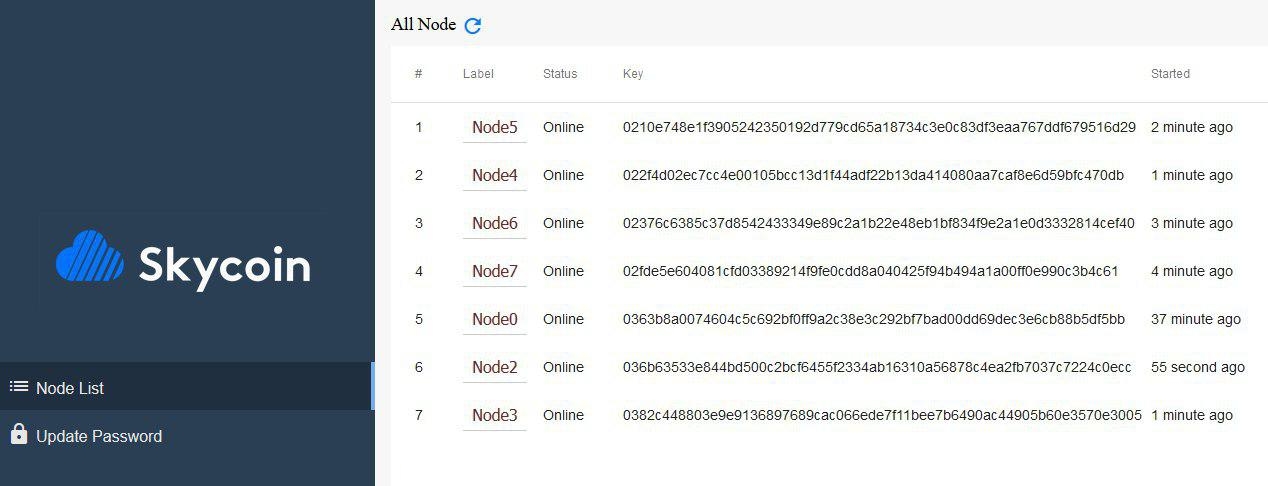
Note: keep in mind 1 node is missing due to the fact that your laptop is connected. You are advised to follow the networking guide to fix this. In this example node1 was unplugged from the Skyminer router, node0 represents the manager node.
If you click on the 64-character key of the node, it should look like the following:
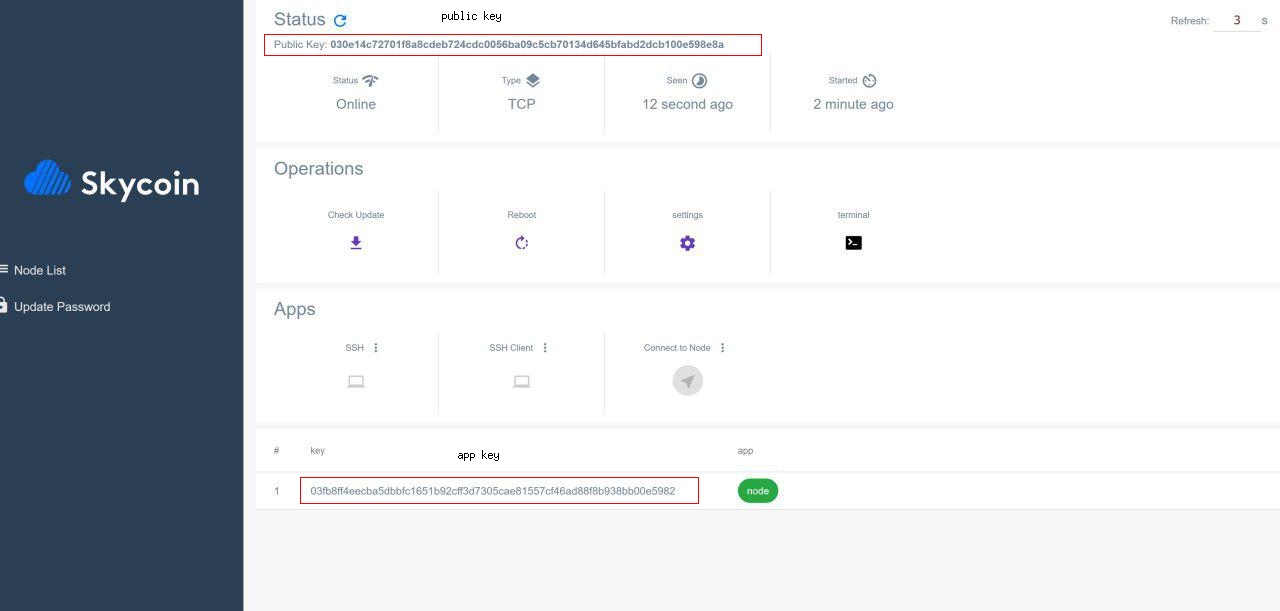
The red rectangles mark the public key and the app key of the node app of your node.
You should verify for all nodes that they are connected to the correct discovery server. By clicking on settings you should look at this screen with a green checkmark next to it.
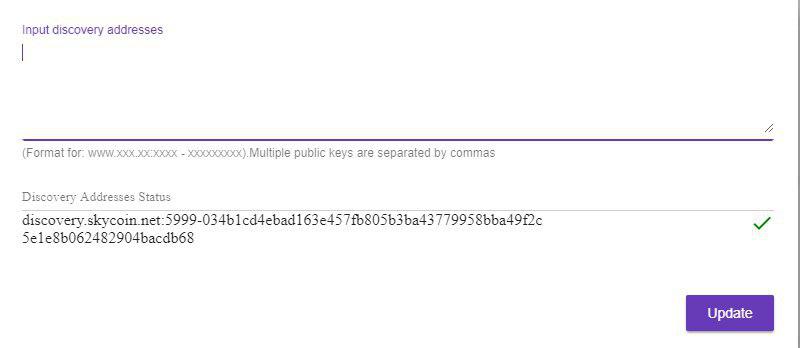
Additional to that you should look for your keys on the discovery website to be sure that your uptime is being counted. Checkout this guide to get further instructions on how to stay online.
If everything looks good you can label them by their IP addresses using this method. Adding a label to the list can be accomplished by simply clicking on it and entering the label content with your keyboard.
Continue with updating Debian 8 to 9 by performing these instructions. Next, you can upgrade your images to include the new manager user interface by executing the one time upgrade script.
This section covers the new manager UI. The prepared images right now do not include this UI since they need to be updated.
Open a new browser tab and visit 192.168.0.2:8000. The Skywire manager web interface will appear:

Login with the password 1234, you are forced to change it immediately and re-login afterward. A successful installation should look like this:
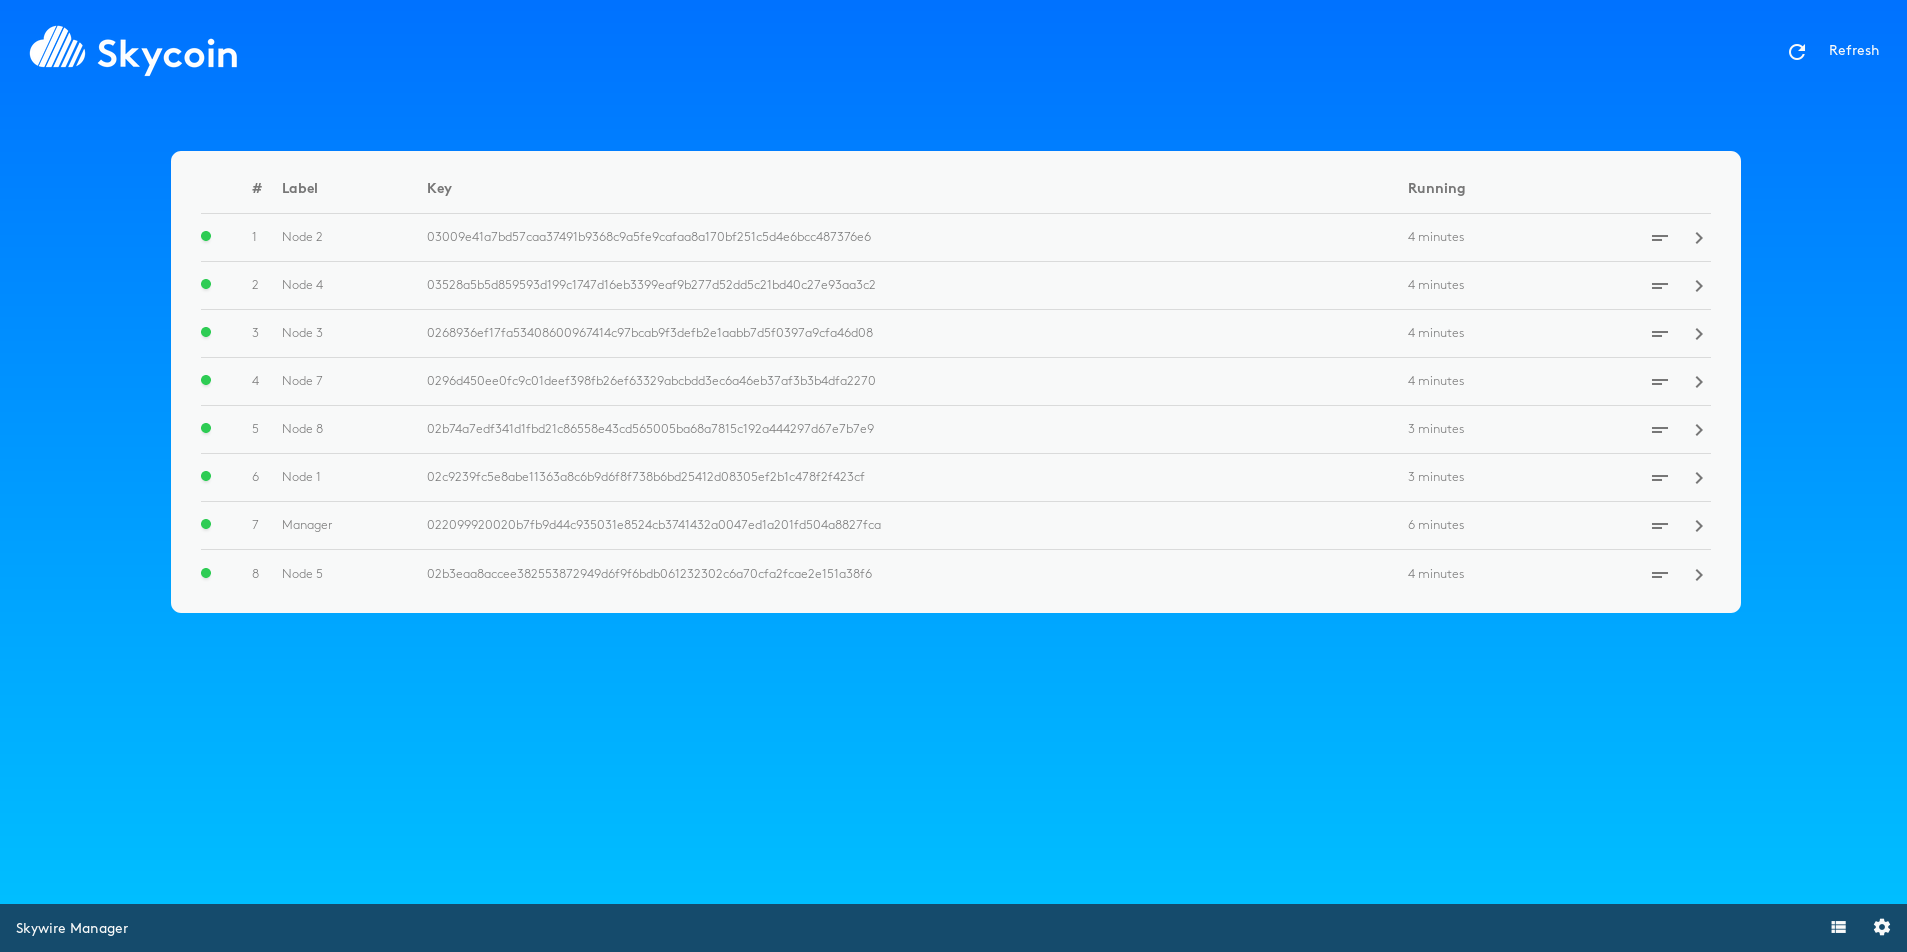
Note: keep in mind 1 node is missing due to the fact that your laptop is connected. You are advised to follow the networking guide to fix this. In this example node1 was unplugged from the Skyminer router, node0 represents the manager node.
If you click on the 64-character key of the node, it should look like the following:
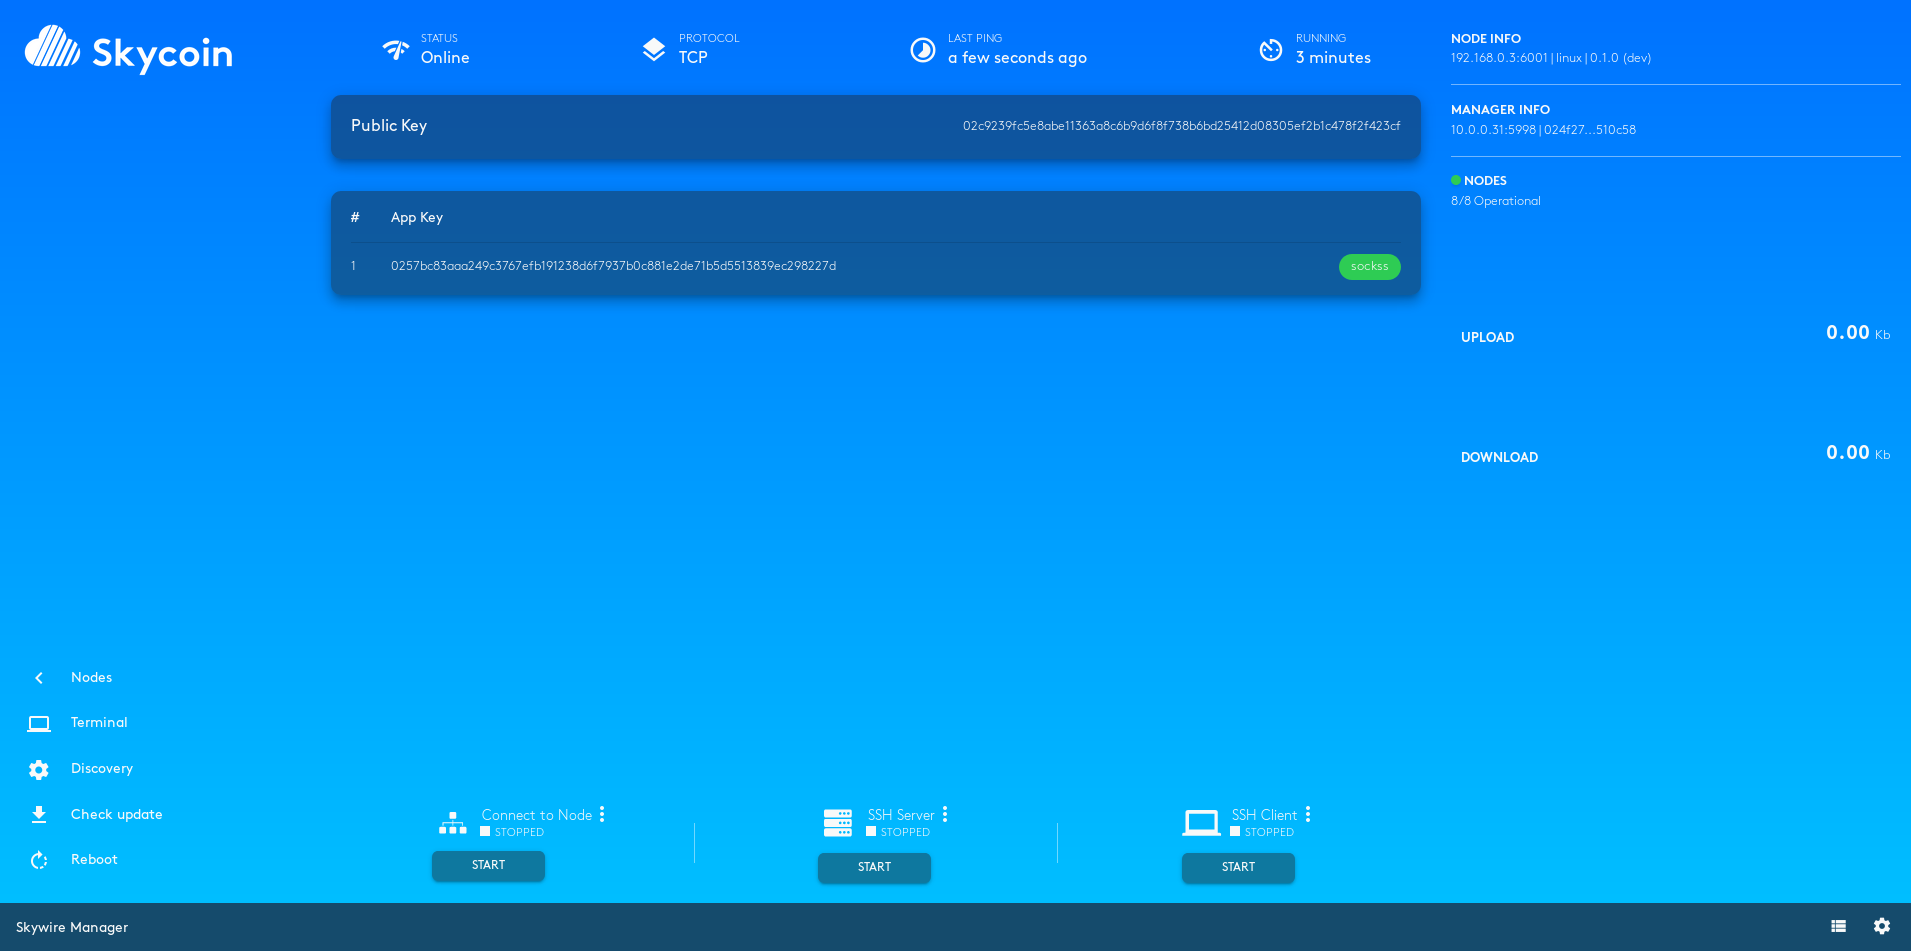
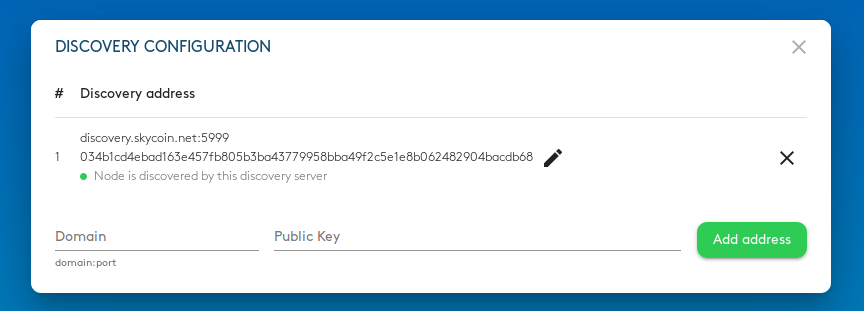
You should verify for all nodes that they are connected to the correct discovery server. By clicking on settings you should look at this screen with the following discovery server address
discovery.skycoin.net:5999-034b1cd4ebad163e457fb805b3ba43779958bba49f2c5e1e8b062482904bacdb68
Additional to that you should look for your keys on the discovery website to be sure that your uptime is being counted. Checkout this guide to get further instructions on how to stay online.
If everything looks good you can label them by their IP addresses using this method. Adding a label to the list can be accomplished by simply clicking on it and entering the label content with your keyboard.
This section assumes that you previously downloaded & flashed the Linux images (for example Armbian Ubuntu Server) on the boards and are able to connect to them via SSH. If you have troubles find the IP of the board(s) you are trying to set up, check out this guide to find its/their IP address(es).
Log in via SSH, default password is often times 1234.
First, update and upgrade via
sudo apt-get update && sudo apt-get upgrade -y
Next, install the dependencies:
sudo apt-get install -y curl git mercurial make binutils gcc bzr bison libgmp3-dev screen gcc build-essential
Download the respective Golang (Go) version matching your CPU, the following commands are for 64-bit ARM architectures:
cd ~
curl -sS https://dl.google.com/go/go1.11.linux-arm64.tar.gz > go$1.11.linux-arm64.tar.gz
tar xvf go1.11.linux-arm64.tar.gz
rm go1.11.linux-arm64.tar.gz
then install Go, create symbolic links and create Go directories:
sudo mv go /usr/local/go
sudo ln -s /usr/local/go/bin/go /usr/local/bin/go
sudo ln -s /usr/local/go/bin/godoc /usr/local/bin/godoc
sudo ln -s /usr/local/go/bin/gofmt /usr/local/bin/gofmt
mkdir -p $HOME/go/{bin,pkg,src}
Next, setup the enviroment variables in .bashrc:
cd ~
nano .bashrc
This opens .bashrc in the nano text editor. Paste the following lines at the end of the file:
export GOROOT=/usr/local/go
export GOPATH=$HOME/go
export GOBIN=$GOPATH/bin
export PATH=$PATH:$GOBIN
Save .bashrc via ctrl+x and y and then activate your changes via:
source ~/.bashrc
Download the files from the GitHub repository:
mkdir -p $GOPATH/src/github.com/skycoin
cd $GOPATH/src/github.com/skycoin
git clone https://github.com/skycoin/skywire.git
Install Skywire using the following commands:
cd $GOPATH/src/github.com/skycoin/skywire/cmd
go install -v ./...
That's it, the installation of Skywire is finished. Test your installation by running a manager and node process as described in the readme. Verification steps that your nodes are online are outlined in this guide.
To do this disconnect any cable going into the WAN port of the skyminer router (or DIY router) and connect your computer to a free LAN port. You need to run the pi's within a 192.168.0.0/24 subnet, otherwise, you won't be able to connect to them.
Now login to the first pi via SSH or open a terminal in the manager. If you use SSH or Putty you need to specify the IP of the pi itself and not the skyminer router!
You need to edit three files:
- /etc/network/interfaces.d/eth0
- /etc/resolv.conf
- /etc/rebuild.sh
Let's say you want to start with the manager node and change its IP address. Type in a terminal:
ssh [email protected]
Type in your password.
The first thing we need to change is the static IP address to match a different subnet, in this example we'll change it from the 192.168.0.1/24 subnet to the 192.168.1.0/24 subnet. You can replace 192.168.1.0/24 (router IP would be 192.168.1.1) in the following section to the specific subnet you choose to operate in.
Check the existing static ip via
cat /etc/network/interfaces.d/eth0
The output will look like this:
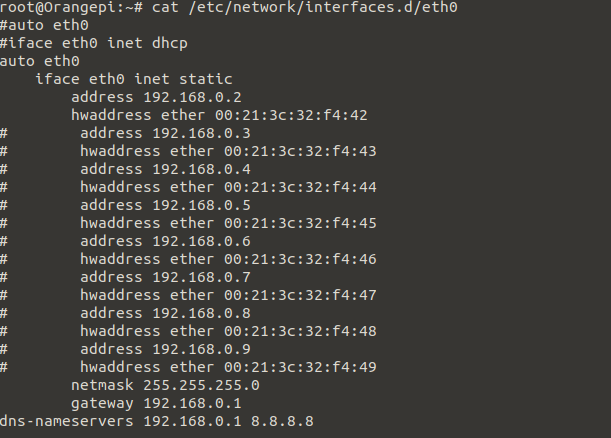
As you can see the file contains static IP settings for all 8 images, but only one address is active since all others are commented out ('#' at beginning of the line). You need to change 3 lines.
address 192.168.0.2
gateway 192.168.0.1
dns-nameservers 192.168.0.1 8.8.8.8
to
address 192.168.1.2
gateway 192.168.1.1
dns-nameservers 192.168.1.1 8.8.8.8
Leave the rest as it is, save the changes via 'Ctrl+X' and confirm with yes.
Next, you need to edit the file resolv.conf, located in /etc. To do this, type:
nano /etc/resolv.conf
Change
nameserver 192.168.0.1
to
nameserver 192.168.1.1
Safe the changes via 'Ctrl+X' and confirm with yes.
The last file we need to change is the startup script rebuild.sh.
Type
nano /etc/rebuild.sh
For the manager the script should look like this:
cd  /usr/local/skywire/go/bin
nohup ./manager -web-dir /usr/local/skywire/go/src/github.com/skycoin/skywire/static/skywire-manager > $
sleep 3
nohup ./node -connect-manager -manager-address 192.168.1.2:5998 -manager-web 192.168.1.2:8000 -discover$
cd /
For nodes 1-7 the script should look like this:
cd  /usr/local/skywire/go/bin
#nohup ./manager -web-dir /usr/local/skywire/go/src/github.com/skycoin/skywire/static/skywire-manager > $
sleep 3
nohup ./node -connect-manager -manager-address 192.168.1.2:5998 -manager-web 192.168.1.2:8000 -discover$
cd /
Safe the changes via 'Ctrl+X' and confirm with yes.
You need to change all 8 nodes for this to work. The IP addresses of the nodes need to be pairwise distinct.
Since the router only has 8 ports and you need one for your laptop you have to change the connected pis at some point.
After you're done editing all files on all nodes please reboot the pis and the router. Then, while the pis are turned off, connect a LAN cable to the WAN port to the skyminer router (or DIY router) and set the IP to 192.168.1.1 (or whatever subnet you'd like to use and configured in the steps above). Once that is done disconnect your laptop and reboot the skyminer router again.
Proceed with starting the manager first and the other nodes within an interval of ~10 seconds. You should now be able to view the manager via these instructions as if it was running on the default settings.
- Skywire Testnet Rules
- Skywire Authentication System User Guide
- Skywire Whitelisting System User Guide
- Official Skyminer Guide
- Testnet Discovery Address Change Instructions
- Skywire Installation Guide
- Skyflash User Guide
- Networking guide for the official router
- Official Skyminer - Wiring
- Public Key Backup
- Skywire Rasberry Pi Installation Guide
- Skywire Systemd Service
- Skywire Manager Web Interface
- Online Status Verification User Guide
- Skywire SSH User Guide
- Skywire SOCKS5 Proxy User Guide
- Single Board Computer WiFi Hotspot
- HTTP Proxy Service with Skywire VPN
- Setting Up Multiple Virtual Machines with Skywire VPN
- Tunnel exit node traffic through VPN
- Connecting Skynodes to your own OpenVPN Server
- Change startup delay of node processes using an automated script
- Change DNS of the official images
- Automated restart script
- Automated poweroff script
- Automated restart of node app
- Automated reboot if the network connections drops off