A reference architecture for Hashicorp Vault on AWS
This project aims to show how to build an secure and resilient impementation of Vault on the AWS platform, consumed by a simple web application that includes some good security coding practises. Hopefully this will help you get the best out of your Vault out of your projects. The project is licensed under the Apache v2.0 license, so you are free to use or modify it however you like, but we don't offer any kind of warranty!
Vault is a good fit for a few use cases. The main one we are looking at is for a running application. This solves a few problems:
- It protects agains the insider threat of rogue admins/operators abusing DB credentials. This is a hard issue to solve in traditional ways and in the end the mitigation comes down to auditing DB logs for unusual activity. That is obviously a bit late because the damage has already been done by the time you look at the logs..
- It automates credential rotation, making it easy to comply with your crypto key management best practises
- It removes the need to store credentials in potentially insecure config files or similar
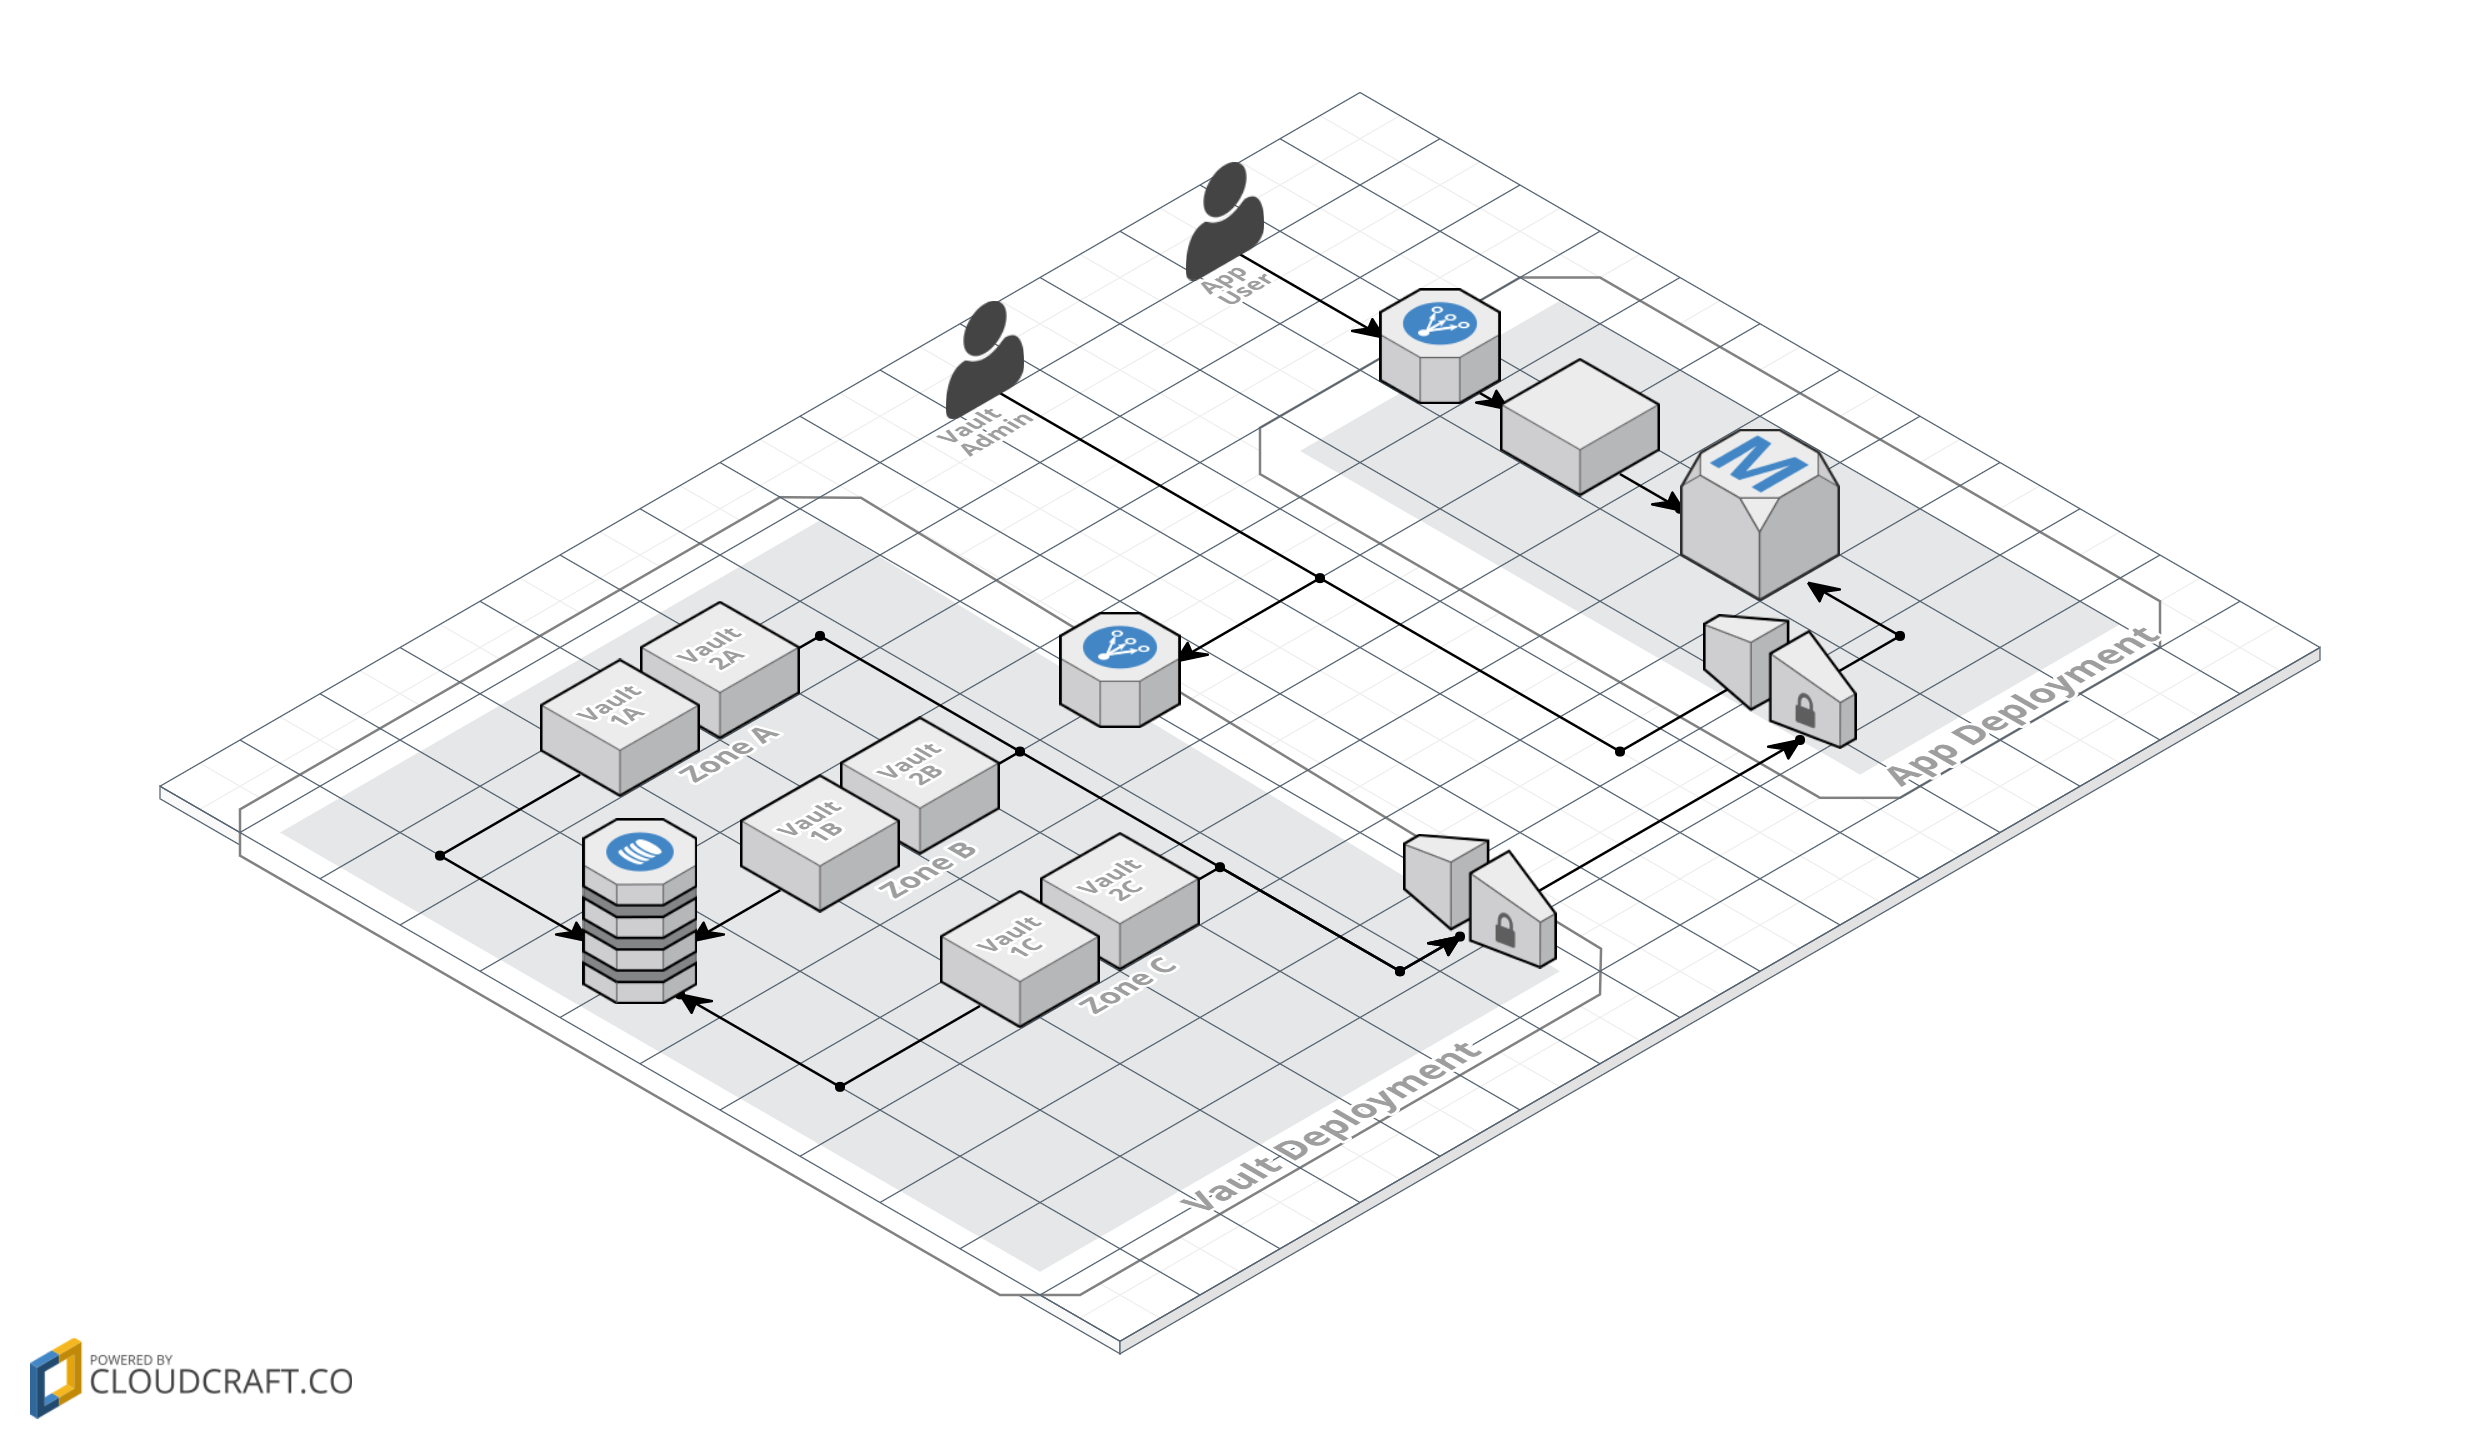
Here is the overall architecture:
Some key features:
- If the Vault fails, any dependent application fails too, so it is multi AZ and multi-server in each AZ
- The storage backend must also support HA (we have chosen DynamoDB)
- The MySQL secret backend generates credentials on the fly so it needs access to the DB. We are using VPG Gateways to lock down access to the DB
- We are using the AWS EC2 Auth backend so that we can make use of IAM roles to control access to the Vault
- For better isolation and defense-in-depth, the architecture supports applications in different AWS accounts and the Vault servers in yet another AWS account
To do:
- Network
- Components
- Deployment/CloudFormation
To do:
- Initialisation
- Storage backend
- Audit backend
- MySQL secret backend
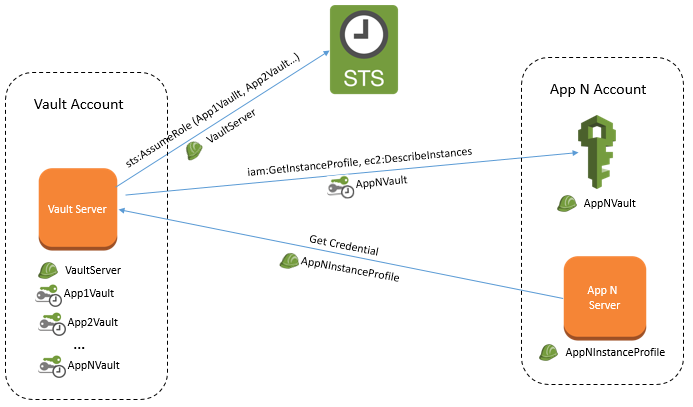
The overall identitiy flow is like this:
Vault will be configured to use the AWS EC2 Auth backend so each application server will launch into an instance profile IAM role. We have called this AppNInstanceProfile - a different profile is needed for each application if they are in different accounts. There are no special IAM polciy requirements for this role. It just needs whatever is required for the application to run. In the case of the sampel application, this is nothing.
The Vault servers are launched using an IAM role called VaultServer. In order to authenticate requests for credentials from the application servers, it needs to make calls to IAM for each of the application AWS accounts. In each application account this needs a role AppNVault with permissions ec2:DescribeInstances and iam:GetInstanceProfile. The VaultServer role then needs sts:AssumeRole for each of these roles.
For better isolation, each application has a dedicated secret backend mounted in Vault. Only the appropriate application server instance profile is allowed to call each secret backend.
To complement this reference infrastructure, there is a sample Vault-aware application. The app shows how to dynamically fetch DB credentials and handle Vault lease renewals.
We are not affiliated to Hashicorp or the Vault project in any way and any recommendations made are our own and not endorsed by Hashicorp. We just like Vault, AWS, security and messing about with cool tech :-)
There are a couple of things you need to satisfy before you can deploy the Vault Reference Infrastructure in your own AWS environment;
- An AWS Account - You can set up an account by following the instructions listed here. At the moment one account will suffice, but the final deployment will utilise two separate AWS accounts with one VPC in each. The account creation is the only thing that cannot be automated.
- AWS CLI - This deployment uses the CLI to automate the build process, so you will need to install and configure this before attempting the deploy. Full instructions to install the CLI tools are located here, with configuration instructions located here.
Once you have created the AWS account, you will need to create an IAM user (with ability to run the Cloudformation templates and create AWS services) and also download the associated SSH key (which is used to SSH onto the Bastion and Vault Servers.)
You will have two files located in the ~/.aws/ directory called config and credentials. The contents of the credentials file will look similar to;
[default]
aws_access_key_id = AKIGHSJJKKKLKLLAKHJK
aws_secret_access_key = k/wKqksafjejfhkhadflkjlixjklqnekdm;lw8Xd
You don't need to know anything in this file, other than what is between the square brackets, in this case [default]. This is the profile name and will be used later when the setup script is run.
The files required for the installation (and are located in this GitHub repository) are listed below;
| File Name | Description |
|---|---|
| setup.sh | A Bash script which makes the set up of variables much easier. It's been tested on Linux but should also work on all macOS and OSX versions. A Powershell script will also be added for ease of Installation on Windows machines. |
| vault-core-networking.json | This is the first Cloudformation template which generates all of the basic networking required (VPCs, subnets and gateways.) |
| vault-core-networking-parameters.json | This file contains all of the parameters which you will need to change to deploy the system within your AWS infrastructure. These include the VPC CIDR address, Choice of AWS Region Availability Zones, Subnet CIDR addresses and your IP address for connecting into the Vault servers if required. |
| vault-core-security.json | The Cloudformation template that handles Security Groups and Network ACLs. |
| vault-core-instances.json | The Cloudformation template which generates the EC2 instances, AutoScaling Groups and ELBs. |
| config.hcl | Basic config file for DynamoDB creation. You will only need to change the AWS Region to where you require DynamoDB to be created (The default is EU-West-1.) |
| supervisord.conf | This is the Supervisord config file which allows Vault to run automatically upn deploy. |
| supervisord | The init.d script for Supervisord to start. |
The first step to deploy, is to clone the GitHub repository to your local machine, using the following command (you will need git installed and running locally, which is out of scope for this document);
git clone https://github.com/mike-goodwin/aws-vault-reference-infrastructure.git
Once this has been cloned locally, all of the parameters that you may possibly need to change are in one file called vault-core-networking-parameters.json. Although all options can be changed, the ones you especially need to pay attention to, are listed at the end of the file;
| Parameter Key | Parameter Value | Description |
|---|---|---|
| VaultIngressCIDR | 77.97.82.48/32 | In order to SSH into the Vault servers, you are required to use a Bastion server sitting in a public subnet to 'hop' onto and from there, connect to the Vault servers. This Bastion server is locked down to a single IP address which is the address that you are connecting to the Internet from (Go to https://ifconfig.co to get this value) and replace the existing CIDR address. |
| VaultCoreEC2AMI | ami-70edb016 | If you are deploying to any region other than EU-WEST-1, you will need to change this to reflect an AMI in your region |
| VaultEC2KeyPair | palindrome_2017 | This is the name of your AWS SSH key which you should have downloaded when creating your AWS IAM User Account (described above) |
The final step is to actually deploy the full Stack. To do this, locate the file called setup.sh ( This will be in the local git repository you cloned earlier and you may need to set the file executable bit using chmod +x setup.sh) and then run it. You will see the following;
--------------------------------------------------------------------------------------- AWS VAULT REFERENCE INSTALLATION --------------------------------------------------------------------------------------- Select from the following options...1. VALIDATE CLOUDFORMATION TEMPLATES 2. BUILD CLOUDFORMATION STACK 0. Quit Enter Selection [0-2]
Press 1, if you want to check that all of the templates downloaded are syntactically correct before deploying.
To deploy the whole Cloudformation Stack, press 2 and you will see;
---------------------------------------------------------------------------------------
BUILD CLOUDFORMATION STACK
---------------------------------------------------------------------------------------
Enter the name of the AWS profile you wish to use (Leave blank for 'default' profile)...

default

Enter the name of the Cloudformation Stack...

Vault Reference Stack
Type the name of the profile in the first field (the one in the square brackets of the credentials file) and in the second field, type in any name or phrase you wish to call the Cloudformation Stack. The Stack will then build (this will take some time) and providing everything goes well, the Vault side of the infrastructure will be built and will be running.

