This describes how developers may contribute to Angular Rust.
Angular Rust's mission is to provide a batteries-included framework for making large scale web and desktop application development as efficient and maintainable as possible.
The design should be configurable and modular so that it can grow with the developer. However, it should provide a wonderful un-boxing experience and default configuration that can woo new developers and make simple web and desktop apps straight forward. The framework should have an opinion about how to do all of the common tasks in web and desktop development to reduce unnecessary cognitive load.
Perhaps most important of all, Angular Rust should be a joy to use. We want to reduce the time spent on tedious boilerplate functionality and increase the time available for creating polished solutions for your application's target users.
The first step to improving Angular Rust is to join the community and help grow it! You can find the community on:
We believe the wider community can create better code. The first tool for improving the community is to tell the developers about the project by giving it a star. More stars - more members.
Once you've joined, there are many ways to contribute to Angular Rust:
- Report bugs (via GitHub)
- Answer questions of other community members (via Gitter or GitHub Discussions)
- Give feedback on new feature discussions (via GitHub and Gitter)
- Propose your own ideas (via Gitter or GitHub)
We have begun to formalize the development process by adopting pragmatic practices such as:
- Developing on the
developbranch - Merging
developbranch tomainbranch in 6 week iterations - Tagging releases with MAJOR.MINOR syntax (e.g. v0.8) ** We may also tag MAJOR.MINOR.HOTFIX releases as needed (e.g. v0.8.1) to address urgent bugs. Such releases will not introduce or change functionality
- Managing bugs, enhancements, features and release milestones via GitHub's Issue Tracker
- Using feature branches to create pull requests
- Discussing new features before hacking away at it
Fork this repository by clicking on the fork button on the top of this page. This will create a copy of this repository in your account.
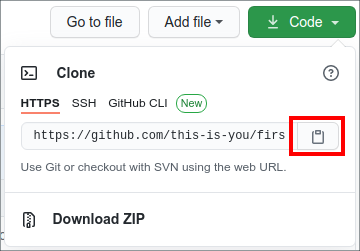
Now clone the forked repository to your machine. Go to your GitHub account, open the forked repository, click on the code button and then click the copy to clipboard icon.
Open a terminal and run the following git command:
git clone "url you just copied"
where "url you just copied" (without the quotation marks) is the url to this repository (your fork of this project). See the previous steps to obtain the url.
use SSH tab to copy proper URL
For example:
git clone [email protected]:$USER/yew-components.git
where $USER is your GitHub username. Here you're copying the contents of the yew-components repository on GitHub to your computer.
Change to the repository directory on your computer (if you are not already there):
cd yew-components
Now create a branch using the git checkout command:
git checkout -b <feature/useful-new-thing> origin/develop
replacing <feature/useful-new-thing> with the adequate name of the feature you will develop.
Now that you've properly installed and forked Angular Rust, you are ready to start coding (assuming you have a validated your ideas with other community members)!
Remember to run cargo fmt before committing your changes.
Many Go developers opt to have their editor run cargo fmt automatically when saving Go files.
Additionally, follow the core Rust style conventions to have your pull requests accepted.
Significant new features require tests. Besides unit tests, it is also possible to test a feature by exercising it in one of the sample apps and verifying its operation using that app's test suite. This has the added benefit of providing example code for developers to refer to.
Benchmarks are helpful but not required.
Typically running the main set of unit tests will be sufficient:
$ cargo test
Due to the wide audience and shared nature of Angular Rust, documentation is an essential addition to your new code. Pull requests risk not being accepted until proper documentation is created to detail how to make use of new functionality.
Open CONTRIBUTORS.md file in a text editor, add your name to it. Don't add it at the beginning or end of the file. Put it anywhere in between. Now, save the file.
If you go to the project directory and execute the command git status, you'll see there are changes.
Add those changes to the branch you just created using the git add command:
git add .
Now commit those changes using the git commit command:
git commit -m "$COMMENT"
replacing $COMMENT with appropriate description of your changes.
Push your changes using the command git push:
git push origin <feature/useful-new-thing>
replacing <feature/useful-new-thing> with the name of the branch you created earlier.
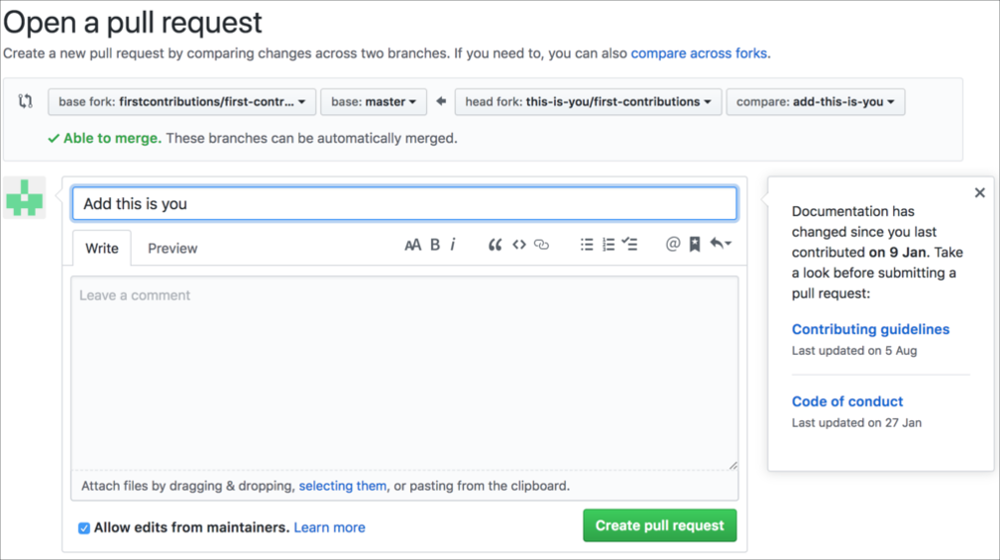
Once you've done all of the above & pushed your changes to your fork, you can create a pull request for review and acceptance.
If you go to your repository on GitHub, you'll see a Compare & pull request button. Click on that button.
Now submit the pull request. Do not forget to set develop branch for your pull request.
Congrats! You just completed the standard fork -> clone -> edit -> pull request workflow that you'll encounter often as a contributor!
You can check more details in our detailed contribution guide.
You could join our gitter team in case you need any help or have any questions. Join gitter team.


