A .NET implementation for the Coinbase API. This library uses API version 2.
📢 HEY! Be sure to checkout these other Coinbase API integrations:
- Coinbase.Commerce - For e-commerce, merchants, and websites selling products or services looking to receive cryptocurrency as payment.
- Coinbase.Pro - For retail trading on Coinbase Pro. Integration with orders, market data, and real-time WebSocket feeds.
- .NET Standard 2.0 or later
- .NET Framework 4.6.1 or later
- TLS 1.2 or later
Note: If you are using .NET Framework 4.6.1 you will need to ensure your application is using TLS 1.2 or later. This can be configured via the registry (link 1, link 2) or configured at application startup by setting the following value in ServicePointManager:
ServicePointManager.SecurityProtocol = SecurityProtocolType.Tls12;Nuget Package Coinbase
Install-Package CoinbaseCoinbase offers two ways to authenticate your application with their API. You will need to select one of the following authentication methods:
- OAuth2 authentication.
- API key + Secret authentication.
This library can perform OAuth or API Key + Secret authentication make calls to Coinbase servers.
For the most part, to get the started, simply new up a new CoinbaseClient object as shown below:
//using OAuth Token authenticiation
var client = new CoinbaseClient(new OAuthConfig{ AccessToken = "..." });

//using API Key + Secret authentication
var client = new CoinbaseClient(new ApiKeyConfig{ ApiKey = "...", ApiSecret = "..."});

//No authentication
//  - Useful only for Data Endpoints that don't require authentication.
var client = new CoinbaseClient();
Once you have a CoinbaseClient object, simply call one of any of the Wallet Endpoints or Data Endpoints. Extensive examples can be found here.
In one such example, to get the spot price of ETH-USD, do the following:
[Test]
public async Task can_get_spotprice_of_ETHUSD()
{
   var spot = await client.Data.GetSpotPriceAsync("ETH-USD");
   spot.Data.Amount.Should().BeGreaterThan(5);
   spot.Data.Currency.Should().Be("USD");
   spot.Data.Base.Should().Be("ETH");
}client.Accounts- Examplesclient.Addresses- Examplesclient.Buys- Examplesclient.Deposits- Examplesclient.PaymentMethods- Examplesclient.Sells- Examplesclient.Transactions- Examplesclient.Users- Examplesclient.Withdrawals- Examples
Some Coinbase APIs support pagination. See developer docs here. APIs that support pagination can specify an extra PaginationOptions object used to specify item page limit and other various options. The following code shows how to enumerate the first 3 pages where each page contains 5 buy transactions for an account.
var client = new CoinbaseClient(...);

var page1 = await client.Buys.ListBuysAsync("..accountId..",
                  new PaginationOptions{Limit = 5}); //Limit results to 5 items

var page2 = await client.GetNextPageAsync(page1); //Same pagination options used.
                                                  //Limit 5 items.

var page3 = await client.GetNextPageAsync(page2); //Same pagination options used.
                                                  //Limit 5 items.
Use the .GetNextPageAsync helper method on CoinbaseClient supplying the current page of data to get the next page of data.
This section only applies to developers using OAuth authentication, not API key + Secret authentication. Full documentation for Coinbase's OAuth token flow can be found here.
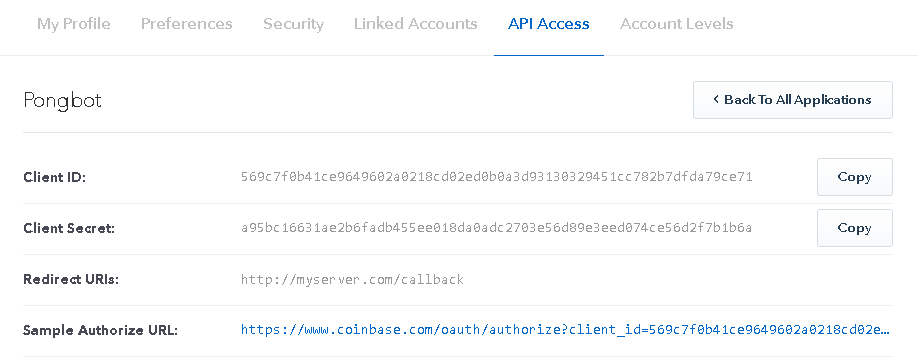
Before you begin OAuth you'll need to register your OAuth application with Coinbase. Once you have an OAuth application registered, you should have something similar to the following screen:
Note the Client Id and Client Secret values.
The following steps show how to obtain an AccessToken from a Coinbase user with your application:
- First, get authorization from the user by sending the user to a URL using:
//Create the options and permission scopes you want your app to have access to
var opts = new AuthorizeOptions
{
 ClientId = "YOUR_CLIENT_ID",
 RedirectUri = "YOUR_REDIRECT_URL", //Example value: http://myserver.com/callback
 State = "SECURE_RANDOM",
 Scope = "wallet:accounts:read"
};

//Send the user to URL created by GetAuthorizeUrl
var authUrl = OAuthHelper.GetAuthorizeUrl(opts);
SECURE_RANDOM is some random state that you should generate to check when the user returns back to your site.
-
The user will be presented with a screen similar to:
If your app needs more permissions, check here for details and here for reference.
-
Once your app has been given permission, Coinbase will send the user's browser back to
RedirectUri. Acodevalue will be present as a query string parameter. Extract thiscodevalue in your application and use it to obtain anAccessTokenas shown below:
//http://myserver.com/callback?code=f284bdc3c1c9e24a494e285cb387c69510f28de51c15bb93179d9c7f28705398&state=SECURE_RANDOM

var redirectUri = "http://myserver.com/callback";
var code = "f284bdc3c1c9e24a494e285cb387c69510f28de51c15bb93179d9c7f28705398";

// Convert an Authorization Code to an Access Token.
// The RedirectUri parameter is the same parameter used in Step 1's AuthorizeOptions object above.
var token = await OAuthHelper.GetAccessTokenAsync(code, ClientId, ClientSecret, redirectUri);

var refreshToken = token.RefreshToken; // Save for later

var client = new CoinbaseClient(new OAuthConfig{ AccessToken = token.AccessToken })AccessTokens have a two hour life time. Any OAuth API requests after two hours will be denied. However, you can use a Refresh Token to get a new Access Token (that will again later, expire after 2 hours). Refresh Tokens don't have a life time per se, but they can only be used once to renew an expired Access Token.
Initially, back in Step 3, when an authorization code is converted into an access token, you actually get two tokens, an AccessToken and a RefreshToken. In Step 3, the variable refreshToken (which was saved for later use) is used to obtain a new AccessToken.
var newTokens = await OAuthHelper.RenewAccessAsync(refreshToken, ClientAppId, ClientSecret);
var newClient = new CoinbaseClient(new OAuthConfig{ AccessToken = newTokens.AccessToken })

// Safe for later, again because refresh tokens can only be used once for renewal.
var newRefreshToken = newTokens.RefreshToken;The CoinbaseClient supports automatic token renewal. If you want to avoid refreshing your AccessToken every two hours you can use the following .WithAutomaticOAuthTokenRefresh() extension method to activate automatic token renewal. When creating the CoinbaseClient object in Step 3 above do the following:
var client = new CoinbaseClient(new OAuthConfig { AccessToken = token.AccessToken,
                                                  RefreshToken = token.RefreshToken })
                 .WithAutomaticOAuthTokenRefresh(ClientId, ClientSecret);
You only need to call .WithAutomaticOAuthTokenRefresh once when creating the CoinbaseClient object. Any failed HTTP requests that require authorization will be tried again with a refreshed AccessToken.
Some APIs require Two-Factor Authentication (2FA). To use APIs that require 2FA, add a the TwoFactorToken header value before sending the request as shown below:
using Flurl.Http;
using static Coinbase.HeaderNames;

//using OAuth Token
var client = new CoinbaseClient(new OAuthConfig{ AccessToken = "..." });
var create = new CreateTransaction
   {
      To = "...btc_address..."
      Amount = 1.0m,
      Currency = "BTC"
   };

var response = await client
    .WithHeader(TwoFactorToken, "...")
    .Transactions.SendMoneyAsync("accountId", create);

if( response.HasError() )
{
   // something went wrong.
}
else
{
   // transaction is okay!
}This library can handle verification of notifications / webhook / callbacks from Coinbase. When an intresting event occurs, Coinbase can POST JSON notifications to your server. When receiving a notification, an HTTP POST is delivered to your server that looks similar to:
POST /callmebackhere HTTP/1.1
User-Agent: weipay-webhooks
Content-Type: application/json
CB-SIGNATURE: 6yQRl17CNj5YSHSpF+tLjb0vVsNVEv021Tyy1bTVEQ69SWlmhwmJYuMc7jiDyeW9TLy4vRqSh4g4YEyN8eoQIM57pMoNw6Lw6Oudubqwp+E3cKtLFxW0l18db3Z/vhxn5BScAutHWwT/XrmkCNaHyCsvOOGMekwrNO7mxX9QIx21FBaEejJeviSYrF8bG6MbmFEs2VGKSybf9YrElR8BxxNe/uNfCXN3P5tO8MgR5wlL3Kr4yq8e6i4WWJgD08IVTnrSnoZR6v8JkPA+fn7I0M6cy0Xzw3BRMJAvdQB97wkobu97gFqJFKsOH2u/JR1S/UNP26vL0mzuAVuKAUwlRn0SUhWEAgcM3X0UCtWLYfCIb5QqrSHwlp7lwOkVnFt329Mrpjy+jAfYYSRqzIsw4ZsRRVauy/v3CvmjPI9sUKiJ5l1FSgkpK2lkjhFgKB3WaYZWy9ZfIAI9bDyG8vSTT7IDurlUhyTweDqVNlYUsO6jaUa4KmSpg1o9eIeHxm0XBQ2c0Lv/T39KNc/VOAi1LBfPiQYMXD1e/8VuPPBTDGgzOMD3i334ppSr36+8YtApAn3D36Hr9jqAfFrugM7uPecjCGuleWsHFyNnJErT0/amIt24Nh1GoiESEq42o7Co4wZieKZ+/yeAlIUErJzK41ACVGmTnGoDUwEBXxADOdA=
Accept-Encoding: gzip;q=1.0,deflate;q=0.6,identity;q=0.3
Accept: */*
Connection: close
Content-Length: 1122

{"order":{"id":null,"created_at":null,"status":"completed","event":null,"total_btc":{"cents":100000000,"currency_iso":"BTC"},"total_native":{"cents":1000,"currency_iso":"USD"},"total_payout":{"cents":1000,"currency_iso":"USD"},"custom":"123456789","receive_address":"mzVoQenSY6RTBgBUcpSBTBAvUMNgGWxgJn","button":{"type":"buy_now","name":"Test Item","description":null,"id":null},"transaction":{"id":"53bdfe4d091c0d74a7000003","hash":"4a5e1e4baab89f3a32518a88c31bc87f618f76673e2cc77ab2127b7afdeda33b","confirmations":0}}}
The two important pieces of information you need to extract from this HTTP POST callback are:
- The
CB-SIGNATUREheader value. - The raw HTTP body JSON payload.
The WebhookHelper static class included with this library does all the heavy lifting for you. All you need to do is call Webhookhelper.IsValid() supplying the CB-SIGNATURE header value in the HTTP POST above, and the raw JSON body in the HTTP POST above.
The following C# code shows how to use the WebhookHelper to validate callbacks from Coinbase:
if( WebhookHelper.IsValid( Request.Body.Json, cbSignatureHeaderValue) ){
   // The request is legit and an authentic message from Coinbase.
   // It's safe to deserialize the JSON body.
   var webhook = JsonConvert.DeserializeObject<Notification>(Request.Body.Json);

   ... do further processing.

   return Response.Ok();
}
else {
   // Some hackery going on. The Webhook message validation failed.
   // Someone is trying to spoof payment events!
   // Log the requesting IP address and HTTP body.
}
Easy peasy! Happy crypto shopping! 🎉
In some advanced cases it may be desirable to gain access to the underlying HttpResponseMessage object to check HTTP status codes, HTTP headers or to manually inspect the response body. The .HoistResponse() method on CoinbaseClient can be used to gain access the underlying HttpResponseMessage. The following code demonstrates how get the underlying HttpResponseMessage:
var accountList = await client
   .AllowAnyHttpStatus()
   .HoistResponse(out var responseGetter)
   .Accounts
   .ListAccountsAsync();

var response = responseGetter();

var httpStatusCode = response.StatusCode;- Download the source code.
- Run
build.cmd.
Upon successful build, the results will be in the \__compile directory. If you want to build NuGet packages, run build.cmd pack and the NuGet packages will be in __package.
Created by Brian Chavez.
A big thanks to GitHub and all contributors:
- ElanHasson (Elan Hasson)
- ryanmwilliams (Ryan Williams)
Note: This application/third-party library is not directly supported by Coinbase Inc. Coinbase Inc. makes no claims about this application/third-party library. This application/third-party library is not endorsed or certified by Coinbase Inc.


