Library of Infineon's highly sensitive DPS310 sensor for Arduino.
The DPS310 is a miniaturized digital barometric air pressure sensor with a high accuracy and a low current consumption, capable of measuring both pressure and temperature. The internal signal processor converts the output from the pressure and temperature sensor elements to 24 bit results. Each unit is individually calibrated, the calibration coefficients calculated during this process are stored in the calibration registers. The available raw data of the sensor can be calibrated by using the pre-calibrated coefficients as they are used in the application to convert the measurement results to high accuracy pressure and temperature values.
Sensor measurements and calibration coefficients are available through the serial I2C or SPI interface.
- Supply voltage range 1.7V to 3.6V
- Operation range 300hPa – 1200hPa
- Sensor’s precision 0.005hPa
- Relative accuracy ±0.06hPa
- Pressure temperature sensitivity of 0.5Pa/K
- Temperature accuracy ±0.5C°
- Applications
- Wearable applications, sport and fitness activities tracking
- Drones automatic pilot, fix point flying
- Indoor navigation, altitude metering
Please download this repository from GitHub by clicking on the following field in the latest release of this repository:
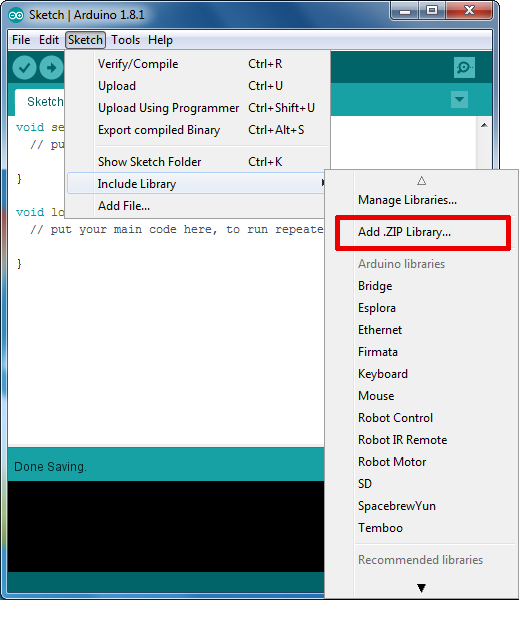
To install the DPS310 pressure sensor library in the Arduino IDE, please go now to Sketch > Include Library > Add .ZIP Library... in the Arduino IDE and navigate to the downloaded .ZIP file of this repository. The library will be installed in your Arduino sketch folder in libraries and you can select as well as include this one to your project under Sketch > Include Library > DPS310.
Please see the example sketches in the /examples directory in this library to learn more about the usage of the library. Especially, take care of the respective SPI and I²C configuration of the sensor.
For more information, please consult the datasheet here.
Currently, there exists the DPS310 Pressure Shield2Go evaluation board as a break out board:
The DPS310 Pressure Shield2Go is a standalone break out board with Infineon's Shield2Go formfactor and pin out. You can connect it easily to any microcontroller of your choice which is Arduino compatible and has 3.3 V logic level (please note that the Arduino UNO has 5 V logic level and cannot be used without level shifting). Please consult the wiki for additional details about the board.
Each sensor can only work either SPI or I2C. To convert from SPI to I2C, for example, you have to re-solder the resistors on the Shield2Go. Please take care that every Shield2Go for the DPS310 is shipped as I2C configuration right now.
- Link to the wiki with more information
However, every Shield2Go is directly compatible with Infineon's XMC2Go and the recommended quick start is to use an XMC2Go for evaluation. Therefore, please install (if not already done) also the XMC-for-Arduino implementation and choose afterwards XMC1100 XMC2Go from the Tools>Board menu in the Arduino IDE if working with this evaluation board. To use it, please plug the DPS310 Pressure Shield2Go onto the XMC2Go as shown below.
There could be a problem with temperature measurement of the DPS310. If your DPS310 indicates a temperature around 60 °C although you expect around room temperature, e.g. 20 °C, please call the function correctTemp() as included in the library to fix this issue.
In case you need additional help, please do not hesitate to open an issue in this repository.
Interrupt mode not working reliably on XMC2Go for DPS310 right now.
Please find the datasheet of the DPS310 here. It depends on the evaluation board which you are using or the respective configuration of the sensor on your PCB which communication protocol as well as addresses you need to use for communicating with the sensor.


