-
Notifications
You must be signed in to change notification settings - Fork 186
Arduino IDE
We do NOT recommend using Arduino IDE, we strongly recommend using Platformio, the build process is simpler and it is less likely to have compilation errors. https://github.com/G4lile0/ESP32-OLED-Fossa-GroundStation/wiki/Platformio
You can install the Arduino IDE by downloading it from arduino.cc, we recommend the last version, but you should use v1.6 or above.
First step is to install support for ESP32 based boards on the Arduino IDE through the Board Manager.
- Start Arduino and open Preferences window.
- Enter
https://dl.espressif.com/dl/package_esp32_index.jsoninto Additional Board Manager URLs field. You can add multiple URLs, separating them with commas. - Open Boards Manager from Tools > Board menu and find esp32 platform.
- Select the version you need from a drop-down box.
- Click install button.
This project relies on several third party dependencies that must be installed in order to be able to build the binaries. You can find the dependencies list below.
To install the libraries you can simply copy all files from the GroundStation folder lib into your sketchbook\libraries folder. Make sure there are no duplicate libraries that might cause a conflict.
- RadioLib (with modifications) (required: v4.2.0@G4lile0) https://github.com/G4lile0/RadioLib
- ArduinoJson (recomended v6.17.2 Required >v6.0) https://github.com/bblanchon/ArduinoJson
- ESP8266_SSD1306 (recomended v4.2.0) https://github.com/ThingPulse/esp8266-oled-ssd1306
- IoTWebConf2 (Required: 3.0.0@4m1g0) https://github.com/4m1g0/IotWebConf2
- PubSubClient (recomended 2.8) https://github.com/knolleary/pubsubclient
- ESPNtpClient (recomended 0.2.3) https://github.com/gmag11/ESPNtpClient
- FailSafeMode (recommended 0.2.2) https://github.com/gmag11/FailSafeMode
Note: Radiolib have modifications compared to the original one, so make sure you use the version listed here or just copy the libraries from the libfolder to avoid problems.
Arduino IDE makes it not possible to configure the libraries automatically so you have to do it on your own. For an automatic configuration we recommend using Platformio: https://github.com/G4lile0/ESP32-OLED-Fossa-GroundStation/wiki/Platformio
- In
/ArduinoJson/src/ArduinoJson/Configuration.hppset#define ARDUINOJSON_USE_LONG_LONG 1to 1 around line 68. - In
/IotWebCong2/src/IotWebConf2Settings.hadd this line at the beggining of the file#define IOTWEBCONF_DEBUG_DISABLED 1 - In
/RadioLib/src/BuildOpt.huncomment#define RADIOLIB_GODMODEaround line 367 - In
/PubSubClient/src/PubSubClient.hset#define MQTT_MAX_PACKET_SIZE 1000to 1000
Once you have cloned this project to a local directory, you can open it from the Arduino IDE in File > Add folder to workspace. And select the .ino file which is located in TinyGS > TinyGS.ino

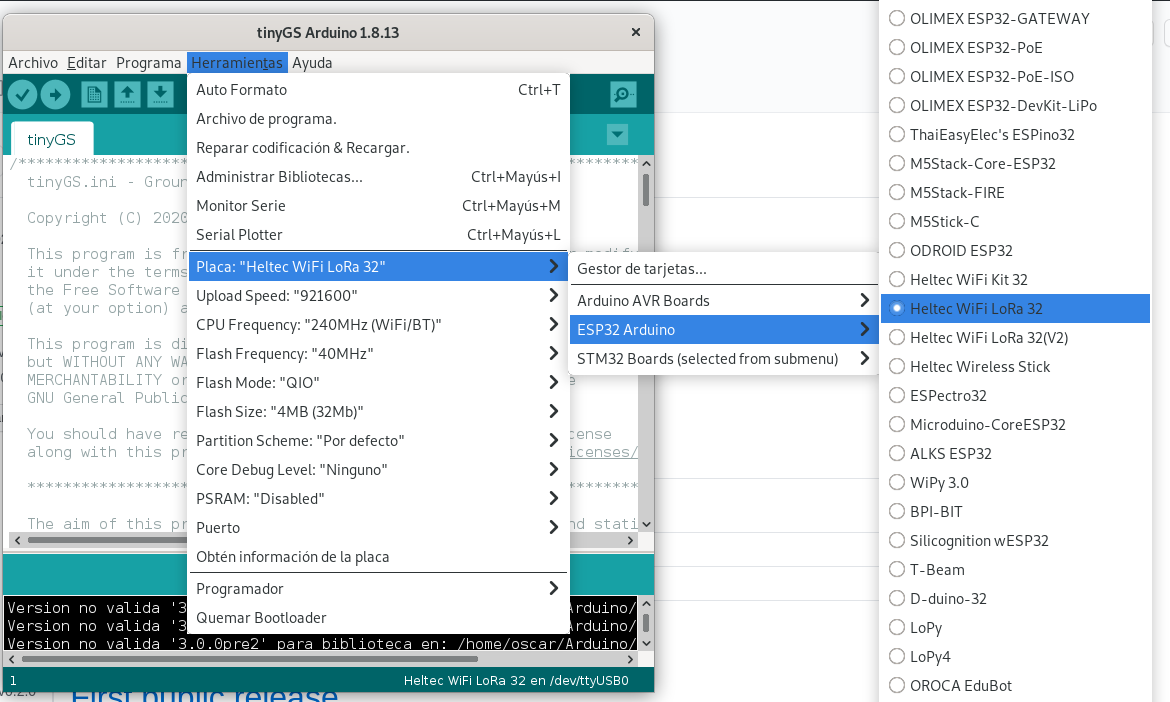
Connect the board to the computer, select your board in the Arduino IDE Tools > Boards if you have doubts you can select Heltec Lora 32 V1 this configuration will work for most of the boards based on ESP32.

Then select the port where the board is connected to the computer in Tools > Ports
And finally click on the rounded arrow button on the top to upload the project to the board or go to Program > Upload (Ctl+U)
Getting started
Configuration
Useful resources
Other